|
|
| Home | Marine Aquariums |
Freshwater Aquariums |
Planted Aquariums |
Brackish Systems |
Ponds,
lakes & fountains |
Turtles & Amphibians |
Aquatic Business |
Aquatic Science |
Ask the WWM Crew a Question |
| Please visit our Sponsors | ||||
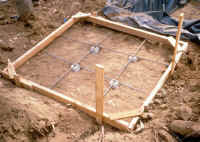
Sandy soils can be a blessing in pond construction, allowing for easier digging, forming of basins, and laying of conduits for water and electricity, and providing quick drainage of misplaced water. If you've ever dug holes in both hard and soft soils you'll agree. Let's take a general overview of pond construction, with emphasis on how to build an in-ground water feature in a loose-soil setting. Design: The same considerations hold for soft-ground pond-planning as for heavier clay-based soils. You want your basin to be large enough to keep plants and fish; deep enough to be stable; steep-sided enough to keep the fish from jumping out or predators from wading in; sited conveniently enough for easy viewing and close enough to electricity and water to maintain easily. I can't emphasize enough the value of making scale drawings of your proposed pond, filters and other gear, superimposed on a layout of the space available. Sketching in the immobile elements like trees, rocks and buildings... and figuring in paths for walking and mowing, will not only keep you out of trouble, but will also give everyone involved with the project a clear picture of what will be built and how the pond will tie in with the rest of the landscape. I like to make such plans on quadrille paper for easy scaling, and add scale-model paper rocks, basins, falls, filters and other elements that can be moved around on the plan. When it comes time for actual siting outdoors, there's nothing like a simple garden hose arrayed on the ground in the shape of the pond's perimeter to gain a clear understanding of the size and shape of the system. Digging: For small systems (hundreds to a few thousand gallons), hand-digging with shovels and pickaxes may be the best available technology. For large systems that readily allow access for earth-moving equipment, I advise the use of a backhoe and possibly a skip loader for moving the soil elsewhere. A skilled operator can dig a pond to specification in a few hours. Steep sides and curves can be accomplished by the operator or created by hand with a shovel. Keep in mind that you're likely to need some of the excavated soil for filling behind the constructed pond walls. Don't have it all hauled away. Have a tarp available to store sufficient soil (or sand) for backfilling. Construction: The chief difficulty in construction in sandy soils is getting the walls to stay up. For cementitious-type construction (concrete, block, liners and cement/aggregate) it is imperative to start at the bottom. By laying in or pouring the base first, the mass of the vertical walls can be adequately supported. Liner-only ponds or pre-made constructs (such as resin and fiberglass or polyethylene) are a different matter, calling for careful excavation and provision of as solid a berm as you can arrange. Using liner with concrete and reinforcing mesh creates the strongest, easiest to build, most permanent basin formation. In sandy soils, as little backfill area as possible should be cut away. Original grade is desirable because it is more compact and less resistant to "giving" (compaction) in the construction process. Don't dig any more than necessary! Once the basin is dug to your satisfaction, a series of stakes or lengths of rebar a couple of feet long are driven into the ground along the berm to act as anchoring for the liner and reinforcing mesh (made of chicken wire and stucco cloth which to "hang" the small-aggregate concrete). Typically, a pencil-diameter rebar will suffices as a surround, attached with large metal staples or wire-tie onto the stakes, with the line and mesh hog-ringed on. When the liner is down and staked to a surrounding berm, concrete or shotcrete can be pumped in or hand-paced, first in a thick bead around the bottom edges. You want to avoid "cold joints", but give the first bottom beads at the wall junctions time to set up a bit. Then, apply, more concrete at the wall bottoms and work it up by hand into the reinforcing mesh and between it and the liner underneath. If the basin's deep or there is a desire for vertical walls, a "bounce beam" wall of plywood can be easily constructed behind the liner and the area backfilled behind it and compacted. Have someone watch to assure the plywood's placement during concrete application. The berm of a pond built in softer soil is generally wider than one in more solid ground construction, but is easily disguised with rock work (best placed while the concrete edge is being set) and plants. Block Wall Ponds: Block wall ponds built in sandy soil need more substantial foundations and more backfilling of the area behind the walls. I encourage you to run at least #2 rebar into every cell in the block, in order to tie it in with the horizontal rebar in the bottoms, and to fill all block with concrete for added strength. Swimming Pool Methods: A great deal of extra material (gunite mortar made of sand, cement and water- no crushed rock aggregate) is applied in swimming-pool-type basins- shot over and through reinforcing steel that is tied together. The resulting "shell" is then plaster-coated. If you are planning a large, deep system, this type of construction may be the best available, most appropriate technology for you to use. Sandy soil areas are often fitted with a plywood "bounce beam" as mentioned previously. Otherwise, the subcontractors doing the gunite work simply bid in more material to make up for the backfill area. Liner-Only Ponds: Liner-only ponds are the most difficult types of ponds to erect on sandy soils. Far too often, through simple erosion, an edge of the pond "falls", allowing water to further erode the side. What is needed here is a sturdy edge to hang the liner onto. The best support is sheets of plywood covered with used carpeting (to prevent puncture. After digging out the basin, a side-frame of ply is cut (1/2" is fine for pond walls 2' deep or less), fit into place, and tied together with stripping from behind. This is overlaid on the inside with the used carpet. The areas behind are backfilled, compacted to level grade (a tee on the end of a 2: schedule 40 PVC pipe works fine for small installations), the liner overhung, the basin filled with water, and excess liner tucked under. Waterfall and Pond Filter Foundations: Setting a concrete pad on sand or sandy soil alone is not nearly as strong as using a "class 2 foundation"- a mixture of crushed rock aggregate mixed in with sandy soil to a depth of several inches. Have a soils engineer or concrete contractor take a look at your site and give you advice on pouring these slabs if you're doing it yourself.
Conclusion: The bottom line is that with careful preparation
and construction, you can build a pond in any type of ground. However,
given the digging to be done, I'd rather build in sandy soils.
https://expertaquarist.com/build-backyard-pond/
|
|

|
Features: |
|
| Featured Sponsors: |