|
|
| Home | Marine Aquariums |
Freshwater Aquariums |
Planted Aquariums |
Brackish Systems |
Ponds,
lakes & fountains |
Turtles & Amphibians |
Aquatic Business |
Aquatic Science |
Ask the WWM Crew a Question |
| Please visit our Sponsors | ||||
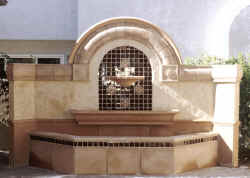
Wouldn't a fountain or bird bath look great right there in the yard"? "And they come pre-made, as simple as A, B, C to put together" "Be careful to lift properly and don't pinch your fingers" might be the only advice offered from where you purchase a pre-cast fountain. Knowing completely what to expect and arranging adequate help, tools and materials ahead of time will make your project go much more smoothly. This article details the steps to install pre-cast concrete and cut-stone fountains, basins, and statuary used in water features. Variations in technique, availability of materials and local climactic and geological conditions may necessitate modification. It is suggested that you review these instructions with suppliers, architects, owners, or their representatives before attempting assembly. a.) 3-D Orientation. How will pieces be oriented in relation to other elements? I strongly suggest making a field sketch and having everyone involved initial it. Maybe lay a hose out to model the approximate base size, setting. b.) Water Spout or Fall Pattern. Be aware of how many gallons per hour you're going to need to produce your desired sights and sounds. Check for appropriate sized and engineered pump, filter, circulation, electrical systems.
c.) Other Possibilities; and provision for lighting, auto fill, drain, remote pump system. Most_Fountains Will_Require_Forming_a_Bottom_Basin: Don't count on the original ground to provide adequate long term planar and level support for your fountain (and possible perimeter); build an appropriate foundation. a.) Measure, Make Template of the outside perimeter by arranging base pieces on a flat surface allowing a 1/2 - 3/4" mortar joint space. Measure outside diameter plus a few inches extra for size of concrete slab. b.) Excavation. Minimum 3-4 inches; lay down gravel and sand if appropriate. c.) Stake Edge. To determine foundation border. d.) Build Form with footing for fountain if necessary. e.) Insert Rebar for edge of lowest basin; or reinforced mesh as appropriate. f.) Provide Miscellaneous; sump area, auto fill, filter, recirculation system, light niches in foundation as desired/planned. Lay_In_Plumbing_If_Pump is Remote. You may want or have to trench to provide the following conduits if your pump is located outside of the system. a.) Fill Line. Or you might be just filling via a hose. b.) Intake, Return. Don't forget an intake screen. c.) Drain Line fitted with a ball valve. Electrical;_If_Light(s),_Pump_Are In_The Fountain: a.) Conduit Laid in foundation; stubbed through copper or brass per National Electrical Code requirements. b.) Junction Box, MIP wrapped with plastic to keep clean. Pour_Foundation;_Using_Pre-mix_Or_5-6_Bag_Mix: a.) Float the concrete two times. b.) Scratch Coat with white plaster if plaster finish or, c.) Leave Rough if foundation coated; cover or coat with concrete curing preparation. d.) Allow to cure 24 plus hours. Build_Fountain: a.) Lay out pieces, clean and in order. b.) Pre-assemble Components; Lay in pump, plumbing first if required. c.) Be CAREFUL, take your time; this is the land where squished toes, smashed fingers and bad backs abound. d.) Stack, Assemble parts; Each consecutive piece must seat on all others which must level and planar. e.) Use a masonry or carpenter's level to check each piece. Make a few level checks for each piece. If your level's too short, set it on a true 2 by long enough to reach the width of the pieces. See the piece on Level use for more. Seat_Bottom_Pedestal_With_Mortar,_a_Bonder_Or_Concrete: With adhesive and coloring agent; possibly pin with rebar and lock with block, concrete. a.) Wedge with permanent material as required to make level. b.) Apply Sealer around riser/stub-ups as necessary. Let Set Up Cure: Hold off for a short while, at least until the mortar does not leave finger prints; move and lock next basin(s) and pedestals, statuary into place in the same fashion. Build Perimeter: a.) Set All Pieces on edge of foundation in place to check for fit. b.) Mark Edge placement with chalk or pencil. c.) Move Off Pieces on either side of first section or block of first course that makes up perimeter (to make working room) d.) Mortar bottom and butter one side. e.) Move, Assemble in one direction doing steps b and c until all pieces are set. Be careful not to disturb the already mortared pieces. f.) Wait a good hour, wire brush mortar joints. g.) Paint interior surface with undiluted concrete adhesive. f.) Apply Scratch Coat of interior mortar wash or plaster mix (plastic cement, silica sand and, adhesive and coloring agent) to all bottom and inside of basin. Put on two coats of at least 3/4 inch total thickness. Alternatively, water seal with foundation coating, like thoroseal. a.) Use Water-Proofing Sealant, such as foundation coating above or liquid silicone and/or... b.) Install Tile if to be done. Let_Dry_24_Hours: If Livestock is to be added to the system, you should do a dilute acid-wash first (see Acid/Bleach Wash article). Hook Up Electrical: Through a G.F.I. outlet or breaker; attach plumbing to pump, filter; auto-fill if you're using one. Fire Up System: Check for leaks, water blow-over. Treat water, set time clock(s), clean up, leave running. Summary: Sorry about the "cook-book" approach, but I've found that this is the best way of making clear what needs/will be done in actual practice. Your system may not involve all these elements, but this checklist of steps to completion is meant to be all-encompassing. Keep this Section on mental-file for use when you find yourself installing a pre-cast concrete or cut stone fountain or statuary in your garden. Bibliography/Further Reading: http://www.garden-fountains.com/articles/basics-of-water-fountains.html
|
|

|
Features: |
|
| Featured Sponsors: |