|
|
| Home | Marine Aquariums |
Freshwater Aquariums |
Planted Aquariums |
Brackish Systems |
Ponds,
lakes & fountains |
Turtles & Amphibians |
Aquatic Business |
Aquatic Science |
Ask the WWM Crew a Question |
| Please visit our Sponsors | ||||
Of the great joys of exploring as a snorkeler/diver, the making
and sharing of images is my greatest. Years back, hunting for abalone,
spear-fishing, collecting shells and more for ornament were higher
priority activities, but in a world with diminishing resources and too
many humans, how much better it is to be able to record and disperse
visuals of below water environments; leaving the life there for others
to experience in person.
I like to state that humans are visually-oriented organisms. That if we
were dogs, we might well have such a periodical as “Play Dog” magazine;
with blank pages replete with smells smeared on them. “What a babe!” a
canine might think. People as the clever monkeys we are, reach for the
colored fruit (in season) and for visual stimuli in all things.
Join me here in this brief introduction exploring the basics of what it
takes to make underwater images.
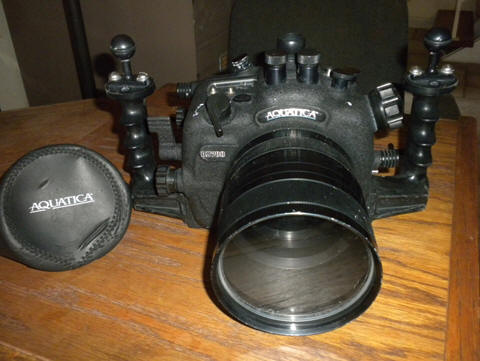
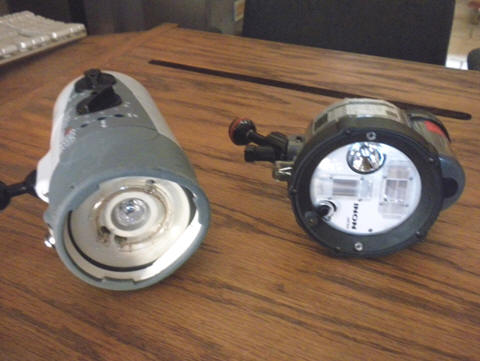
Housings First?
It might strike you as odd, as in unusual, to not start discussing
cameras first; following up with housings, but… within the choices of
consumer rigs, the cost, function and utility of what goes around the
camera (if anything!) is more important these years. Take a look;
Single-Lens Reflex or Compact Digital are lay-peoples A-B choices for
above and below water use; with functionally not much difference in
features, quality of images (yes) within reason amongst either group. A
MUCH larger array of choice exists in housings; for DSLRs, most costing
more than the camera body they’re engineered to house. Also, considering
that you must use the options and functionality of your housing to get
to what your camera inside can do drives home the importance of this
tool.
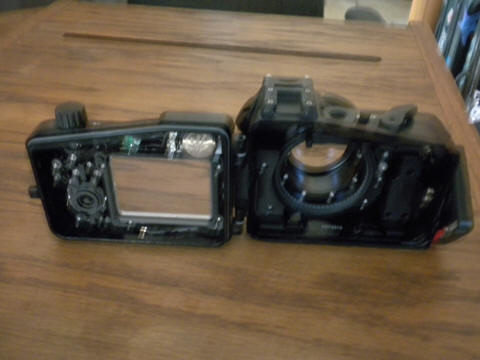
First off, a housing needs to be functional… leak-proof, strong in terms
of impact resistance, and entail “actuators” that not only allow you to
turn on/off, up/down, higher/lower settings on the enclosed camera, but
are “kinesiologically” pleasing.
No Leaky Please! Thank goodness (and
engineers); housings are MUCH less prone to allow water in then just a
few years back. Better castings, O-rings, lube, fittings period account
for far less-often dunked cameras. This being stated, I would gladly
devote an hour or two presenting my ideas on “the discipline of O-rings”
themselves; as their (mis) application is the principal source of woe
and loss for underwater photographers. DO read up and PRACTICE removing,
cleaning the race/s, cleaning the rings, lubricating them and properly
replacing them. Valuable time well spent.
And O-rings alone aren’t the only source of potential to probable
leakage. Closures that impinge on the rings must be checked for sand,
hair and other obstructions, lest they allow a bridge of water to pass
into the housing. Related are the various through puts like sync cord
ports, mechanical controller through – puts with their O-rings, many of
which are NOT user-friendly. Again, practice and knowing which are to be
pulled out when loading the camera, all to be “pushed in” before dunking
your rig.
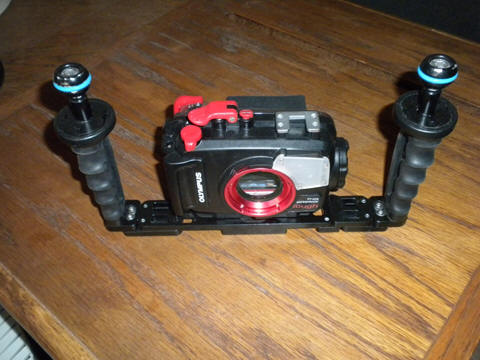
Ports for full size SLR rigs are removable, inter-changeable, to allow
for lenses of different lengths. Their O-rings and securing mechanisms
are another possible weak link. READ their manuals carefully, and EACH
time you’re getting into the water, check to make sure the port,
possible extension are locked in all the way.
The above being stated, just how often should you take out and clean
your O-rings, the races, surfaces they fit against? Well; at least every
trip, but for me, not every dive, day or time I open the housing. There
is reason in having a few days go by twixt O-ring manipulation; there
just being more likelihood of twisting, leaving part of the ring
un-lubed, or introducing hair, sand… In a week’s trip, I might re-do the
rings once or twice.
Impact Resistance: My usual joke here
regarding the sturdiness of UW housings and plane crashes; though our
bodies would be reduced to less than thumb sized pieces, likely UW
housings would get slightly scratched. They’re really tough; even the
cast plastic ones; let alone the computer cut aluminum bodied models.
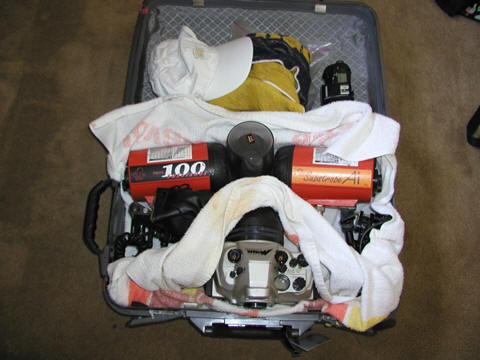
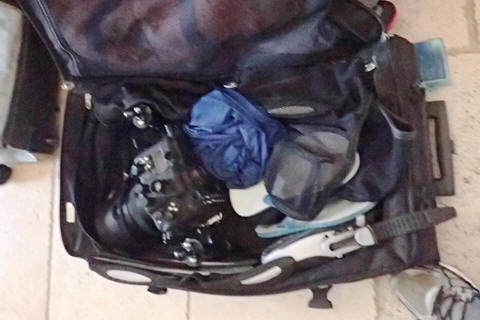
This being stated, you DO want to protect your housing from uneven
forces and particularly the knobs, dials… actuators… and glass ports
from outside damage. Best to transport them sans camera bodies inside
fins, clothing, wetsuits/booties/hoods in sturdy luggage:
The very worst “source of mortality” of UW rigs is…. Where?
Dive/rinse buckets on board boats and liveaboards. Honestly, it amazes
me the number of times I encounter everyone’s gear tossed willy nilly in
a rocking bucket of freshwater. The only worse, added to injury is when
folks have the ignorance or audacity to rinse their defogger spritzed
masks in said entanglements; dissolving O-ring lubricant in the process!
Lastly or at least secondarily; yes, housings should be
attractive; they should look nice… And they do!
Cameras: General to Specific Selection Considerations:
Years back in the analog/film camera days I at times served as a
judge at underwater photo contests, aka shoot-outs. As with most
“deciders” I was decidedly unwelcome by some folks who contrived that
their photos were better than others; largely based on the size and
comparative expense of their rigs. At times, newish divers with “throw
away”, one-use cheapy cameras would and still do shoot better pix than
high end DSLR outfits of several thousand dollars… Why? Could be “luck”
to some extent, but more often than not, folks who TAKE THEIR TIME, and
KNOW about the life history of their subjects… shoot better. My point
here is that though there are some differences twixt high/low end
compact digital and Digital Single Lens Reflex cameras, the MOST
IMPORTANT feature is whatever gear you have that you get out and
(actually) use it. Are some makes, models of cameras inherently better
than others? Yes… but, the degree of better/worse is more like the
varying qualities of gasolines; than gas, water and olive oil.
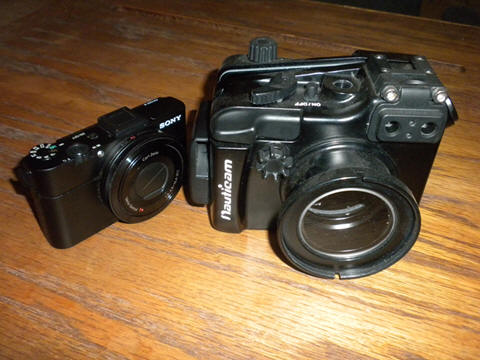
Compact Digital Cameras:
Scoff if you will, the technology in these miniscule
marvels exceeds that which took humans to and back from the moon… and
for a few measly hundred dollars. CD cameras have gotten so good that a
few friends have recently written books on their use.
Other than taking images of such high quality that they’re hard to
discern from SLRs, CD Cameras are of lower cost; smaller in size and
hence more popular; in turn having housings that are less expensive.
All modern CD shoot in RAW formats; many are waterproof to some nominal
depth (though I’d only use them in a housing); and as far as “extras”
go… not much more to invest.
Nowayears there’s not quite so much delay time twixt actuating the
shutter release and the actual taking of the image, but there are vast
differences in viewfinders. Many makes/models either don’t have them; or
utilize electronic rendering rather than a view that approximates what
the camera sees.
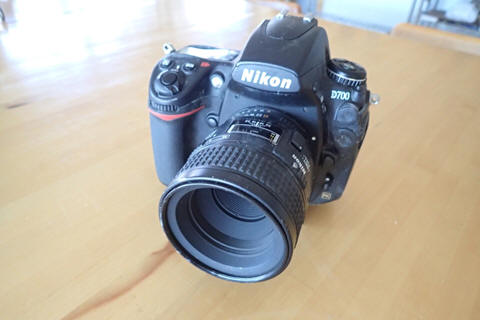
(Digital) Single Lens Reflex Cameras:
DSLRs are “better” cameras than compacts due to their differing feature
of switchable lenses of higher quality, and usually more advanced
(greater acuity and color richness) electronics, most notably principal
sensors. Compared with Compact Digitals, SLRs are heavier, larger, and
more expensive… as are their housings. And VERY often SLR folks will
find themselves investing in external strobes (flashes)… along with sync
cords, arms, trays… for a few thou more.
Comparing Some Compact Digital and Single Lens Reflex Camera
Characteristics:
In brief, CDs vs. SLRs: Cost less, as do their housings. Weigh
less, as do their housings… can/do shoot a BUNCH of pixels per image,
shoot HD video…. Is the higher range of ISO in DSLR vs. CD of use?
Meh.
May As Well Mention
Strobes/Lighting:
Photography (still and kinetic) is all about controlling light.
Yes; and just like parties, BYO is best… providing at least some
supplementary light for “fill”, contrast and color, though not
absolutely necessary.
Actual Image-Making; Using Your Gear:
I have a standard spiel I’d like to share with you regarding real
application of image gear. This S.O.P. is the same for video or still
rigs; and any/all prevailing conditions underwater. In order of
operation, given a thorough understanding (presumption) of the function
of your camera, housing, lighting AND the behavior of the life you’re
viewing, hoping to capture, AND your awareness of your diving skills,
conditions…
1)
FIND YOUR SUBJECT: First comes the locating of a probable
photo/video subject. Perhaps this is a beautiful subject, specimen,
setting…
2)
CONSIDER THE SETTING: Next, consideration of this last; the
composition. Unless you’re hoping for a simple organism identification
pic; you’ll want to think about how you might shoot in context; perhaps
telling a story of tied-in environment, behavior… This may entail
getting down to substrate level, or even “shooting upward” a bit. Body
and camera/rig placement can be very important.
3)
CHECK YOUR CAMERA SETTINGS! Whatever set up you’re using, you want
to be assured that exposure, film speed, aperture…. A personal insight:
I use the two right hand dials (on most cameras, housings) for f-stop
and exposure… leaving the latter usually at 125th to 200th
of a second… and leave all other camera settings “as are” for a given
lens, type of intended shooting. Yep; I shoot manual rather than Program
or Aperture or Shutter priority. I do almost always avail myself to
auto-focus modes (‘cept for longish focal lengths); and set my strobes
manually (rarely TTL).
4)
CHECK YOUR LIGHTS! Oh, how many times have I/we encountered folks
whose lights were aimed hither and yon… anywhere but at the subject?!
You can use just one strobe; mounted above the housing (ala Roger
Steene) or another or two just to the side of the port… BUT DO assure
they are pointed where they’ll do some good.
5)
SHOOT! And SHOOT AGAIN! Actuate the equivalent of the shutter
release… AND LOOK at the subsequent facsimile produced on the devices
screen… AND SHOOT AGAIN! Electrons are cheap! Even with retaining the
same settings. For some hold-over reasons no doubt, I still manually
bracket at least half up and down a stop if there’s enough time, the
composition warrants and allows it. Post production; what little I do
employ, can/will save the vast majority of partly over and under-lit
exposures.
The Big Wrap-Up
Like none other than the Jacques Yves Cousteau, you may go through
a hunter phase, shooting fish for food and sport; further developing
into a gatherer of shells, explorer of wrecks and more; but I mostly
look forward to your becoming a maker of image work. Still and kinetic
picture making entails all the former activities: seeking, finding,
capturing the grace, symmetry and beauty of underwater worlds; but
further leaves them undisturbed; preserved for others appreciation.
What’s more, the “goods” of photos and videography are lasting
testimonies of our adventuring in easy formats to share in space and
time.
|
|
||||||||||||||||||||||||||||||||||||||||||||||||||||||||||||||||||

|
Features: |
|
| Featured Sponsors: |