Scott Sigman's
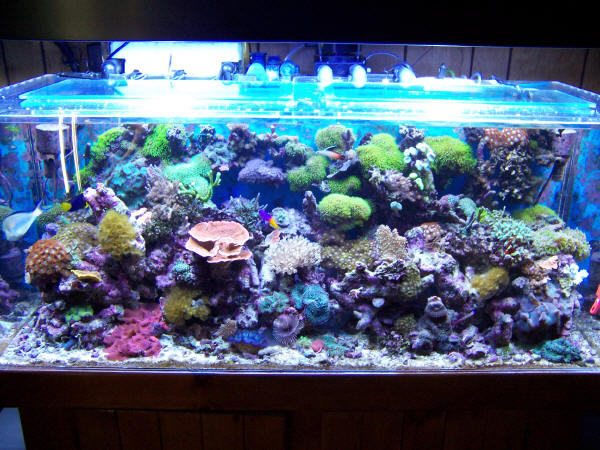
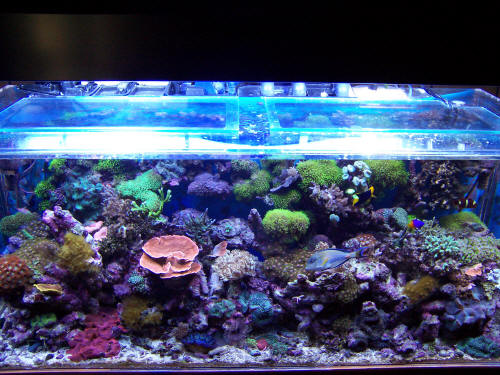
75 Gallon Sea Clear System 2 Reef Tank
"An Expression of Technology"
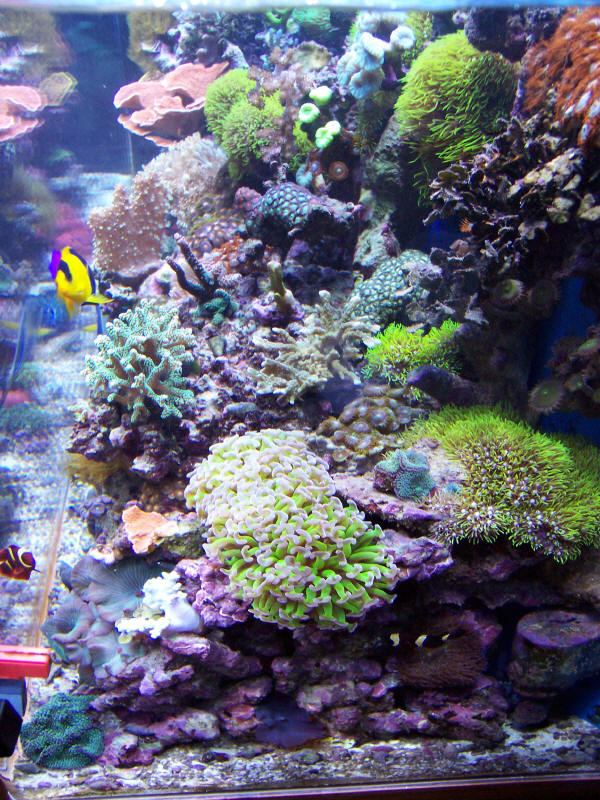
Tank:
I decided to use the SeaClear System 2 tank
because I wanted to have a rear sump so support components could be placed in
the stand for a neat configuration. The water level in the rear sump is beyond
the recommendation from the manufacture (water level is 8 inches below tank
top.) This way all pumps, heaters and probes would be under the waterline. In a
power- out scenario, the tank will not overflow because the rear sump and
aquarium water levels level themselves out quite nicely before overflowing.
Having all the different chambers in the sump really made it easy for component
installation.
Skimmer:
I decided to use the Red Sea Turbo Berlin
Hang on Skimmer. It takes a bit of tweaking, but after you iron out the kinks it
works great. Red Sea will send you a free carbon cup attachment to place on top
of the skimmer collection cup- It a great add on if you dose ozone into the
skimmer. The skimmate goes to a homemade collection container with a carbon
filter. I change the collect container monthly.
Ozone
Generator:
A
Red Sea
100mg ozone generator with a 250mg air dryer and
ozone-safe check valve plumbed inline with the skimmer air inlet. A fiber
pre-filter just forward of the air dryer keeps dust out of the ozone generator.
One of my main concerns when using ozone was to make sure that the ozone does
not get into the main tank water, so a modified Lee's brand plastic cup filled
with Reef Carbon is placed below the skimmer outlets. I also use the carbon cup
attachment from
Red Sea
on top of the skimmer collection cup to assure that no ozone escapes into the
atmosphere or the tank water. The carbon in both units is changed once a month.
I also added a carbon filter for the skimmer collection container. With the use
of ozone and meticulous tank husbandry, the ORP is always between 300-360mv. The
ozone comes on just below 300mv or when I feel like just giving an ozone boost
for water clarity. Most people avoid using ozone, but if you can control its
proper usage, it is beneficial in a reef tank. The unit doses between 35 to 45
mg/hr.
 |
|
A Calcium Reactor helps maintain
calcium and alkalinity. |
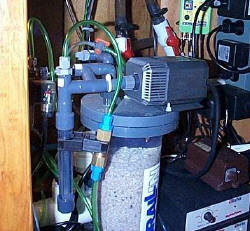
Calcium
Reactor:
My next thought was alkalinity and calcium
supplementation. I decided that it would be worthwhile to invest in a calcium
reactor instead of adding daily doses of additives. In addition to alkalinity
and calcium, a reactor provides an added boost of strontium, magnesium and other
trace elements. I decided to use the Korallin unit because of cost and
reliability. It's a great unit once you get it tweaked right. Initially, I had
trouble getting the correct effluent pH, which I found needed to be between 6.5
– 7.0 for proper operation in my system. This setting gives me a calcium level
of 420 ppm to 450 ppm and alkalinity between 2.5-3.5 meq/l ( DKH
between 8-10) . The only way to properly monitor and
set the effluent pH using this reactor was to use a collection cup were both the
effluent 1 and effluent 2 drips into it before going into the tank.
I used a
Milwaukee
ORP/pH monitor controller to operate
the Co2 valve based on the set point of 6.87 ph. I used the ORP portion of the
controller for the ozone generator.
To insure that Co2 does not enter the tank where the
calcium-enriched water drips back to the last chamber of the sump,
I placed an air stone (which is powered by a Coralife Luft air pump) below
the effluent collection cup to help the Co2 escape to the atmosphere before
returning to the tank water. This is a must if you do not want stray Co2 getting
into the tank, and also increases dissolved oxygen too.
 |
|
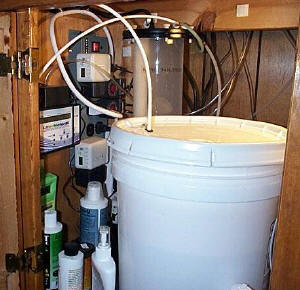
Evaporated water is replaced with
RO/DI water pumped from a five gallon bucket through a Nilsen reactor. |
The tank Ph is monitored by a second
Milwaukee
pH monitor. I did not need to
control pH, so it just monitors this parameter . With the Co2 and Calcium
reactor in this system, the pH registers lower, around 7.8 to 8.0- as calcium
reactors tend to lower the aquarium pH. To counteract the low pH swing , I use a
Nielsen Kalkwasser Reactor/Stirrer that stirs the
Kalkwasser via a timer, and is dosed to the tank using a LitreMeter/float
switch/timer configuration. The pH at night is 7.9 to 8.0 and during the day
8.0-8.2. I use RO/DI water in a 5 gallon bucket to supply the KW Reactor. Not
only does it dose Kalkwasser into my tank, but handle the evaporation of water
in my tank as well.
Phosphate
Canister:
To deal with Silicates and Phosphates, I used a
Lifeguard Fluidized Bed Filter using Rowaphos filter media. I choose this unit
because it fluidized the media perfectly. The water supply for the canister is
powered by a Maxi Jet 600 power head that also feeds the calcium reactor water
inlet as well. I use a split tee and adjustment valve. Dual purpose is the way
to go, so you can cut down on the number of pumps used in your system. Since the
day this tank was started, phosphates and silicates are near non existent.
Chiller:
Cooling was a concern for me, so I use the JBL
Arctic Chiller. It works great and has a built-in temperature sensor and
monitor. The temperature is always between 78 and 80 degrees. At 80 degrees, the
chiller comes on and lowers the temp by two degrees then shuts off. I also use
two titanium heaters (150 watt and 250 watt) connected to an Aqua Logic Digital
Temperature Controller. Heater temperature is set to come on at 77 degrees and
off at 78.2 degrees. This is so both the chiller and the heaters do not
continually cycle on and off. Some hobbyists feel that 80 to 82 degrees is
a better temperature, but that depends on the location from which your corals,
etc… came from and the natural temperature from those areas. <Editors' note:
Always research the specific needs of your animals when setting the
environmental parameters within your system!>
The chiller and heaters maintain the water
temperature perfectly for this environment. Both the chiller and the heaters
have temperature cut-off in case a problem should occur. I also use a Pinpoint
temperature meter for backup temperature indication.
 |
|
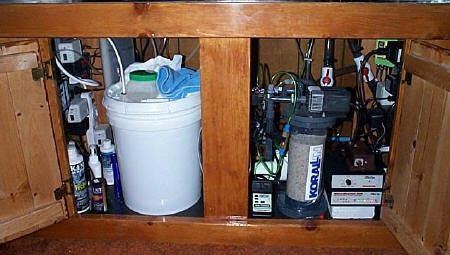
The lack of a sump allows all of this
equipment to be neatly and conveniently hidden in the stand. |
Circulation pump:
Main circulation is with a Pan World Magnetic
pump NH 150PS, which has an output of 1100 gph. It turns my tank water
over about 15 times per hour- total overkill but better more than less! This
pump is quiet, inexpensive and totally reliable. The Sea Clear tank comes with
an internal pump- but I did not use it. I had to modify the tank by drilling two
holes (bottom of tank) in the last chamber of the sump to circulate water thru
the chiller, UV and back to the outlet manifold using this pump. <Editors'
note: If you are not comfortable drilling your tank, have it done professionally
by someone who has the proper tools and skills!>
The water return manifold has drilled holes in the back and up
one side of the tank, similar to a spray bar, and it pushes the water back into
the tank behind the live rock. This keeps the back clean and circulating nicely.
I have a second Pan World pump so that I can quickly swap out pumps in case of
failed operation. In addition, around all intake and output hoses I used
insulation.
Wave Maker:
Water movement in the tank is run by 4 Maxi
Jet 1200 power heads and controlled by a Red Sea Wave Maker Pro. I use the
alternating sequence setting and at
8:00
pm
it switches to night mode for 12
hours.
UV
Sterilizer:
I plumbed the UV sterilizer into the
tank between the
chiller and return manifold. It only comes on once a week for 4 hours and
that is all. No need for it, but it is there just in case. I have an
electronically-controlled flow valve that slows the output back to the tank when
it is in use. Whether or not a UV is necessary in a reef tank is up for
discussion!
Lighting:
Lighting in my tank is accomplished by a USA
Orbit fixture with 2x65 watt day light/ 2x65 watt actinic power compacts, and an
Aqualight Pro 2x65 daylight/ 2x65 watt actinic fixture. I use individual digital
timers to operate the lighting system. At
8:15
am
, 1 set of actinic lights come on,
8:45
the next set of actinic come on. At
9:30 am,
the first daylight bulb comes on,
and at
10:15 am
the next set of day lights come on.
All lights go out in sequence by
10:15 pm
each day. On random days at
different time settings a set of daylights turn off briefly for a few minutes.
This way it simulates cloud coverage and seems to make the corals a bit happier
then the same lights on the same way all the time.
 |
| Lighting is currently provided by PC
florescent lamps, but will soon be upgraded to metal halide. |
Moon Lights:
I use a set of three 5 L.E.D. "Blue Moon" bulbs
from Fishbowl Innovations. They have a 28-day moon cycle controller. These
lights come on at
10:14 pm
and shut off at
8:16
am
. The effect is absolutely amazing.
Both the USA Orbit and the Aqualight Pro have moon lights, but I do not use
them.
My recent Lighting upgrade is a custom metal
halide setup. I custom built this thru Innovative lights, and is comprised of a.
48" 2x175W PFO Professional Series Hood & 2-96W power
compact Lamps with a tempered glass lens for hood.
2 13,000k Venture Metal halide lamps and 2 PFO Actinic 03
Lamps.
I utilize dual IceCap variable speed fans
(temperature- controlled/independent and
selectable) for cooling. A dual PFO metal halide
ballast with independent switches and independent power cords for each metal
halide bulb provides light control. A PFO power compact ballast with
independent switches and with individual power cords for each PC bulb provides
supplemental lighting.
With the new PFO lighting system, I will be able
to bring the MH lights across the reef tank as if the sun is rising from one
side of the tank and making its way across the reef. I am very excited about it.
With all the bulbs individually controlled, this provides awesome
prospect for environmental simulation!
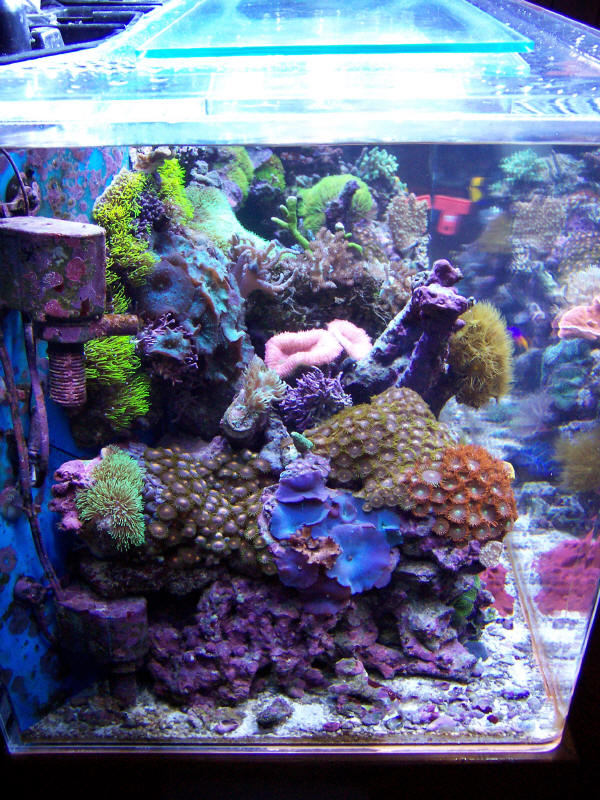
Refugium:
Is a CPR's AquaFuge hang-on refugium. It has its own heater and lighting via a
dual 9 watt Aqualight power compact system using 50/50 bulbs. It is on 24/7. I
call this unit my "pod-condominium". There is a variety of macroalgae growing in
it and that’s where the amphipods/copepods love to hang out and multiply. I used
established sand from my main tank with live rock rubble lining the bottom. It
is plumbed into the main tank thru the sump wall behind the live rock to allow
organisms to enter the main tank. The refugium was added to this aquarium after
six months. It was a "just-got-to-have" item. I have to harvest the algae growth
once a month, and usually feed it to my Tang and put a little into my 10 gallon
hospital tank for safe keeping.
 |
|
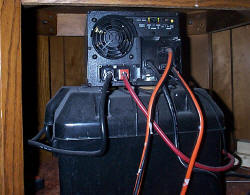
An automatic power back up system
ensures the safety of the inhabitants in case of a power outage. |
Power Back-up System:
My biggest concern was power outage that
could cripple my tank, so I choose the Tripp-Lite Battery Backup system. I use
this unit with two marine batteries. I have a total of 420 amp hours of 115 volt
AC power non-interrupted when it switches to batteries and visa versa. In case
of power outage, the Trip-Lite senses this and converts to battery
power/inverter. When power is restored it goes back to normal electrical and
charges the batteries. In a power out condition it runs my entire system except
for my lights for 4-5 hours. After that I use a gas-powered generator if need
be. No reef system should be without a battery backup and alternate power source
just in case. It’s a must and worth the expense! <Editors' note: We agree!>
RO/DI Unit:
I use a Kent
Marine
60gpd Maxxima Hi-S RO/DI unit with a
second sediment pre-filter upstream of the unit. I use a water purity monitor to
check the TDS of the water going to the vat and it is also a good indicator when
the membrane needs to be changed. I use two pressure gauges to monitor the water
pressure in and out of the unit. This indicates when filters within the unit
need to be replaced.
In addition, I also use a float valve and a
shut-off kit that shuts off the water once my 30 gallon supply vat is filled. I
add Kent
Marine
Osmo-Prep to rejuvenate the water
prior to adding salt. I use Reef Crystals Sea Salt by Aquarium Systems. I
have tried others, but this brand seems to work the best for me. I age my water
at least 3-4 days prior to its use. The fresh saltwater is heated, aerated and
also has a power head for movement in the vat. I also use a Phosban reactor 150
to further remove any phosphates from the makeup water 1 day prior to using. I
keep the temperature of this salt water two degrees lower than my tank.
Cold water settles, warm water rises. This way when I do the water
change, the new sea water settles at the bottom of the tank driving the warmer
older water out of the tank.
Water change kit:
I have an UltraLife float switch that sits
in the sump of the aquarium which supplies power to a power head in the vat of
fresh saltwater (I used the power head that came with the Sea Clear tank.) I use
two 1-inch diameter hoses. The saltwater inlet hose has a check valve, so when
the power head shut off, water does not return to the vat of the new saltwater.
The siphon drain hose has a valve on it so I can regulate the amount of water
taken from the tank, which helps to balance the intake of fresh saltwater and
the outflow of old saltwater respectively. The siphon drain hose is placed in
the first chamber of the sump. The supply hose is placed in the last chamber of
the sump, where it is circulated thru the manifold to the tank. Pretty simple
operation, as water is removed the float switch senses this and turns on or off
the power head based on the float switch level. Water is release outside via a
garden hose to a drain.
I do a 25 gallon
per week water change (just 15 minutes to do) every Saturday religiously! I
believe “Dilution is the Solution” in controlling nutrients. However, 5 gallons
from my main tank is used to water change my 10 gallon hospital tank and my 2.5
gallon Nano Reef tank in my office.
Hospital Tank:
Consists of a 10 gallon tank, mini-refugium
made from an Aqua Clear 70 which is modified, a 25-watt heater, 9-watt light, a
small counter current protein skimmer and Jalli dual 13 watt power compact
light with 50/50 bulbs. A little overkill, but I had the components, and rather
then allow them collect dust, I used them! I also use a Phosban 150
Reactor with either Reef Carbon or Phosban once in a while. I use this tank to
acclimate new corals, fish, etc...prior to placement
into my main system or if I have a sick fish I use medication in this tank. The
quarantine time on new livestock is 1-2 weeks dependant on what it is. And on
sick livestock, dependant on time it takes to affect a cure.
Setup of the system:
When I planned the creation of this reef system in my home, I
decided to collect all the components needed to build this system, and then
slowly add them onto the tank over time. I decided that the tank would sit for a
few months before I began to add any marine organisms. I felt this would build
the tank's ecosystem up at a slow pace. In this hobby “Patience is Guidance!”
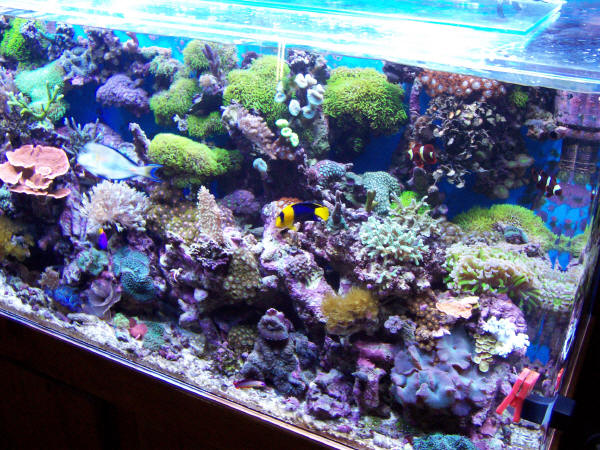
Live Rock and Substrate:
I used Kaelini live rock because in
my estimation, it has the best colors and shapes. I also used some branch and
Fiji rubble. The live rock was added from two different shipments a week apart.
When I set up the live rock, it was placed away from the rear of the tank to
allow water movement behind the reef via two Maxi-Jet 1200 power heads located
at the bottom at different heights. Two additional power heads at the top of the
tank at different heights provide water movement in the tank. The rocks were
drilled and I use ¼ inch acrylic rod to fasten individual rocks to one other
where it was needed to build the reef. I also decided to build the reef up on
the back wall using ledges and rubble. I would attach the rock to the back of
the tank using Coral glue. The effect would be a sloping reef to a level
platform.
For the substrate, I use fine sand mixed with
medium sand. I also seeded the tank with IPSF Live Sand Activator, Wonder
Mud and Coralline Algae Booster. In addition to this, I used GARF Grunge and
Grunge Lite to kick-start my system. The sand was
added 2 month after I initially put the rock in. The live rock was uncured (my
request) and because of this the tank needed to cycle longer than normal. Using
no sand in the beginning stages allowed for easy clean up of detritus while the
LR cycled. During that time I used the actinic 03 lights, building up to 12
hours per day of light.
Once the live rock cured and sand showed some evidence of life, I
added all sorts of amphipods, Mini Brittle Stars, Hermit Crabs, Bristle Worms,
snails and anything else I could get my hands on to build up the system. I let
the tank further cycle and grow for about two months prior to adding any other
marine organisms. I introduced day lights to the tank for about 5 hours a
day and slowly increased the on time over a few weeks to 12 hours. I also
increased the actinics to 13 hours a day over a period of a few weeks.
During the tank cycling, I observed the growth of a
fluorescent green algae. After about 3 months on the rocks, this algae slowly
gave way to pink, deep green and purple coralline algae. Also, the back wall of
the tank and power heads showed growth of coralline algae. I think that
with the seeding of coralline boosters from IPSF, I got a head start on
the succession of algae growth. Keeping the calcium, magnesium and strontium at
proper levels added to the coralline growth.
My next additions to the tank (month 4) were feather dusters and
mushrooms and some small frags of Zoanthids. My "recipe" of additions was
in this order: Invertebrates, corals then fish. I wanted the tank to build
itself up a little at the time.
Over the course of a month, I added more
Zoanthids, mushrooms and some soft corals. I also started to build the back reef
on the rear of the aquarium with live rock rubble that I got from a local per
store.
During the monitoring and the "tweaking phase" of the water
quality parameters and the addition of live stock ( and only when I felt the
levels in the reef tank were stable enough for more demanding corals), I started
to conduct extensive research to decide on what types of additional corals,
inverts and types of fish I would add. The initial addition of livestock during
the beginning phase was to satisfy the need for some life and color in the
aquarium! I only choose livestock that were not dependent upon pristine water
quality.
One of my main concerns was compatibility between the different
species of marine organisms, as well as diversity and color contrast to make
this tank a natural looking eco system, and not something that looked man-made.
I also decided I would use cultured fragments of livestock and nothing that came
directly from the ocean, as my part in protecting our natural and shrinking
reefs of the world. If anything in my aquarium is directly from the ocean, it
was without my knowledge.
My overall design for this setup was to build the back wall up
like a living shelf of life. I choose different types of polyps and attached
them to the wall as a start. I wanted them to grow out and fill in areas. I
attached small pieces of live rock that would support different corals on them.
In order to attach the live rock to the back wall, I sanded one end flat and
used coral glue to join.
Slowly, I added more water quality demanding corals; two at a
time over a 6 weeks period. I had decided that the corals that would be added
first would be ones that depended primarily upon photosynthesis as a food
source. This way, I would not tax the system with corals that needed daily
feeding before the system was fully life-sustaining on its own. But I did add a
few small food-dependant species of coral to provide overall diversity.
The fish I had chosen were added over a six-week period. The
first two fish added were a Gold Stripe Maroon Clown (Premnas biaculeatus)
and Royal Grammas (Gramma loreto). The next two fish were a Bi-Colored
Angel
(Centropyge bicolor) which, by the way, prefers frozen food over
corals/zoanthids, and a Sohal Tang (Acanthurus sohal). I went early on
with the Sohal Tang, but since I had an abundance of good algae growing in the
tank, I felt it would be ok. My next addition was a baby Sixline Wrasse
(Pseudocheilinus hexataenia). I felt that there would be no problem with
starvation for this little guy, since the tank was full of food for him to eat,
supplemented with the substitution of frozen foods
My latest addition, and my favorite critter, is the Blue Boxer
Shrimp or referred to as a blue Coral Banded Shrimp
(Stenopus hispidus).
He was really hard to find. After a few months of diligence searching the
net, I located a baby specimen. He spends most of his time in the shadows but
comes out occasional when my hand is in the tank to see what the commotion was.
At this point, there are a total of five fish, some hermit crabs,
snails, different types of starfish, some feather dusters, the Blue Coral Banded
Shrimp, and many different species
of
corals in this reef tank.
Because I was committed to setting up this tank in the fashion
outlined above, I knew the increased bioload over time would not affect critical
water quality levels in one big shock or cause “New Tank Syndrome”, which so
many impatient hobbyists have suffered from in the past.
During the entire cycling period of this tank, I had very little
diatom algae, nor the occurrence or presence of any slime algae. That was an
indication that my system was doing very well and had no detectable phosphates,
silicates or other excessive nutrients to feed undesirable algae
outbreaks.
One problem I did have was the increased colony of Chiton and
Snails that seemed to love coralline algae. I removed most of them over a period
of time at night. I left a few, but when they get too big, I will remove them
also and place them in my 10 gallon hospital tank in till I decided what to do
with them. When the Hermit Crabs grew too large, they were removed and replace
with smaller ones. I traded them off with my local pet store for smaller
critters.
Additives:
I really do not use very much of any one of what is listed:
Kent
Marine
Liquid Gold for trace elements switching off
with Combisan every other water change.
Kent
Marine
Tech M, ESV
Strontium Chloride, Kent
Marine
Lugol’s
solutions for iodine and
Marine
C vitamin
supplement.
Kent
Marine
Turbo Strontium sometimes during the week. Marc
Weiss Combo Vital each night 2 hours before lights out and sometimes in the
morning.
Marc Weiss Reef Vital DNA every fourth day.
Two Little Fishes Kalkwasser mix for my KW
reactor.
I use all chemicals very sparingly so the ionic balance of tank
stays correct.
Feeding The Tank:
I use Cyclop-eeze and DT’s Phytoplankton
for the inverts and corals- swapping every other day between the two.
I use live brine shrimp, Golden Pearls, Plankton
Gold Plus and Phytoplankton Plus flake foods and mixture of different
frozen foods, with a drop of Naturose Powdered and Selcon mixed in for the
fish. I also
feed Nori to the Tang daily. I vary the use of
these different foods every other day and use them sparingly. I usually feed the
fish in the morning and the evening. I also feed the brittle stars frozen krill
every so often.
That’s it!
<Editors' note: If you are interested in sharing your freshwater, marine,
brackish, reptile, pond, fish room, or other aquatic feature in Conscientious
Aquarist, please email a summary, photos and/or diagrams of your system for
consideration to:
camag@mail.wetwebmedia.com
Winners will be
automatically entered into our contest for the "Aquatic Feature of The Year",
and will be eligible to receive our special "Grand Prize" in December! Keep
reading Conscientious Aquarist for more details!>