Article and photographs by Adam Blundell & Shane Silcox
With a quick internet search or
visit to your favorite aquatic website you can quickly find pictures from Terry
Seigel, Bob Fenner, Corey Kruitbosch, Shane Silcox, Skip Attix, Greg Rothschild,
Jake Pehrson, and Lorenzo Gonzales. And aren’t those pictures amazing?
Have you ever wondered how some people take those amazing photographs of their
aquariums? Do you see many aquatic pictures on the internet and in
magazines and wish they were pictures of your tank? Well, hopefully with a
little help and a lot of practice you can.
Aquarium Photography Basics
|
Exposure |
| Without spending too much time explaining standard photography there
are some terms and definitions that should need to be familiar. The
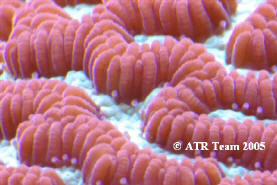
first and most important aspect of photography is exposure. Exposure is
how the final picture turns out and is the result of a combination of
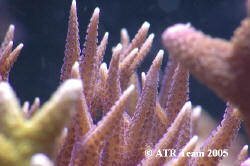
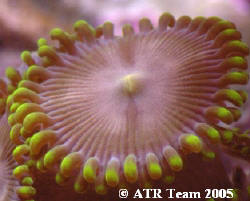
shutter speed and aperture. This picture has poor exposure, and
therefore is blurry even when the subject is (or was) in focus |
 |
|
Shutter Speed |
 |
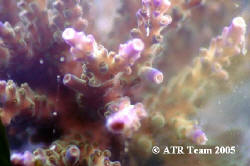
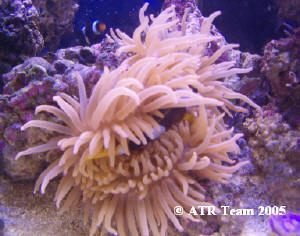
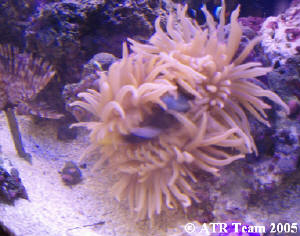
Shutter speed determines the length of time the camera
shutter is left open allowing light to come in to the sensor or film to
capture the image. A fast shutter speed prevents blurry pictures
because the camera and subject do not have time to move relative to each
other in that time. However a fast shutter speed does not have time to
allow as much light to enter the camera and therefore the pictures may
be dark and underdeveloped. Having more light coming from, or shining
on, the subject is necessary for taking pictures with a faster shutter
speed. Notice the difference in these pictures. A faster shutter speed
allowed the authors to get a clear image on the bottom picture |
|
|
 |
|
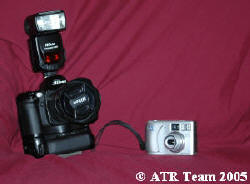
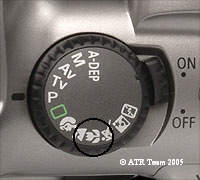
Some important differences exist
between full control (left) and point and shoot cameras (right), even
for the amateur photographer. |
The other aspect of exposure is
aperture. Aperture (sometimes also known as F-stop) is a term to describe
how wide the camera lens opens. This is very similar to a human iris.
Basically it can open wide creating a large opening for light to enter, or be
closed down and allow little light to enter. Too much light and the image is
washed out and overexposed. Too little light and it is dim and underexposed.
Although a larger aperture opening seems like a better choice, the more open
the aperture the shorter the depth of field. In other words, (without too
much photography techno-babble) opening the aperture helps to let in more light,
but makes less of the picture in focus. Now that we have gone over the
basics, here are some quick tips to taking better pictures. We will
address most issues with two types of cameras in mind. We are classifying
cameras as either 1) small point and shoot cameras, or 2) large, full control
cameras.
|
White Balance |
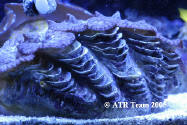 |
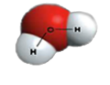
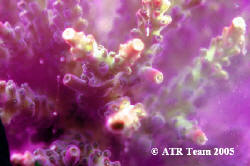
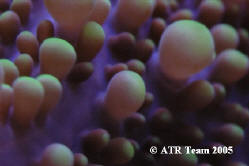
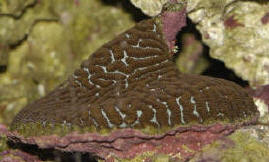
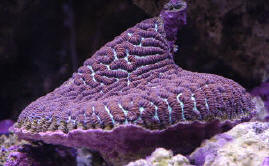
When using a digital camera, arguably the most important part of
aquarium photography is the “White Balance” setting. Using white as a
reference, the camera adjusts the color balance to give as true as
possible a white, which in turn changes all the other colors of the
picture by doing this. For example, in a photograph of a white wall with
a very blue light shining on it (kind of like aquarium lights!), the
wall would look blue. Being able to adjust the white balance
appropriately would render that “blue” wall white in the exposed
picture, the accurate color of the wall. This is why it is so important
to set the white balance correctly, or the resulting pictures may turn
out either too blue or too yellow. Never trust the camera’s “Auto White
Balance”. It is rarely able to recreate the correct coloration of the
subject. Shown here is the same clam with camera settings for
different levels of white balance. Notice that the color changes
can also be seen in the surrounding substrate, which is a useful
indication of the true nature of the photograph. |
 |
|
Flash |
 |
For most aquarium photos, it is desireable to
turn the flash off when taking pictures. By using the light of the
aquarium, you will get better color rendition and avoid the “washed out”
look from a flash. If the photos are too dark and underexposed, a slower
shutter speed or larger aperture may be required. In point and shoot
cameras it will be in “manual mode”. Consult your user manual to find
out if your camera will support it. Camera flash as well as
reflections from windows and lamps can hurt the clarity of the image.
Avoiding the use of the flash as well as turning off lights in the room
helps avoid this. |
 |
 |
|
Close-ups |
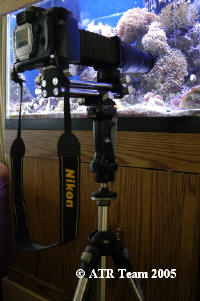 |
Setting a slower shutter speed will increase the potential for blurry
images, especially for very close up or macro photos. In these instances
a tripod is an absolute must. Any movement to the camera or even
vibration from pushing the shutter release can cause opportunity for
blurred images. Using a remote shutter release or even putting the
shutter release on a timer will help to limit the amount of vibration in
the camera, and help to get those very focused, clean shots. Also, when
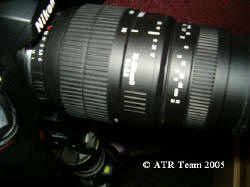
photographing corals, it is helpful to turn off the aquarium pumps and
powerheads in order to avoid the blurry images of “swaying” coral. Note
also the bellows on the front of the camera which aids in achieving
sharp focus on small subjects by increasing the focal length of the
lens. |
|
Focus - Aquarium Glass Distortion |
 |
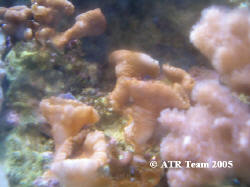
This leads to the next important area to address, keeping
the subject matter in focus. First off, it is important that you place
the camera perpendicular to the glass and the subject. If the camera is
placed at an angle to the glass, the glass will distort the light making
it difficult to get a clean focus. In addition to the distortion from
the glass itslef, automatic focusing cameras often times can not
properly focus when taking pictures on an angle to the glass. Notice the
poor focus and "carnival mirror" appearance of the bottom picture. |
 |
|
Focus - Depth of Field |
 |
With a point and shoot camera with auto-focus only,
attaining focus can be tricky. Try holding the camera close to the
glass, if that does not work, then try standing back and zooming in.
Having a manual focus is very useful when working with a short depth of
field. Otherwise the main subject matter may be out of focus. |
 |
|
Focus - Small Objects |
| 
|
Next, attaining focus on small objects is easiest
accomplished in manual focus mode. Also, many cameras have a “flower”
mode or some type of macro setting that will automatically adjust the
camera settings to properly take close-up shots. With larger, full
control cameras the focus is usually not a problem as manual focus
removes this difficulty. If you find it difficult to find a perfect
focus, try zooming in to your subject, then slowly rocking back and
forth until you achieve focus. Larger cameras also offer the advantages
of interchangeable lenses to provide better optics for close range
(although admittedly a pricey solution). For larger cameras with
interchangeable lenses, you can also get relatively cheap extension
tubes and close-up lenses that will allow you to increase the
magnification of your setup. Just remember that putting additional glass
between the camera and the subject will potentially decrease the quality
of the photo. |
|
|
 |
|
Clean Glass |
 |
Remember to clean the aquarium glass (or acrylic). It may not look
bad to you, but once a picture is taken and you zoom in it will
certainly be noticeable. Shown here are Blundell Buttons, although they
are difficult to make out behind that dirty glass! |
Tricks of the Trade
Okay, so you’ve practiced taking
pictures for a while now but still can’t get those professional pictures.
If you aren't up to purchasing a high grade camera, another trick of the
trade is available if you are shooting digital pictures. Actually it would
work with film cameras but would be quite costly. What we are talking
about here is simply taking a lot of pictures at different camera settings.
When we say a lot, we mean that for an article like this, showing around 30
pictures, the authors may take 400 pictures. By taking multiple shots at
different shutter speeds, aperture settings, and white balance settings, you
will be able to find the shot that most accurately depicts the subject.
Digital photography also affords the opportunity to "fix" otherwise less than
perfect picures
Advanced Techniques - Digital Manipulation
|
Digital Manipulation - The Good |
 |
Learn to use the crop tool. Often times you can not zoom
in or get close enough to take a picture of that small item. Try
shooting the picture at high resolution from far away, and cropping the
picture. Now you can enlarge the picture (obviously loosing quality)
and be able to show that item. Computer programs can also be of great
help in aquarium photographs. |
 |
Subject Matter
This topic is important enough that the authors decided to give it its own
category. Most photographs that are being taken by hobbyists are not
intended to be artistic nor well designed. It is in no way the authors’
intent to discourage creative works, but this paragraph is merely intended to
help the average hobbyist. Wet Web Media as well as many other website
receive daily emails requesting identification of a very small sessile
invertebrate. It is important when taking such photographs to make sure
the subject matter or animal in question is filling as much of the picture as
possible. Please remember, a clearly focused close up picture is a wonderful
thing to see. If you need to, take the picture on a high setting from far
away, and then crop the picture to the subject matter. This will of course
lose clarity, but as will be discussed below pictures are cut in size before
posting anyway.
Photography Etiquette
When working with aquarium photography there are some etiquette rules or
guidelines worth mentioning. The first guideline was already mentioned.
That is, the photographs you take and share should be as close to portraying the
actual item. In other words, it would be deceitful to take a picture and
alter it to look different from the real image. This is a growing trend
which needs to be curbed.
  |
|
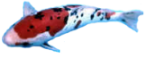
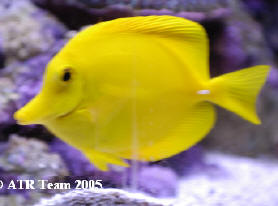
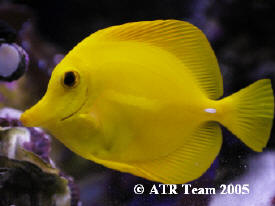
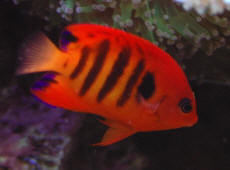
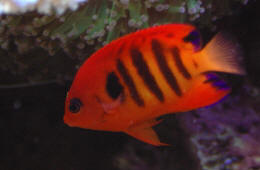
Photos of fishes should always display
the left side of the fish. The picture on the left is the
original, and the picture on the right is the same picture which has
been digitally "flipped". This technique is acceptable as long as
the fish is symmetrical and that nothing in the picture belies the
"trick" (like text). |
A second guideline for taking
aquarium pictures deals specifically with taking pictures of fishes. When
displaying a picture of a fish it is proper to take a picture of the left side
of the fish. In other words, the fish is facing left. This isn’t
always possible, and in general a picture of a fish facing right can be flipped
and mirror image is used. There are of course exceptions to this rule
including: never flip a picture that has a human in the photo, never flip a
picture of a non-bilaterally symmetric fish (i.e. flounders), and internal
dissection pictures are taken on the right sides of the fishes.
A third guideline for taking aquarium photographs is adjusting the file size.
It is always best to take pictures in the highest setting/best quality possible.
After such pictures are taken they can be manipulated for color and cropped for
subject matter. Then remember what you are doing with these pictures.
If they are to be printed in a large size than it is certainly best to keep them
in their large format. If the pictures are to be emailed or used for
online posting, then it is best to shrink them down. Wet Web Media and
many other websites prefer photographs sent with approximately 150 pixels in
width. [Editors note: Most folks (us included) who
plan on reproducing submitted photos online prefer digital photos that have been
cropped for subject matter, but that have not been shrunk or resized.
This ensures maximum quality of the final image once it has been placed online.]
Conclusion
There are some tips and tricks that
can be used by anyone to obtain better aquarium photographs. Additionally
some items are just purchased (more advanced cameras, computer software).
It is important to ask yourself what you wish to get from your pictures, and how
much time and money you are willing to invest to get them. Lastly, it is
always a good idea to have a spare set of batteries and extra film or memory
cards on hand at all times. You never know when you will get an opportunity to
take a bunch of photographs only to realize your batteries are dead or you are
out of film.
Acknowledgements
Many thanks are owed to the home
owners who allowed the authors to visit and photograph their systems. We
would also like to thank the editorial staff of Conscientious Aquarist
for their support of this article.
Author Information
This article was researched and
written by The Aquatic & Terrestrial Research Team members Adam Blundell and
Shane Silcox. Adam and Shane are aquarium hobbyists who are happy to
contribute to the aquarium hobby. Adam can be found at wetwebmedia.com and
Shane can be found at
www.utahreefs.com.
Input and suggestions are always welcomed.