|
|
Another Perspective on Your
Pond
|
By J. Maxwell Smith
|
Would you like to get pictures like these of your own pond? Record your
pets’ markings for posterity? Or just visit their world?
Equipment
Chances are you have all of the equipment you need:
A camera
A clean, dry aquarium (glass aquaria are more transparent than plastic
ones, resulting in brighter, clearer images)
Ballast
Optional extras
Remote shutter release (my camera doesn’t accommodate one)
Small mirror mounted at an angle so you can see a little better where
you’re shooting (there are many ways to fashion the mounts, I simply cut
diagonal grooves in blocks of wood)
Autofocus
Method
Aquariums are fragile, so be careful when assembling your photography rig.
First, place the empty aquarium in your pond, and then carefully load
the ballast sufficiently that the aquarium sinks about halfway down. The
aim is to have the aquarium low enough under water that the camera will
be below the waterline, but the top of the aquarium remains high enough
above the waterline that the camera stays dry. With the aquarium
adequately ballasted, put the camera in the aquarium with the lens flat
against the glass.
You can use many different things for ballast; I used pavers (patio
bricks) but bags containing sand, stone, or pea gravel would do the job.
Be sure to bag whatever you use. Use several bags for ease of loading
and adjusting, and keep the bags clean, so you don’t scratch your
aquarium.
The amount of ballast you need depends on the size of your aquarium.
Water weighs 8.34 lb per gallon (1 kg per litre) so if you know the
capacity of your aquarium, you can estimate how much ballast you’ll need
to sink it. In other words, a 10-gallon aquarium will need about 83 lb
of ballast to sink completely, but we only want our aquarium to sink
halfway, so about half that amount of ballast should do the job.
Obviously you should practice this without the camera!
Aim to get the tank floating high enough for safety so that your camera
doesn’t get wet if water splashes about. Move the ballast about in the
tank so that it is evenly distributed; this will make it easier to keep
the rig steady and to tilt it up or down slightly when required.
When you’re finished, carefully reverse the procedure to remove the tank
from the water: take out the camera first, then the ballast; and the
empty tank last of all.
Light
Light causes a variety of problems. Ambient light can makes it difficult
to see the viewfinder display at the back of the camera. You could
fabricate a shield for your viewfinder, or move the mirror about a bit
so that it catches less light. But may I suggest you keep it simple?
Just shoot. At least with digital cameras, that’s best. Shoot a lot.
Fill your memory, dump it onto another media, and shoot some more.
Sooner or later you’ll get good images worth keeping, and the rest you
can throw away.
On the other hand, if there isn’t enough natural light your photographs
will be too dim. You’ll get the best results at midday, when the
overhead light is strongest. You can also get good shots at night as
well if your water is very clear and you have underwater floodlights.
Suspended matter in the water will be catch and scatter the light from
the flash. For best results, wait for the water to cool and the fish to
quiet before using the flash. The same applies to long exposures, where
suspended matter will streak across the image in a very annoying way.
Yet more fun
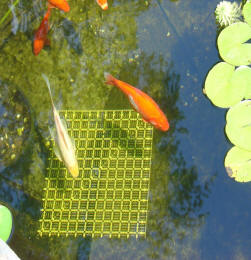
You can use an Omnigrid placed in the pond to provide you with a way to
measure the length of your fish photographically. An Omnigrid is a tool
quilters and sewers use. The fish doesn't have to line up with the grid;
it just needs to be in the same photo, and square to the camera. Place a
piece of paper over the monitor and mark the fish's length, then line
that up with the grid. More accurate measurement is derived from the
fish's shadow, eliminating perspective error
One last word (okay, six): Wait until you see your movies!
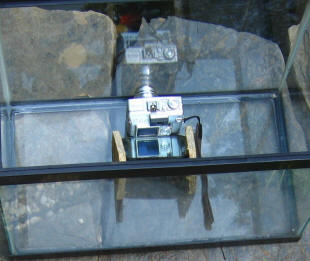
- On rig the mirror is held in place behind my camera by a couple of
pieces of wood, making it possible to view the display at the back of
the camera without difficulty
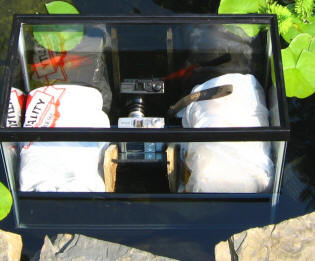
- Another view of the rig, this time with the ballast in place and
with the camera below the waterline
- An Omnigrid placed in the pond provides you with a way to measure
your fish photographically
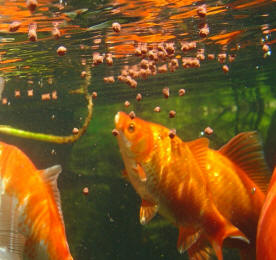
- Initially my fish were alarmed by the aquarium, but after throwing
them some food they quickly got over their shyness
- The central portion of my pond is about 7 feet in diameter and 3
feet deep
- For my pond fish portraits, I use a Sony Cyber-Shot DSC V-1 in a
10-gallon tank
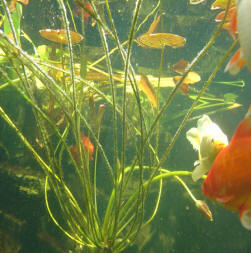
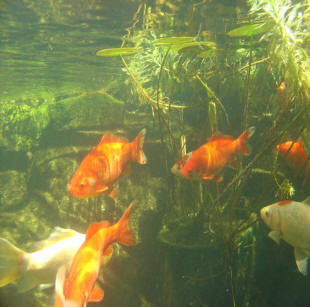
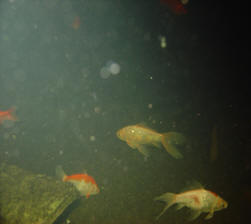
- Even pond plants take on a magical new appearance when viewed from
underwater
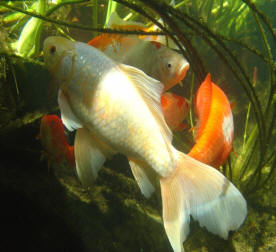
- Who needs to go diving on a reef to see beautiful fish in their
natural habitat?
- Strong midday light works best by illuminating the pond from above
|
|