FAQs About
Sump/Filters Design/Engineering 11
Related FAQs: Sump Design
1, Sump Design 2, Sump Design 3, Sump Design 4, Sump Design 5 Sump Design 6 Sump
Design 7, Sump Design 8, Sump Design 9, Sump
Design 10, & Sumps/Filters
1, Sumps/Filters 2, Sumps 3, Sumps
4, Sumps 5, Sumps 6, Sumps
7, Sumps 8, Sumps 9, Sumps
10, Rationale, Construction, Sump Components, Pumps/Circulation, Maintenance, Refugiums, Plenums in Reef Filtration, Marine System Plumbing,
Holes & Drilling
1, Durso Standpipes, Overflow Boxes, Bubble Trouble, Plumbing Noise, Make Up Water Systems,
Marine Aquarium
Set-Up, Algal Filtration in
General, Mud Filtration
1,
Related Articles: Pressure Locking Sump
Baffles; Welcome to the World of Versatility! By Joshua
McMillen, Refugiums, Marine Filtration,
Reef Filtration, Mechanical, Physical, Marine
System Plumbing, Fish-Only Marine
Set-up, FOWLR/Fish and Invertebrate Systems,
Reef Systems, Coldwater Systems, Small
Systems, Large Systems,
Refugiums,
|
|
Drilling glass sump in back; placement of skimmer /RMF
3/14/20
Hi crew!
<Hey Charles>
I’m making a sump out of a 135 gallon oceanic aquarium. I’ve drilled
one of the short sides for 2, 1.5” bulkheads. I need to drill
another hole for a 1.5” bulkhead, but there isn’t enough room on the
end for one. I was planning to drill the back pane of the aquarium,
near the bottom corner, for this bulkhead. Is that ok to do?
<Should be... take your time, low pressure...>
This bulkhead will be for the skimmer pump for my external skimmer.
I was planning to put it in the pump return section of the sump.
Should I instead move it to one of the other constant water height
sections?
<I might well do this; even consider buying an in-sump model>
So it would still be in the back pane near the bottom, but farther
from the edge of the pane. Would this still be ok for the aquarium?
<Yes; there is only a small difference in "cleanliness"
(skimmability?) of the water depending on which end of a sump system
the skimmer is located>
Thanks for your help,
-Charles
<Cheers! Bob Fenner>
Drilling glass sump in back /Wil
3/14/20
Hi crew!
<Hi Charles>
I’m making a sump out of a 135-gallon oceanic aquarium. I’ve drilled
one of the short sides for 2, 1.5” bulkheads. I need to drill
another hole for a 1.5” bulkhead, but there isn’t enough room on the
end for one. I was planning to drill the back pane of the aquarium,
near the bottom corner,
for this bulkhead. Is that ok to do?
<Yes, I don’t see a problem as long as you leave enough space from
the edge of the glass>
This bulkhead will be for the skimmer pump for my external skimmer.
<My first thought is; get an internal skimmer instead, but since you
already have the external unit…>
I was planning to put it in the pump return section of the sump.
Should I instead move it to one of the other constant water height
sections? So it would still be in the back pane near the bottom, but
farther from the edge of the pane. Would this still be ok for the
aquarium?
<Personally, I prefer to place the skimmer in the first or second
section, just after the sump inlet/drain discharge, but it should be
ok on either section.>
Thanks for your help,
-Charles
<You’re welcome- Wil.>
Sump modification -Segregation of chambers
11/6/19
Begin forwarded
> Dear Team
> Have been pondering on an idea for which I could not find any good
reference or advice.
<Oh?>
> It’s almost a norm now for me to first check you’ll before
experimenting on any adhoc idea I get.
> My current idea is segregation of the sump chambers
> Currently for my 16 inch nano cube, I am running a sump 30 x 12 X 15
(LxWxH).
> The flow is as follows :
> Drain form display to the Skimmer chamber > Microalgae> DSB> return
pump chamber
<Okay>
> Generally , in any sump, we have different chambers and the flow is
decided by the height of baffles fixed with the sump. In these, my
experience is
> 1.Cleaning becomes a bit difficult considering the limited space.
> 2.any modifications becomes very difficult and space constraints for
addition of any equipment again becomes an issue in case some of the
equipment needs to be shifted within the sump chambers
<Yes on both counts>
> I Was thinking on terms to segregate each of the chambers and have the
flow in the same sequence. Such, there would be 4 individual small
aquariums/cases with different heights of water levels ( the individual
chamber could be lifted from base on a stand to acquire the desired
height for the flow) . Each one would receive input from any one of the
sump/tank.
<... how would this sharing, movement of water be accomplished? Herein
lies danger... SHOULD there be an interruption of flow, the chamber/s
ahead will overflow onto the floor>
The drain pipe in each tank would be attached on one side and would
freely fall in the other tank/sump. The input pipe would not be fixed to
the other tank.
<What if something should occlude, plug the interconnecting pipe?>
> The idea is that I could remove any one chamber and yet have the
systems connected to run ( by manual adjustment to the existing tanks).
<A neat idea>
> Cleaning, re-fixing, discarding, etc would be easy as the tank, once
detached, may be taken to a convenient space for the maintenance before
fixing it back to the system as required.
<I see>
> Need your views. It would be better if you can tell me any
disadvantages of tis system apart for a bit more space and cost involved
as compared to the traditional style sumps.
<The main danger is the possibility of flooding as mentioned;
secondarily, the cost for separate containers, more plumbing, space
taken up by container walls, gaps...>
> Warm Regards,
> Srinivas Manian
<Worth investigating, trying. Bob Fenner>
Drilling glass center brace (of a sump)
8/15/19
Good evening Crew!
<Hey Charles>
I'm in the planning stages for my dream aquarium (250-350 gallon
display), and I would very much appreciate some advice on my sump plans.
<Okay>
The sump will be located in a fish room in my basement (unfortunately at
the other end of the house, but it can't all be easy). I'll be using an
old Oceanic 150 gallon aquarium as my sump. This has a hefty glass
center brace. Would it be ok for me to drill this center brace and have
my overflow lines from the display run into this? 150 gallon tank (sump)
details: ~72" L x 18" W x 28" H Center brace - 17 7/8" long. Didn't
measure the glass thickness (3/8-1/2"?) Seems quite solid I'm planning
to have a total of 3 lines from the display (Bean Animal style
overflow), each being 2-inch flexible PVC. So I'd be looking to drill 3
x 3" holes in the center glass brace for the lines, likely all in a row
from front to back. Will this compromise the structure of this tank????
If so, could I just put 1 or two of these lines through the brace?
Since the 3rd is strictly an emergency overflow line, it could be placed
in a different location. Based on my initial calculations for water in
the lines and drain-down from the display, the sump would normally
operate about 3/4 full (waterline ~6" from the top of the tank, with a
little safety margin).
<Unless you silicon baffles near the center, which would add additional
strength, do not drill the center brace, you could compromise the safety
of the tank. Even though you intend to fill it only to 3/4, it may not
be safe enough, you also have to think that in an eventual blackout, the
level would rise and add more pressure, why don't you put the drains on
one of the sides?>
Many thanks for your advice on this and throughout your website!
-Charles
<You’re Welcome, Charles. Wil.>
Marine aquarium Sump question
7/14/19
Hi team
Glad you’ll are here
<Hi Srinivas>
Just needed a confirmation.
<Ok>
Based on your recommendations, I have modified my sump used for my 16”
cube. The flow sequence is as under
Display > skimmer > micro algae > DSB> return pump
<It is right>
Is there any issue in keeping a couple of live rocks in the skimmer
chamber? My display cannot hold them
<You can place them in the skimmer chamber, the only problem would be if
the rocks lose some fragments and these get stuck in the skimmer pump
intake. Wil.>
Sump question 7/9/19
Dear Crew
<Hey Srinivas>
For my 16" x16" nano display, I helped myself with a sump system to
increase the overall volume.
Was modifying my existing sump to make way for my chiller pump and free
the skimmer which seemed to be stuck ( had issues in cleaning the same).
I had a three chamber (nano)sump with the following :
* Chamber 1: Drain/Inlet from Display and live rocks
* Chamber 2: DSB and Chaetomorpha ( a very small bunch)
* Chamber 3: Return pump and Skimmer
<I’d place the skimmer in the first chamber>
The current flow is in that order : Display => Live rock => DSB/Chaeto
=> return chamber
Am adding an extra chamber and moving the skimmer out. That gives me
space in the third chamber which would be utilized for the chiller pump
and reactors if I use any in future.
<Good>
Am also looking forward remove/replace some live rock from the first
chamber and add the Chaeto in that. This is with the view that I would
be able to monitor the DSB better.
The proposed flow would be : : Display =>Skimmer => Some live rock and
Chaeto => DSB => return chamber
<Much better>
Please assist with your views on:
1. Can I keep couple of rocks and Chaeto together ?
<I’d place the Chaeto alone in a separate chamber... better if you could
make it tumble with a small power head.>
2. Will the above proposed flow be Ok?
<Yep, it will work fine.>
PS: the current bio-load in insignificant. But am planning a reef set-up
with softies
<It’s always better to plan ahead.>
Warm Regards,
Srinivas Manian
<Cheers. Wil.>
Re: Sump question 7/10/19
Thank you so much Wil
<Glad to help, Srinivas. Wil.>
|
Large system sump remodel 1/10/17
Ok, I’m looking for plumbing suggestions on a large system and I’m hoping you
can help. I have a 220 gal (72”x 24”x 28”) mixed reef tank in my living room
sitting on a stand with 26” interior headroom
<Thank goodness>
and I’m really struggling to work on anything down in the stand.
<Due to space constraint?>
The sump is an Oceanic #3 (50gallon breeder) and the 19.5” sides make access
difficult. I’d like to expand the sump, which right now is acting as just a
refugium,
<I do want to mention; that looking at your photo, I WOULD raise the refugium
walls here; to give more volume, allow deepening of the DSB here, more algal
culture space>
and I need to upgrade the protein skimmer. Below are the solutions I’m currently
considering:
1) Just seal the inside base of the stand with 3/8” acrylic sheet to make a 12”
or 15” tall sump, expanding my surface area and improving access.
<Interesting approach; worth considering. Would you have to take the tank down,
insert the new sump from the top of the stand? Seems so>
However, the more I look at upgrading the protein skimmer, the harder it is to
find a good one that will fit in the 26” with enough room to maintain it.
<You are wise, maybe just experienced (ha!) to consider this...>
I would also like to add an algae scrubber and a few more tools and I worry I
just won’t have enough room.
<I myself would definitely leave a good 10-12 inches open space twixt the top of
the sump/refugium and stand to get in/out work on/in it>
2) I have a basement and could place my filtration there.
<Ahh! Perhaps a large... Rubbermaid tote here!>
I am looking at upgrading my return pump anyway (currently a Mag 18 running
externally), and I like the idea of being able to stand up while
cleaning/maintaining, as well as the room to expand the sump, get whatever size
protein skimmer I want, and incorporate an algae scrubber and a bunch of other
improvements.
<Me too. Well worth the extra cost in electricity>
This would also give me a place for some of the DIY I’d like to try without
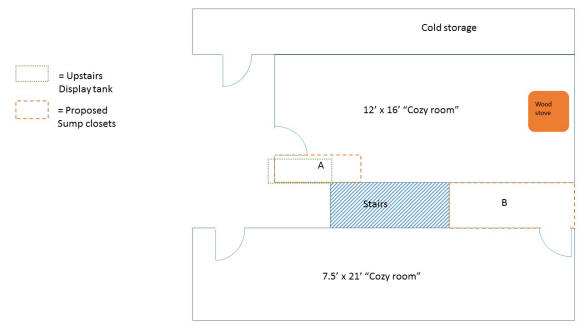
bothering the cosmetics. However, directly below the tank is our “cozy room”…a
10’x15’ room built around a wood burning stove and the room routinely gets up to
150° F.
<?! Yikes; really? >
I could build in a small ‘closet’ (“Closet A”: see diagram) and insulate it but
I worry I’ll be continuously fighting the temps…
<Mmm, I see the space to the hallway/stairs in your excellent diagram... and
would build passive or active (muffin fans) air circulation there through in and
out vents>
and I’m not sure my dear wife will go for the idea.
<Well; not able to help much t/here... Perhaps suggesting a trade off...
something she'd like in the way of home improvement... Maybe even unrelated; a
trip to the Bahamas?>
I have a 7’x17’ work room nearby which is kept at 78° F that houses my reptile
collection, and it has an unused closet 'cubby’ beneath the stairs (“Closet B”:
see diagram), but that would put the sump 11’ below and 17’ away from the
display, which seems like a long run with quite a few 90° elbows required, not
to mention the holes in floor and walls. This also seems like the more expensive
option and cost is king.
<I'd go with choice A myself; with the walled insulation you mention and the air
venting I do. Bob Fenner>
|
 |
|
DSB Transition 12/5/16
Aloha Bob, I followed your tip and remove all the black cinders from the first
stage of my sump.
<Good>
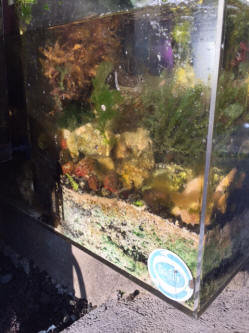
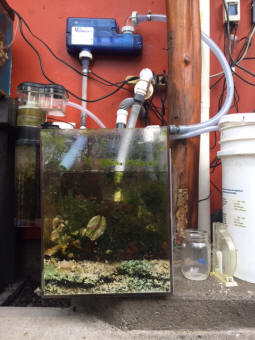
Together with installing a GFO reactor I have gotten the phosphates down from 5
to <.25. Here's a pic of my DT, which I may keep shallow and vacuumed then
install a DSB remotely.
<Very good>
Do you like the idea of a giant Rubbermaid tub DSB\Refugium as part of this
system.
<Yes I do. These are MIGHTY fine products... sturdy, easy to modify, chemically
inert... and cheap per volume>
Looks like Cyano keeps creeping in .
<Time going by here... Patience!>
Still no coralline with 12KDH. Using RI water now with lots of water changes.
Only has come down from 14- high KDH is still a mystery.
<Time here as well>
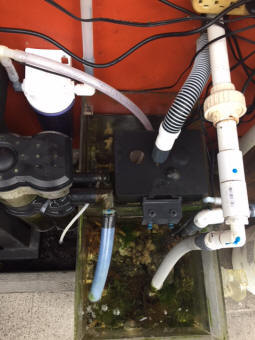
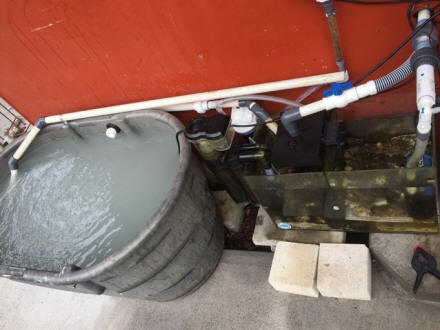
I plan to add a few inches to my sump, regardless. In the next image you can see
my current second chamber of my outdoor sump. There are some layers of cinders
in there and lots of life.
<I see>
My main question is do I remove all that sand pictures in my sump, since it may
have trapped phosphates- then leave a little bit to re-seed the coral sand? Or
do you feel it's safe to just place new sand atop this and not stir things up
too much?
<The latter is the route I'd go>
Keep in mind I have plenty of room outside to plumb in a new sump or remote DSB.
Would you replace the 20gal sump with a 36-90 since I have the room?
My DT is 100g. Mahaloz!
<I would ALWAYS make sumps, refugiums, DSBs... As LARGE as possible>
Sky Kubby
<Bob Kubby>
|
 |
|
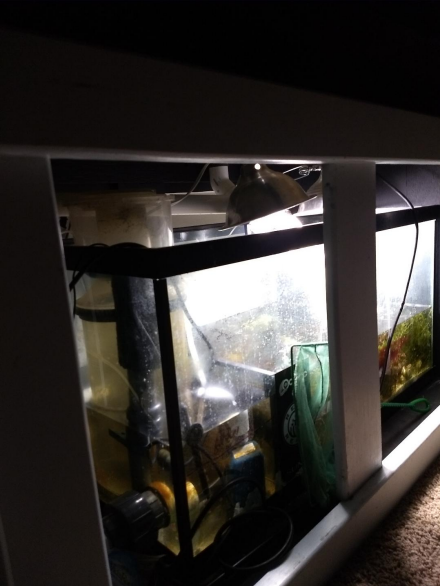
Too view of sump. 12/5/16
This goes with my last two emails for perspective....
<Ok>
Sky Kubby
|
 |
|
DSB replacement cont... 12/5/16
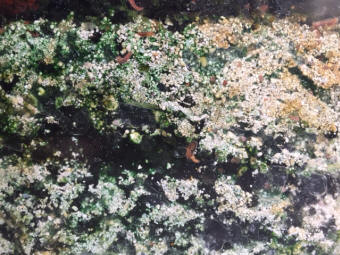
Here's a couple more follow up pics show the close up of the layer of black
cinders in the sand bed. Remove or safe to cover with more sand?
<Safe to cover>
Also note the precarious positioning of my sump on the ledge. This is why
I'm thinking of replacing it with a long larger sup against the back with a
proper base. Do you agree or think this will suffice? Thanks!
<I'd replace w/ larger w/ proper base for sure. BK>
Sky Kubby
|
|
|
Re: DSB Transition 12/5/16
Perfect, thanks! Since I’m solar powered I’m going to gravity drain from
this sump into the RubberMaid via a 2” pipe, or something, so as not to add
an extra pump and possible failing system.
<You are wise here>
Or better yet, use this sump inside the (250g?) RubberMaid, as a pump return
chamber! ;-)
<!>
By the way I see you replied Bob Kubby. Is this a typo, or a long-lost
relative!? LOL!
<Just pulling your fins, BobF>
In Radiant Health,
Sky Kubby
|
HI Solar Powered Aquarium: RDSB
12/7/16
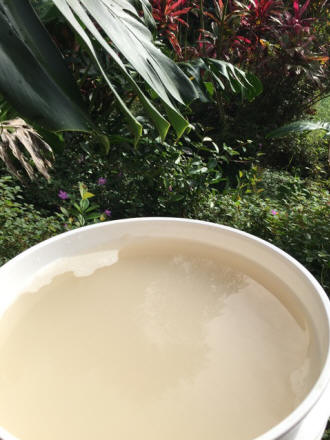
Bob, here's a pic of the washed crushed coral sand. Are you sure you'd still
recommend this stuff after see the grain size? I bought a bunch of bags of
this stuff.
<Yes I would; and good pix>
After reading so much more I am surprised how many people say Crushed coral
sand will be a detritus trap and how many people have taken their systems
down after installing such a bed.
<Mmm; yeah; well... all systems require "some" maintenance; and such beds
REALLY s/b periodically (partially; like half each interval) "stirred"
(shades of James Bond!), and/or vacuumed>
I could see however that the superfine particles in this cc sand would be
perfect and probably settle to the bottom. Then the life in the sand would
eat up the detritus, right?
<Yes; most all... depending on... foods used and amounts, circulation,
relative amount of bed, biomass... You and I could formulate a model
describing eh?>
I plan to have the DT drain directly into the far end of the Rubbermaid tub.
Then gravity drain into my sump via a 1 1/2" pipe for a clean return.
<I'd use a 2" ID, likely two such pipes...>
My total system now is about 150 watts. So it will be slow flow in the DSB.
Here's almost what it will look:
<Nice>
Except the sump will be turned facing the wall. Am I on the right track
here?
<Appears so>
I'm going to get bulkheads and other fittings to connect the sump and
Rubbermaid now.
<Schedule 40 will be fine. No need for the extra expense of 80>
Have it drain over or drill both containers?
<Either... if there's gravity, drop distance the former>
I've read a lot and this is the best I could come up with. Any ideas on how
to make no bettah?
<Not so far... just waking here though!>
MAHALO!!
<Por nada amigo. BobF>
Sky Kubby
|
.JPG)
.JPG) .JPG)
|
Re: HI Solar Powered Aquarium: RDSB. Sump des; substrate/DSBs f's
12/9/16
Bob, in reference to my Rubbermaid RDSB and 20g. sump, you said:
<Either... if there's gravity, drop distance the former>
Jut to be clear- that would mean the Rubbermaid! I was planning the water
entering the DSB then gravity feeding into the sump, this dropping the sump
level, not the RubberMaid.
<Okay... >
Are you suggesting I plumb it the other way around? I didn’t want to suck sand
into my DT.
<No; what you have in mind is fine>
Also, the test washing of the sand seems futile- it’s like 20-30 washes in a 5
gal bucket (1 bag of sand) seems to still be producing a never-ending supply of
murky tan sediment.
<Likely dissolving as you go. What you've sent as a photo is fine. I'd rinse,
swirl 5-10 lb.s at a time... rinse maybe a dozen times per batch... This too
will clear>
Even settling overnight, it’s still cloudy. Do I want to keep some of these
fines and let it settle on the bed- almost like mud?
<Yes>
It will be low flow in there so I could see that possibly working.
<Good>
I read where you said to wash another substrate in 5# increments, I think. Is it
better to wash this stuff like that, or all at once in the RubberMaid tub?
<The first here>
For the latter, give as good of rinse as possible in the RubberMaid all-at-once,
then let it sit?
<Yes>
What about using some of those packets for clarifying the water that came in a
couple bags of CaribSea sand I got?
<Mmm; you could>
The CaribSea I got for my DT was “Supernatural”, was really fine (maybe
.25-.50mm). It doesn’t say on the bag or on the site whether it is silica-based
or not. But it “ seems” like tiny white crystals. So did I blow it if it is
silica based?
<Not necessarily... at least if "some" of the material you're using is
carbonaceous... the "cinders" are practically all silicate>
Here’s the link at Petco:
http://www.petco.com/shop/en/petcostore/product/caribsea-super-naturals-aquarium-sand
<http://www.petco.com/shop/en/petcostore/product/caribsea-super-naturals-aquarium-sand>
It stays on the bottom of my DT but the powerhead, if misdirected blows it
everywhere. It does make a good mat and all detritus stays on top.
<No worries, redirect powerhead/s, pumps, discharges to blow horizontally along
the surface; just below water level>
All good to put some of this crushed coral sand atop that to bring my DT sand
bed up to “Deep” levels and keep it from stirring up too much?
<Sure; though it will be mixed in a few days, weeks... w/ coating by biofilm/s
et al., most all will settle down. You'll see>
Or would that just be a detritus trap like everyone says? I know we’ve been over
this before and as you say it will probably all mix together anyway but just
want to make sure in this unique situation.
<You're obsessing....>
Here’s a pic of the CaribSea sand in action, and, at the end, the coral sand
after about an hour of washing LOL!:
Some friends gave me some frags finally- yay!
You can see a pile of sand excavated by a common local crab. I need to get him
out if I want to have a DSB in here, right!? Mahaloz!
<The crab will be fine... good to have some digging, tunneling here>
In Radiant Health,
Sky Kubby
<And you, Bob Fenner>
|
 |
|
|
Re: HI Solar Powered Aquarium: RDSB
12/11/16
I'll hunt Pimpled Basked Snails in sandy tide pool areas with some meat. In
"Hawaii Sea Creatures" (Hoover) it says they can kill small crabs and shrimp.
But my coral banded shrimp should be good, right?
<Yes>
Drupes seem too predatory. If I can't find snails for my DSB am I doomed?
<Not doomed... worms, small crustaceans and much more can/will come to "do the
job">
I'll keep the sea stars to the sump for detritus and remove the DSB in the sump
to inoculate the Rubbermaid DSB.
<Ok>
I just added more crushed coral sand to my DT. Yes it's clearing up nice and
fast with the bio-magnet clarifier but I have to say some of the sand chunks do
seem rather large, like 1/4".
<Fine>
An old aquarium friend told me different sized substrate is good for growing
different types of life.
<This is so>
I'm confuse why so much info in the DSB FAQs say only to use fine sand.
<Non-divers, non-studiers of bio.... perhaps sellers or stock holders of fine
sand companies!>
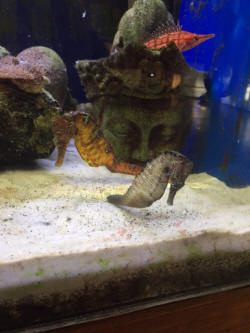
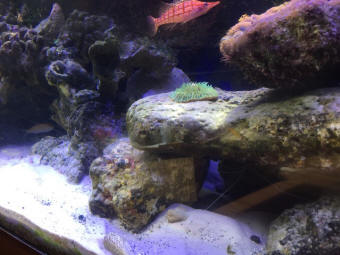
I just stirred the front of my glass to make it look nicer i.e., different
levels of sand and colors of algae. See pic.
<Nice>
Is this good practice, say quarterly?
<Monthly>
Before:
After
I'll substitute the basaltic non-porous rocks for my calcium-based rocks when
they're done curing. But are they worth keeping in my RDSB?
<Worth keeping>
Or just get rid of them? The do make good platforms to build aquascaping
upon....
Lastly, about that crab... He's a common rock crab with black pincher tips. I'm
finding pieces of bristle worms everywhere and think he's pinching them in half.
Would this be grounds for expulsion?
<Close to it>
It seemed to coincide with when I added sand. I kept finding dead worms. Maybe
the layer of sand just killed them?
<Likely a contributing factor... the crab will not be able to find, consume all>
Mahalo.
<A hu'i hou! BobF>
|
.JPG)
.JPG) |
|
Re: HI Solar Powered Aquarium: RDSB
12/11/16
I may not have mentioned that the drain line to the Rubbermaid from my DT is
only 1”.
<Mmm; I don't think so; or at least very much hope I didn't miss this. "It"
won't work... >
Do you still recommend that the overflow from the Rubbermaid to the sump be dual
2” bulkhead to bulkhead? Or will dual 1” suffice?
<It will not. PLEASE READ here:
http://www.wetwebmedia.com/SystemPIX/PlumbingPix/Oneinchart.htm
and the linked files above... incl. the FAQs files, detailing the trials,
travails of folks who've had too few, too small drain lines. I'd have two-two
inch at a minimum>
Also, there’s a layer of sediment on everything in the DT now that the sand
settled that won’t blow away swishing my hand over it. I brushed lightly-
hopefully goes away over time. It’s really clinging to the hair algae making it
more pronounced, though. Do you want to shy away from completely scrubbing live
rock? Of is this a case that may call for it?
In Gratitude,
<I'd lightly vacuum it away; a bit every week. B>
Sky Kubby
Re: HI Solar Powered Aquarium: RDSB
12/12/16
Sure enough, as the article stated, I just calculated my flow through my 1” pipe
to be 300gph. I did this by the container filling method. However I’m not
experiencing the issues outlined in the link you gave me. Yes, I have a lot of
noise coming from my overflow box but it’s not because the water line is rising
above the box, or creating siphoning issues. The noise is because the water
falls so far. It flows in flex tubing out that wall and into the sump. So it
seems I don’t have an issue with restricted flow out. Perhaps that will change
when I run the outflow the length of the RubberMaid to dump in at the far left
side.
<Sky; mate... When, not IF this one inch line become occluded... a snail, some
gravel... Do NOT trust this line>
I’m not sure what you meant by:
"<"It" won't work... > "
The RubberMaid RDSB addition or my whole system?
<The plumbing here. PLEASE send along a diagram of your whole system.
The going back and forth with bits/pieces is very easy for me to make mistakes
here>
If I’m just having softies and want minimum wattage from a return pump so as to
not tax my solar system, will the 300gph flow suffice?
<For how large a system? I'd have several volumes changed/recirculated per hour>
Or do you just mean that to you mean to have 2” overflows from the Rubbermaid to
the sump won’t work.
>.... ALL through-puts should be over-sized and redundant<
Is the idea to keep it uniform diameter throughout? Since I have 1” pipe, I
thought I’d be able to proceed with two 1” bulkheads from the RubberMaid to the
sump. Or do I really need to I re-plumb the stock fitting that came with my 100g
tank to 2” for my RDSB to “work”.
<ALL TWO INCH is the route I'd go>
The other issue is that I probably cannot fit two 2” bulkheads on the far side
of my sump which is the curved part.
<Use the flush area of the Rubbermaid>
Maybe one with silicone. I understand the need for redundancy with the second
bulkhead. The RubberMaid tub needs to be pushed up flush with the house to
provide room to walk on the sidewalk around it. This kind of eliminates the
bulkheads to go where they are supposed to (on the flat front and back sides).
<I'd sacrifice the sidewalk space>
I was hoping to plumb from the far R side, opposite to where the inflow would be
on the L, to create a flow of current accrues the DSB.
<..... this makes no sense. Id est, I have no idea what you're referring to>B
Maybe I shouldn’t be hung up on this though the concept makes sense. I can
re-plumb with 2” for better flow, but I wanted to make sure we were on the same
page as I’m not shooting for growing SPS in high flow system. Of course, that
would be cool if you think I could still manage with my little LEDs and
supplemental natural sunlight.
Of course in the Rubbermaid is a different story. It get Full sunlight so I
could probably grow some SPS there. But we already talked about this and you
said it would be good as low flow. Tanks.
In Radiant Health,
Sky Kubby
|
|
Remote DSB About to Integrate! 12/23/16
Aloha Bob and Crew, Here’s the final plumbing on my remote DSB, and hopefully my
final questions:
1. I’m waiting for the water cloudiness to go away and I will hook up the line
where the blue shut-ff valve is. Better to T the valve if I need to remove the
RDSB for any reason, diverting the flow directly to the sump?
<.... Sky, mate... I've asked you to make, send along a diagram... I really
can't tell clearly from your pix OR descriptions what you're referring to. I do
agree however with plumbing that allows turning off elements, isolating them>
2. I only have one drain now, gravity feeding into the sump (below the long
pipe). I will add another as you recommended. Is there anything else I should do
before adding this to my display loop? Besides water parameters being the same?
<... can't tell from here, this>
I got some Ogo Limu and put it in a sump. It was from the store. Is it dead or
will it grow?
<Hopefully the latter!>
If not, I contacted NELHA but they didn’t know Gerald. Do you have a direct
contact?
<It's been years... Heslinga doesn't deal much with the public; but he has a
website: IPSF.com (I better check this; yeah, it's good) Would be GREAT if he
had more liking for visits; for you to get on by there at NELHA and have a chat>
My Live Rock is almost done curing. I cured in full light for part of the day,
like you suggested and it definitely grew algae. Can I give it a good scrub
before I put it in the display or will it kill off too much bacteria?
<I'd leave the algae on it>
Looping back to my RDSB question: Since the sump will be in full sun for part of
the day (when it’s not raining) I could have some major temp swings. Do I need
to be worried about this? Am I going to need a shade cloth over it?
<I would definitely shade it; maybe even from the rain... temp. wise, August and
September can be brutal on the W. side, even at moderate elevation>
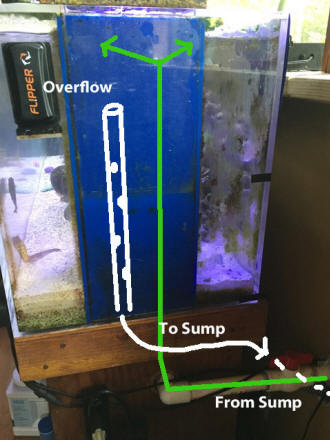
Finally, here’s some pics of my overflow system so you can see how the whole
system is plumbed. These two pipes flow in and out of the two pipes coming out
of the wall in the first pic.
<? Can't make out>
The floss, I just re-added because I couldn’t get rid of the gurgling noise
without it. Change that out monthly, you think?
<As frequently as it's dirty... maybe every week... better to get/use sections
of foam that you can rinse, dry, re-use>
I also have a sponge filter in there next to the overflow box which was sold to
me by the same guy who suggested I use cinders in my sump. I don’t see too many
reefers using those- is it time to let that one go?
<I would hold onto it... for a few reasons; as long as it's not a major
contributor to NO3 build-up>
Mahalo!
<Cheers! BobF>
In Radiant Health,
Sky Kubby
|

 |
|
Re: Remote DSB About to Integrate!
12/23/16
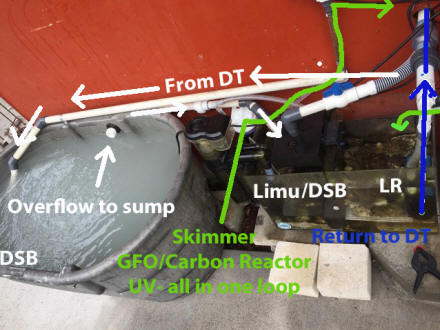
Okay Bob, here’s diagrams over images to be more clear.
<VERY nice; but didn't get the SumpDiagram... you sent two copies of the
OutsideWallDiag.>
Water is still a little cloudy but I’m ready to hook up the line from the DT to
the DSB.
<Exciting!>
I’m a little worried about the temp swings and another algae bloom but trusting
this is the best course for overall stability. It will be nice to get some
yellow tangs in there to eat the algae in be beautiful, plus I can expand LR,
frags, etc.
<Yes; and there are friends (Pablo Tepoot down in S. FLA comes to mind) who do
situate their filtration et al. outside; tied in w/ plumbing to the main/display
inside their homes....>
I left the sponge in the middle of the sump so it may pick up particulate and so
as not to let the Limu through to the return. There’s a big space in the middle
of the sump if I remove the sponge- about 2-3 inches that would definitely let
stuff through.
<I see>
Any last minute suggestions before I hook it up?
<None really. I'd fire it all up and see>
The green line here should actually be blue- coming from the outside, however
blue on blue wouldn’t show up well.
<All right>
The overflow from the DSB gravity feeds into the sump.
<I see this; now....>
In Radiant Health,
<And you, BobF>
Sky Kubby
Re: Remote DSB About to Integrate!
Sky! The upload brought up all three diag.s when refreshed. Thank you again. B
|
 |
|
Re: Hawaii 150G Remote DSB 12/23/16
Bob, I can see now with a test run that, it may be best to use the overflow line
out from the Rubbermaid to the sump as an INFLOW from the DT. That will make
better gravity flow from the DT as well as shorten the distance. It’s the
highest portion on the RubberMaid. If I go up and over the Rubbermaid I’m
fighting gravity a s depicted in the picture/diagrams I sent in the last email.
<Ahh! Again, drawing all this out ahead of actual construction (with elevations)
would likely have alerted you (anyone) to this issue>
Then I can boost the diameter of the overflow pipe <s>
to 2”, come into the Rubbermaid a couple inches below the existing overflow, but
on the apposing side (also the wall side), then plumb the 2” pipe in and up at
an angel, so there’s better suck/draw/siphon.
<.... you're soon to know... AND realize the value of over-sizing (esp.
draining) plumbing and having redundant lines....>
Then I’ll drill another 2”bulkhead into the sump at water level to deliver the
flow into the sump. Sound like a better idea?
<Try it and see... DO know that when the system is up and going, the "transit
volume" is going to "stack up" in the tank, and the volume be lowered in the
supply (Rubbermaid)... You WILL NEED to be careful re NOT overfilling the
Rubbermaid...>
The part that I cant figure out is how I would do two 2” pipes since I only have
the one side of the Rubbermaid. Did you say before I could T them into one or is
that a bad idea?
<Better to run separately; yes; and at slightly different levels... Going
forward, and had we had this conversation from the beginning/planning phase/s, I
would have STRONGLY encouraged you to do most of your circulation INSIDE the
main tank itself... Too much risk in relying on outside gear IME>
Thanks and Happy Solstice/Holidays.
In Radiant Health,
<And you Sky. BobF>
Sky Kubby
|
|
|
HI Solar Powered Aquarium: RDSB
12/7/16
Bob, here's a pic of the washed crushed coral sand. Are you sure you'd still
recommend this stuff after see the grain size? I bought a bunch of bags of
this stuff.
<Yes I would; and good pix>
After reading so much more I am surprised how many people say Crushed coral
sand will be a detritus trap and how many people have taken their systems
down after installing such a bed.
<Mmm; yeah; well... all systems require "some" maintenance; and such beds
REALLY s/b periodically (partially; like half each interval) "stirred"
(shades of James Bond!), and/or vacuumed>
I could see however that the superfine particles in this cc sand would be
perfect and probably settle to the bottom. Then the life in the sand would
eat up the detritus, right?
<Yes; most all... depending on... foods used and amounts, circulation,
relative amount of bed, biomass... You and I could formulate a model
describing eh?>
I plan to have the DT drain directly into the far end of the Rubbermaid tub.
Then gravity drain into my sump via a 1 1/2" pipe for a clean return.
<I'd use a 2" ID, likely two such pipes...>
My total system now is about 150 watts. So it will be slow flow in the DSB.
Here's almost what it will look:
<Nice>
Except the sump will be turned facing the wall. Am I on the right track
here?
<Appears so>
I'm going to get bulkheads and other fittings to connect the sump and
Rubbermaid now.
<Schedule 40 will be fine. No need for the extra expense of 80>
Have it drain over or drill both containers?
<Either... if there's gravity, drop distance the former>
I've read a lot and this is the best I could come up with. Any ideas on how
to make no bettah?
<Not so far... just waking here though!>
MAHALO!!
<Por nada amigo. BobF>
Sky Kubby
|
|
|
|
Re: HI Solar Powered Aquarium: RDSB
12/10/16
Just made another donation! ;-) Keep up the great work!
<Thank you>
Okay, okay so I may be obsessing a little bit, but that crushed coral sand
was so cloudy I wanted to make sure we got this right. Just a few more
points to clarify and I will be on with my RDSB addition. Here’s two
scenarios for plumbing. Please tell me what you believe to be most
advantageous:
<Okay>
1. Drain from the DT to the far end of the Rubbermaid, into a capped PVC
with holes drilled to diffuse bubbles. The water flow across the bed, with
two 2” pipes skimming the surface at the other end, T’d into one pipe,
draining into the Sump- dropping onto the first chamber creating aeration
and tumbling Limu. No filter bag to keep life hopefully making it back to
the DT. Here I could drop the pipe in, or plum horizontally bulkhead to
bulkhead. I think you said this doesn’t matter. But please clarify if what
you said two 2” pipes, do you mean separately, going into two bulkheads or
two T’d into one as just described?
<I'd run the two independently... So many times that one pipe has become
occluded, overwhelmed for what ever reason>
2. Or I plumb a pipe from existing bottom 1 1/4 drain bulkhead on the bottom
of the Rubbermaid over and up to the middle, just above the DSB, where I’d
cover with live rock so all flow passed by it. In this case, I would cut out
the length of the run of pipe from the DT down from 8 feet or so to about 2
feet, if that is even significant.
<I'd go w/ plan 1.>
Lastly, do I remove the sponge dividing the sump, to allow copepods and such
to make it back to my return pump?
<Yes I would>
Good to hear I don’t need to take my crab out (I've tried twice!). I think
it’s easier to catch in the wild because more rocky. But in my tank he seems
to just disappear under the sand. The only thing I was worried about with
him was making my aquascape tumble from tunneling. Guess it would be good to
prop rocks up on cut out PVC rounds stood on end, then?
<Fine>
Two more animal-related questions: Since I can’t order any of the snails
mentioned that are good for DSB. out here in Hawaii, then what Hawaiian
snails can I collect from a round here if any and from where?
<Yes... I do have some ref.s here re Gastropods of HI.... I would look for,
hunt some that were out by night... Small/ish; that are apparent burrowers>
I know there are two different sand stars that are good and bad. How about
the commons that are under just about every rock out here. Good or bad?
<They're predaceous; but if kept in the sump should be fine>
Seems like they’d be good under the rocks to eat up detritus. Just making
sure these aren’t the “Sand-sifting stars”.
<They are not... the blackish ones most everywhere...>
This brings up the controversy that some people think there should be
absolutely no stirring of the DSB. It makes sense that little bits at a time
are fine. After all, it’s all about balance, right? But if you added a bunch
of sand sifting creatures to a toxic unkempt system, that’s when you could
have trouble. I think that’s where people get hung up on shying away from
DSB, can I get and AMEN Bruddah!? ;-) MAHALOZ!!
In Radiant Health,
<I'd stir half every maintenance cycle... with a large wooden dowel; and
even vacuum occasionally. Bob Fenner>
Sky Kubby
|
|
Questions about Sumps and glass tank seams and chips
10/11/16
Dear WWM Crew,
<Hit it Eddie>
It’s me again, and I have a lot more questions to ask you. The test fill
went great. The tank and the stand did fine. I’m still working on the siding
for the stand, so in the meantime, I’m trying to finalize my filtration
plans. The plan all along has been to have a sump and a refugium/DSB, but I
had to wait until the stand was built so I could know exactly how much room
I would have.
<I see>
The 75 gallon tank has the typical overflow with the 1” drain and ¾”
return.
<Ugh; a one-inch through-put is too small... DO plan on doing most all your
water (re)circulation inside the main tank... with submersible pumps,
powerheads...>
However, I intend to use both holes for drains and run the return over the
back of the tank.
<Mmm; well, the 3/4 inch won't do much good. See HERE:
http://www.wetwebmedia.com/SystemPIX/PlumbingPix/Oneinchart.htm
The plan is for the drains to empty into the skimmer chamber of the sump.
<Mmm... better later... in a chamber that has about constant level>
The skimmer is an Aqua C EV-180. Then there will be the typical baffles to
the other chamber of the sump that will have the return pump. Also in this
chamber will be a power head that will pump water to the DSB/Refugium, and
the water will then gravity feed from there back to the return pump chamber
of the sump. That’s the general plan. Now to the specifics and the questions
. . .
I have had a difficult time finding two containers that will fit together in
the stand to use for the sump and the DSB/Refugium. I know I can use either
smaller tanks or plastic storage containers. For cost reasons the plan was
to use storage containers (trying to do this on a budget), but I can’t seem
to find the right size.
<Mmm; even online? Container Store, Amazon...?>
Then, a couple of weeks ago, I went by a LFS in a nearby city (hour and a
half away) that was going out of business. They had a stack of 20 gallon
glass display tanks that they were selling for $5 each. They were each
drilled with a 1” bulkhead about ¾ of the way up the back, and were painted
blue on all three sides. Because they were so inexpensive, I picked one up,
thinking it might work really well for the DSB/Refugium—since it was already
drilled I thought I could use this throughput for the gravity feed back to
the sump. I took it home and put it in the stand and measured the remaining
space for the sump.
Then I made a vain search for a plastic container that would fit with the 20
gallon tank, but couldn’t find one. That left me limited to using a
10 gallon aquarium for the sump.
<Too small; I'd use the 20 for the sump, the ten for the 'fuge>
(The space is too small for a 20 Gallon. Is there a common 15 gallon size?
I’ve never seen one.)
<Oh yes; 24" X 12" X 12" if memory serves>
I happened to have an old 10 gallon that might work (see below), and if it
doesn’t they are not expensive. So the plan is now to put baffles in the 10
gallon dividing it into two chambers. The water drains into the skimmer
chamber and flows through the baffles to the return chamber. In the return
chamber are two pumps—the Mag 7 pump
<https://www.amazon.com/Danner-Mag-Drive-Supreme-Water-Pump/dp/B0002564QC
May well overdrive your over-flows.... Again... I would NOT drive this much
water through.... IF one of the too-puny overflows becomes occluded... water
on the floor>
which will return the water to the display, and a power head which will pump
water to the 20 gallon DSB/refugium. From there the water will gravity feed
to the return chamber through the 1” drain. To make this work I will have to
build a platform to elevate the 20 gallon tank several inches, but I have
plenty of vertical room in the stand.
So, now here are the issues/questions:
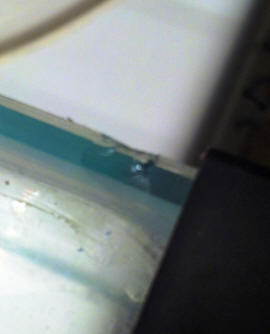
1. I am test filling the 20 gallon tank, and there are some bubbles in the
seams (see pictures—these are from the two front corners. The back
corners also have bubbles, but not quite as many). I have no idea how old
the tank is or how long it was used as a sales tank by the LFS. In my
purpose it will not be full at any time—only up to the drain, so about ¾
full—but it will contain a 5” DSB and perhaps some live rock. In your
estimation is it safe to use for this purpose? I can continue to test fill
for as long as necessary. Also, in test filling it I have filled it over the
bulkhead (by turning the elbow fittings up I have filled it a couple of
inches higher than it will be in normal use). So it has a couple of inches
more water in it now than it will have normally.
<I wouldn't be concerned w/ these air bubbles>
2. If the 20 gallon tank is safe to use, what GPH should I look for in the
power head to feed the water to it?
<Small; as in 3-4 turns per hour>
3. In regard to the idea to use a 10 gallon tank for the sump, will this be
large enough to handle the amount of flow and excess water in a power loss?
<Not likely NO. For SURE you want to "test" here... FILL the tanks up, turn
on the pump/s and then turn them off... see how much water "runs down hill",
MARK the sump as to MAXIMUM depth (with a permanent marker, tape) and DO NOT
fill it any more than this>
I know the 1/3 display tank size rule for sumps, but I am counting the 20
gallon DSB/Refugium too, so that puts me at 30 Gallons.
<Mate; ALL the water above the overflow of the main tank PLUS
refugium will have to be accommodated in the SUMP. USE the twenty or keep
looking. You've configured a disaster in the making here>
Also, I am going to put a valve on the return line so that I can throttle
back the return pump if necessary.
<Not a good idea really. Just get/use the size (pressure, flow) pump that
will be on full all the time>
Most circulation will be accomplished through circulation power heads in the
display.
<Ah, good>
4. If a 10 gallon tank will work, how much minimum space needs to be between
the baffles?
<About... Oh, see this below. Yes to gaps that allow getting a siphon,
cleaning tools into>
I did a WWM search and found somewhere that someone put 1.5” to 2” between
baffles. To fit the skimmer in the sump I need less than 3” between the
baffles, but the EV-180 can be put outside the sump if necessary. I have
space behind the sump, just not lengthwise.
<I'd place this IN the sump for sure>
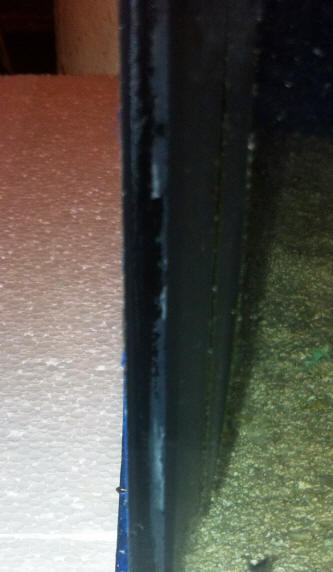
5. Finally, the 10 gallon tank I have has a small chip in the glass (see
picture). It is a seashell shape with no cracks, but it is at the very
bottom of front panel on the edge. Under normal operation, it will be
half-full or so. Is it safe to use for this purpose, or should I pick up
another 10 gallon tank?
<I'd at least fill in the chipped area with Silastic. Won't help
strength-wise, but will save someone from a nasty cut>
Thank you SO MUCH for continually answering my questions. I don’t want to be
a pest, but I don’t really have many other people to ask for advice.
<We're happy to assist your efforts>
I live in a small South Alabama town, and I know of no one else here who is
into saltwater aquaria.
<Perhaps a posting on CraigsList? Starting a "Meet Up" group in your
area....? Easy, fun to do>
I have a friend who owns a LFS, but he is almost 2 hours away. I trust your
judgment. I have CMA and have read it twice. I read WWM FAQs constantly. Yet
often my questions are so specific I feel I need to consult the experts. I
just hope that it’s not TOO often.
Thanks again,
Eddie
<Welcome. Bob Fenner>
|
  Re: Questions about Sumps and glass tank seams and chips
10/12/16
Hi Bob,
<Hey Ed>
Thank you so much for your answers. I’ve never done a drilled tank with a sump
before so I have no practical experience at all—just what I’ve read or seen
looking under display tanks at LFS’s.
<Better, best to read... than trial and many errors>
So, I’m kind of flying blind—especially when it comes to what happens when the
power goes out. As the expression goes, that’s why I asked. You said some things
I thought you would say, and some things I didn’t expect. Either way I’m
grateful, but I also have some confusion, some clarifications, and some more
questions.
<Hotay!>
First of all, I’m abandoning the 10 gallon sump idea. I don’t want to cut it too
close, which is why I asked in the first place. It seemed too small to me.
<Tis>
However, one thing that you said that confused me is that the sump has to hold
all the water above the overflow of the main tank PLUS the refugium.
<It does mate... think... what happens when the power goes out, or the main/sump
pump stops>
The 20 gallon tank I was thinking of using as the DSB/refugium has a one inch
drain in the side near the top (a couple of inches down). I hadn’t anticipated a
lot of back flow from it because if the power head supplying it was three or
four turns per hour (60 to 80 gallons per hour in this case), wouldn’t that keep
the water level pretty close to the level of the drain, and thus not add much to
the sump?
<.... you can calculate this for all surface areas... or just try it in real
time>
I have tried to find plastic containers online, but the problem is the listed
dimensions on the website for them are for the outside rim, not the area of the
bottom (usually a good bit smaller). Whether I’m looking for a sump or a
refugium I need to know the area of the bottom so that I can know whether I’ll
have room for my pumps and skimmer (in the case of the sump) and so that I can
have as large of a DSB as I can (in the case of the refugium). I want to be able
to see the container first hand so that I can put a tape measure to it and know
what I’m dealing with.
<Meh! Life's a series of compromises... the slope isn't all that great on such
containers. Set the ten sideways on top of the right of the twenty...>
You suggested using the 20 gallon as the sump. The problem that I see with this
is the 1” drain hole. This drain hole will limit the amount of water it can hold
as a sump, unless I plug it. How would I go about plugging it?
<Silicone and a bit of plastic sheet or glass>
I have another option for the sump that I didn’t mention before. I have an old
acrylic wet/dry that is 23.5” X 10” X16” (16 gallons or so). Would it be big
enough to be a sump?
<Maybe... if very slow flow>
If I use this W/D, I can’t use the 20 Gallon for the DSB/refugium too, because
it is a half inch too long (Don’t you just hate it when that happens!). If I go
with this option, I’ll probably try to find the biggest plastic container that I
can fit into the space and use it for the DSB/refugium. Regarding that possible
set up:
1. Option 1 would be drilling the W/D and gravity feeding into the DSB/refugium
and then putting the return pump in the DSB/refugium container (basically a
straight line—W/D with Skimmer, gravity feeding into DSB/refugium container,
flowing through it to the return pump—walled off with baffles or similar). That
wouldn’t leave a lot of space for the DSB.
2. Option 2 would be drilling the plastic container and going with a power head
in the sump to pump water into the DSB/refugium and then gravity feeding it back
into the sump. Question/concern with this option is can you drill a plastic
container and use a bulkhead fitting?
<Most, yes. NEED two gaskets, Silastic and tightening the nut just so>
The slanted sides and softer material would seem to make this difficult. I
prefer option 2, but I wasn’t sure about putting a bulkhead in a plastic
container.
<Have done so many times>
I’m also confused in regard to what you said about the Mag 7 pump. Reason being,
when I was considering buying the used pump I emailed you with some questions
about it, and you OK’d me using it in the way I described. Here is the text of
that email (I highlighted the pertinent part).
-------- Original Message --------
From: "Eddie
Sent: Saturday, February 14, 2015 5:45 PM
To: crew@WetWebMedia.com
Subject: Re: Pondmaster Mag Drive Pump
Hi Bob,
<Ed>
Thank you for your answer. I picked up some good stainless screws for the pump,
but now I have another question about it. In the last email I told you that the
pump was a Pondmaster Mag Drive 700. I wasn't 100% certain of that since the
label on the side was missing. The guy told me it was a Mag 7, but I wanted to
be sure. So I did a couple of tests, and now I'm confused. In the first test I
used a two foot section of 3/4" (ID) PVC with an elbow and a 6 inch section of
Loc-line at the top. With this set up I filled a 5 gallon bucket in about 40
seconds.
<Restriction>
By my calculations this is around 450 GPH. I'm a little new to figuring out head
pressure, but after reading a lot of plumbing FAQ's on WWM I think I had around
3 feet of head on this set up. For the second test I used a five foot section of
3/4" (ID) PVC with an elbow at the top (no loc-line this time). With this set up
I filled up a 5 gallon bucket in about 51 seconds. By my calculations this is
around 350 GPH. I think this set up had about 6 feet of head pressure. I
looked up the head/GPH chart for the Pondmaster series on the internet. At 3
feet of head it a Pondmaster 700 should get 500 GPH, but I only got 450 GPH.
<Aye ya; you're a sharp one... this is close>
At 6 feet of head pressure, it should have get 400, but I got only 350 GPH. Yet,
it cannot be a Pondmaster 500. They are the same physical size (according to the
specs I looked up), but at 3 feet of head a 500 gets about 375, and at 6 feet of
head it gets about 175 GPH. It's got to be a 700.
So, here are my questions . . .
1. Am I figuring the head pressure right?
<Apparently so>
2. Is it just not running at optimum level? Could this be because of age?
(It's used, but I'm not sure for how long)
<Possibly...>
I got this pump to use with my Aqua C EV-180. If it's not putting out a full 700
GPH though, I don't want to use it for that. I might instead use it for my
return pump. Let me give you a few details on my planned set up in that regard.
I have a 75 gallon tank (factory drilled with 1" drain & 3/4" return &
overflow). I'm not going to drill additional holes. After a
lot of research of WWM plumbing FAQ's, I had decided to use both of these holes
for drains and limit my flow to between 300 and 350 GPH (and make up for the
rest of what I need through power heads). I haven't figured out all
the plumbing details yet, because I'm still in the planning stages and haven't
gotten my stand finished yet, but I know I'll have about 5 to 5 1/2 feet of
vertical distance from the sump to the top of the tank for the (over the side)
return. I'll have a little bit more head than that because I'll have to move to
a little the side to get out from under the tank to go over
the side for the return. I'm not sure how much additional head that will be. If
I use this pump, I know that at 6 feet of head it does around 350 GPH. If I use
much more than 6 feet of head through my eventual plumbing set up, then it will
(likely) get down to or below 300 GPH. Would that be enough flow through a
sump/refugium combo?
<Yes; assuredly>
<< More than enough>>
Would I be better off with a more powerful pump (say a new Mag 7) and use a
valve to throttle it down if need be?
<I'd stick with/use what you have>
<<Yes>>
I'm not trying to put the cart before the horse. I'm trying to figure out if I
want the pump or not. The guy gave it to me to test, but I haven't paid for it
yet. I can give it back to him. I'd like to use it, because it means
considerable savings over new one, but if I can't use it for the skimmer or the
return, then I might as well give it back to him.
Sorry about the length of this email. Thanks so much for all you do for us
in this hobby.
Eddie
<You're fine w/ this pump. Bob Fenner>
I had read the article on the 1” drain before (and all the FAQs)—after I bought
the tank, of course—and that’s why I had decided to use the return hole as an
additional drain and make sure that I had around 300 GPH after figuring out the
head pressure. I’m going to have a ball valve above the return pump anyway (to
make it easier to remove it if necessary) and I will test the flow before
filling the aquarium. IF I am too much over 300 then I will throttle it down a
little bit. Is that plan feasible, because I really don’t want to buy another
pump at this point?
<<Depends on the sump/.... you do NOT want the transit volume to OVERFLOW the
sump>>
So, counting the text of the previous email pasted in, this may be the longest
email I have ever sent WWM. Is there a length record?
<<Oh, you're WAAAAY short of this>>
Thanks so much for your help, and for clearing up all my confusion. Y’all are
wonderful!
Thanks so much,
Eddie
<Do you understand here Eddie? BobF>
Re: Questions about Sumps and glass tank seams and chips
10/12/16
Hi Bob,
<Eddie>
I have come to understanding (I think) thanks to your patient help. I guess I’ll
never REALLY understand until I see it “in action”, but I’m a lot closer than I
was.
<Ah good>
The more water you push with the pump (the more GPH), the more water you will
have above the level of the drain (and standpipe), and all that’s got to go
somewhere if the pump stops working (power outage),
<Yes!>
so you need a big enough sump to catch it all (or to use a much smaller pump or
bigger drain). And having a longer return line (which lowers the GPH due to the
head pressure) ALSO means more water in those lines that will back flow.
<Correct>
So, based on that realization here are the options going forward:
1. Plug and use the 20 gallon tank for the sump. Then I will find as large of a
plastic container as I can for the DSB/refugium and put a drain in it & feed it
with a powerhead as before.
Would this be a large enough sump if I keep my flow near 300 GPH?
<Mmm; maybe... again, have to actually try out...>
2. Try to find an even bigger tank or container to use as an “all-in-one”
sump/DSB/Refugium. It’s hard to find a plastic container that is long enough and
still narrow enough, but if I can find a 29 or 30 gallon tank for a reasonable
price, then I will get it and divide it up into chambers. I would lose the
advantage of the completely separate refugium this way, but I would gain a good
bit of extra space to “catch” the falling water. Would this be a better option
than #1?
<IF the sump, fuge can't be easily fit in the stand as one piece, better to use
two>
If I go with option 2, I can still plug and use the 20 gallon as a quarantine
tank—so it won’t be a wasted purchase. To plug the hole should the glass/plastic
go on the inside or outside (I would think inside)? How much bigger than the
hole should it be?
<The inside; about twice the size of the hole>
Thanks for being so patient with me (and for correcting me again if I still
don’t understand.
<Clarity is pleasurable for all of us. Cheers, BobF>
Eddie
Re: Questions about Sumps and glass tank seams and chips
10/13/16
Hi Bob,
I still have one little bit of confusion. Could you please clarify what you mean
in your answer regarding option two: “IF the sump, fuge can't be easily fit in
the stand as one piece, better to use two.”
<Fit one (the larger) in the stand first, the other (smaller) on top of the
first>
Thanks,
Eddie
Re: Questions about Sumps and glass tank seams and chips
10/13/16
By building a shelf for the smaller one to sit on or by putting it right on top
of the other one? It could hold the weight of the sand and the water?
<It should be; yes>
My stand’s front/center 2x4 is removable.
<Ahh! Great>
I can get a container or aquarium in there that is up to 39” X 16” or even
longer if it is less than 12” wide. So if I can fit a 29 or 30 gallon tank in
there, it would be better to go with one?
<The bigger the better. T'were it me/mine, I'd be making the sump... from
glass/Silastic or acrylic. Not hard to do; and w/ a bit of shopping, not
expensive. B>
|
Re: Questions about Sumps and glass tank seams and chips. And
sump/fuge design f' 11/5/16
Hi Bob,
<Hey Eddie>
I’m back with what I hope will be my last ever silicon/seam question. After
our previous exchange about my sump plans, I decided to scrap the plans for
separate vessels for the sump and refugium and look for as large a container
as I could fit to make into a combo of the two.
<Good; this is what I would do>
I looked around and found a used 30 gallon (36x12x16 approximately) for next
to nothing. I had to drive almost two hours to get it, but that’s no big
deal. Anyway, the plan is to make this tank my sump with some type of three
chamber configuration (skimmer, pump, DSB/refugium). I’m still researching
the details on how I want to arrange that part.
<Just saw a really neat new (to me) weir design for sumps et al.
aquariums... on Facebook... A sloped bottom to allow easier, greater
flow...>
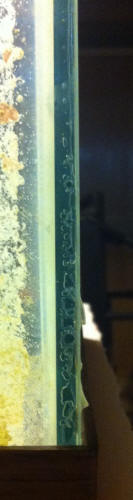
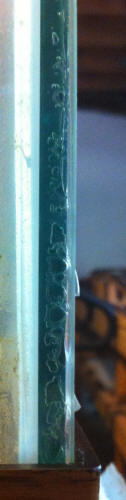
I had them fill the tank when I bought it to make sure it didn’t leak, but
in the bright sunlight I didn’t notice some bubbles in the seam at the
bottom on the rear left of the tank.
<Some?! Wow; I'll say!>
The section in the pictures runs about 3 to 4 inches up from the bottom
frame.
<Wish these were up near the top instead>
I went through the seam FAQs again the last few days and found some that
were similar, but I also know that the size of the tank factors in as well
as the fact that I’m planning on using it for a sump and 95% of the time it
will be around half full.
<Yes>
It looks to me like a bad silicon job (you may can see the excess silicon
sticking out between the plates in the picture), but if so it is just on
this back corner. The rest of the seams look really good.
<Ok>
The first picture is of the tank full. The second picture is of the tank
empty. As you can see there is no observable change.
<Agree/d>
I kept it full for nearly 72 hours without any changes. Please tell me that
this tank is safe to use for a sump.
<Yes; I would use it for such a purpose>
I will make sure that the side with the bubbles is used for the shallower
end of the sump (just in case). If it is not safe, can I possibly repair it
in some way without resealing it.
<Mmm; not really... or not what I would do. One COULD put/Silicone strips
(two or so inches) of glass over the bad corners; overlapping the glass
there... on the outside of the tank. I would just use it as is>
Perhaps by somehow putting extra glass around this corner to help support
it.
<Oh! Yes; the same idea likely>
Thanks as always for all your help. I would be lost without the kind help of
WWM.
Eddie
<Glad to share with you; aid your efforts. Bob Fenner>
|
 |
|
diy sump design
5/17/16
I was hoping you would take the time to look at a sump design I am
thinking of replicating from the video in the link provided?
180 gallon freshwater tank with refugium setup part 1 EDIT: To answer
the comment below I created the following video;
http://www.youtube.com/watch?v=oYczMcW9V-o Part...
I've forwarded the video to where the sump is displayed for convenience.
I do like the idea of the fluidized moving sand filter in the first
chamber.
Your thoughts on this?
<I like it too. I do agree w/ the commentator that the sloping forward
wall should be steeper... and I'd look around for other media than sharp
silica sand... See WWM re such fluidized beds>
Actually i like the entire setup with the exception of the gravel in the
second chamber. I feel it would be hard as far as maintenance is
concerned.
Is there anything you personally would consider to use here instead?
<Heeeee! All sorts. And archived on WWM. See Refugium Design FAQs files>
My other concern is the water level in the refugium after exiting the
baffles. I feel the water level is somewhat high. Is there a way to
reduce this?
<Yes; most practically by making the sump/refugium MUCH larger... I have
a real concern here.... make that surety, that if/when the (1,200 gph)
pump turns off, water is going to hit the floor>
or at least plain it out?
<Try WWM, reading. Bob Fenner>
diy sump design 5/17/16
I apologize I did not tell you I would be utilizing this design for a
reef tank in my previous email. It will be for a 150 gallon reef tank
with either a 40 gallon or 55 gallon sump.
<No diff. for marine or fresh, but glad to read of the relative size of
the tank, sump. BobF>
A problem with a sump
12/29/14
Hi Crew
<Yasfir>
Hope your festive season has been great. I need some help. i have just
bought a 2m tank plus a sump. Once I set it up and started running the
pump, I noticed the return to the sump, is not sufficient so the
water in the sump drops to a level where the pump in the last
compartment in the sump is exposed to air.
<Far too common an issue... pump too large for sump, for overflow
line/s>
How can I fix this problem?
<A few options... replace the pump w/ one of smaller flow (add
circulation in-tank), increase the size of the sump, increase the number
and/or diameter of overflow lines>
I have thought about changing the size of the pump within the sump to a
smaller one.
The other possible solution I have looked at is some kind of overflow
box, as there doesn't appear to be any safe way of increasing the
diameter of the return to the sump.
<Often entails re-drilling...>
Where I live we have very erratic electricity supplies and I am
concerned that if I use an over flow box this may lead to a flooded
living area.
<Also a typical issue>
Are there different types of overflow box?
<Several; and like all the rest above, gone over and over (archived) on
WWM>
I really do not have much experience with them so would appreciate any
help or advice you could give me regarding them, or
dealing with the initial problem.
Regards
Yasi
<Do you need help learning to use the search tool, indices on WWM? Bob
Fenner>
Re: A problem with a sump /Neale
12/29/14
Hi Bob
Maybe I do need help, because I have looked on wet web and there are
literal thousands of pages of FAQs, most are irrelevant to the question
I have, some have a small bit of helpful info, but Simple put there is a
huge pile and not enough time to sift through everything in the pile.
Regards
<<Have you tried using the "search" facility? It's basically a Google
search box at the bottom of the front page:
http:wetwebmedia.com
But you can do quick searches right in your browser. Just enter
something like the following, without the quotation marks:
"site: wetwebmedia.com sump flow problem" Press enter, and you should
get lots of results. Tweak your search by
adding extra words. So for example if I do this search:
"site: wetwebmedia.com sump flow problem leak" I get as my top hit this
page:
http://www.wetwebmedia.com/pumptrouble.htm
Not only lots of previous questions and answers, but also links (at the
top) to relevant in-depth articles. Your problem (the sump water level
drops) isn't particularly complicated. Simply means the pump is pushing
water back up to the tank at a FASTER rate than gravity is pulling water
down through the overflow. You need to balance these somehow so they're
the
same rate. Slowing down to pump would be one solution, and increasing
the amount of overflow would be another. If I can direct you to this
archive of FAQs...
http://www.wetwebmedia.com/ovrfloboxfaq2.htm
You'll see balancing sumps and overflows isn't an uncommon problem. That
was my top hit searching "sump" and "balance" on wetwebmedia.com.
Hope this helps clear up how WWM can work better for you! Have a good
New Year, Neale.>><Thank you RMF> Sump Setup... Silastic sel.; Using
WWM 7/2/14
Hi there, my name is Adam Jones. I currently have a 55 tall saltwater
tank.
I have had nothing but algae problems since a bought the tank
over a year
ago. (Green Hair Algae) is my main issue.
<... typically a matter of imbalance.... too much nutrient, poor
conditions otherwise, lack of predators, competitors... You've read on
WWM re?>
I am currently running a 48" t5 by Deep Blue
Solar Extreme, crap light i know but i didn't know it when i
bought it I'm just trying to save up to get an Aquaticlife fixture. I
have a Mag drive 5 return pump, a RedSea
Skimmer not sure of the model. All running
through a 29 gallon tank. My reason for this email is I'm upgrading
to a 75 gallon tank with a 40 gallon breeder tank for my sump. I
have read on several sites and talked to
several people that you can use the GE *1 100%
silicone to put your baffles into place in your sump. This being said
i used the silicone and got the baffles in. I spoke with the
owner and a
trusted friend of a local fish store (Shaun @ Mountains to Sea Aquariums
in Asheville Nc) She informed me that it may
not be a good idea to use this product but
since she hasn't heard anything bad about it she wasn't sure
and directed me to this site to do some research. Since i have
not seen any info on this subject I figured an
email would be the next best bet. If you could
take a moment and let me know if the silicone will work or not i
would be very thankful. (Maybe some algae tips)
Thanks again, Adam Jones
<There are other brands, manufacturers of Silicone/Silastic... as long
as they lack mildewcides. See this also archived on WWM... the search
tool on every page, the indices. Bob Fenner>
|
75 Gallon Sump Setup – 04/08/14
Kind Crew,
<<Hey Dave>>
Due to a faulty sump pump I ended up with most of the winter thaw
(water) in my basement, drying out my basement led to a total dismantle
of my 75 gallon tank (live rock in a 55 gallon tank, little coral I had
in a 10 gallon, a mated pair of clarkii clownfish in a 20 gallon). I had
a deep sand bed which is currently in a few 5 gallon buckets, which from
what I read is trash?
<<Not in my opinion…it will no longer be “live,” but you can reuse with
a good rinse with a hose…and the live rock will help to re-seed the
sand>>
Or should at least be rinsed thoroughly before putting back in the tank.
<<Ah yes!>>
My spotted Hawkfish, (had for 3 years) and orange spotted goby (had for
8 years) were casualties of the break down.
<<A shame…>>
Starting from scratch, in a sense, I figured I'd make the best of a bad
situation.
<<Excellent>>
First, drill the tank.
<<Indeed>>
It's a Perfecto 75 gallon, I called the manufacturer and only the bottom
is tempered. Searching online I came across the site Glass-Holes.com.
I'm about to order the 1500 overflow box complete kit to drill two 1 ½"
holes in the tank.
<<You can do this…though I feel a single 1.5” drain would be sufficient
for this size tank>>
With regards to the drain lines I was going to use flex tubing to drain
into the sump below.
<<Will work…though my preference is rigid PVC, or even PVC Spa Flex
versus vinyl tubing. The latter has a tendency to flatten/collapse over
time…even when run in a straight line>>
I'm assuming they would stop above the water line in the sump?
<<Better to go “just below” to reduce noise. I also like to use
45-degree Ells on the terminal ends to route away bubbles to keep them
from trying to “come back up” the drain line.>>
Just below rim of tank? I figured with the flex tubing I really
shouldn't need a shut off or disconnect?
<<Not on the drains, no…all plumbing should be designed/arranged such
that when the return pump is off, the transient water volume is
contained in the sump>>
I was going to create my own sump and I'm in the process of trying to
locate a used breeder tank to convert.
<<Bigger the better…>>
At the moment I have a pump rated at 900 gph for the return to the tank
and will connect to a loop manifold (described in Anthony's book) that
would be connected below the cover to the tank.
<<If this “loop” has more than just a couple ½-inch nozzles, you will be
disappointed in the performance. The 900gph pump will not produce much
force/energy with more or bigger nozzles than this. You could size-up
the pump, but that creates other issues re plumbing/noise/bubbles in the
sump. Were this my tank…I would lose the “loop” in favor of a single
return and apply a couple “propeller-style” in-tank pumps for water
motion positioned at the tank ends to provide an alternating GYRE type
flow on a 3-4 hour circuit, and simplify the drain plumbing with a
single 1.5” drain and a return pump of about 600gph.>>
Regarding fittings, I'm thinking I would only need the disconnects to be
able to clean the pump or would it be a good idea to include shut off's?
<<I highly recommend including a ball-valve installed on the “output
side” of the pump to temper flow if needed.>>
I read pros and cons for bare bottom, deep sand beds, and shallow sand
beds. My current thought is to go with 1" of sand in the main tank.
<<Okay… I am a fan of the DSB, but prefer to put this in a separate
refugium versus the display.>>
I have a CPR hang-on refugium, also gutted, that I was going re-install
and hang on the sump, I figured I would provide a DSB in there.
<<Not much volume…but won’t hurt>>
Any thoughts are greatly appreciated,
Dave
<<I’ve given you mine…feel free to let me know if you have any further
questions. EricR>>
Re: 75
Gallon Sump Setup – 04/08/14
EricR,
<<Dave>>
Thank you for the quick reply, a lot of great info.
<<Quite welcome>>
The one drawback I have is I already have the pump, (still unused) from
a previous vision of just creating a loop for water movement, to reduce
power heads in the tank.
<<I see…>>
I can reinvestigate, but keeping the cost down is a better sell to my
wife,
<<I do understand…>>
still paying to refinish the basement (However I would much prefer to
drill one hole.). My original thought was 10x-12x the tank which put me
at 900gph.
<<Indeed…but much better to provide this flow with something other than
the return pump. You don’t need to cycle this much water through the
tank/sump…and not doing so can make life much easier…especially when/if
the tank is in an area where people want to gather and talk, watch TV,
etc.. Besides…the propeller pumps available today do a MUCH better job
of moving water within the display than the sharp jet from the nozzle of
a closed-loop (given a big enough pump to provide such.).
Can I still go with the 1500 overflow box and forgo the loop on the
return?
<<Certainly>>
According to the Glass-Holes site the 1500 has a recommended continuous
flow rate between 500-1000gph?
<<With two 1.5” drains, likely closer to 1400gph or more>>
The 700gph overflow box has a flow rate of 200-500, which drops the pump
size below the 600 you suggested.
<<This has a single 1.5” drain…and should be able to handle about
700GPH. Depending on the pumping height/head-loss of your 900 gph pump,
and if you install the gate-valve as mentioned in our previous
correspondence, you could get away with the ‘700’ model here>>
I figured I would get the overflow from them since I have to pick up the
drill bit to drill the glass. I figured even with the 900, I would have
an additional power head in the tank on a timer to mix up the current.
The future plan is to continually grow it into a reef tank.
<<Okay…but do consider there is a growing belief that “effective” water
movement in a reef tank is paramount even to lighting>>
One question forgot to ask, regarding the overflow box in the main tank.
Is there any set rule on how far it should be from the top rim?
<<That depends on you/where you want the ‘water surface in the tank’ to
be as the position of the overflow will dictate this. I like to position
mine so the in-tank water level is about ¾” from the top (less if it is
visible below the trim from the outside).>>
Again, thank you for all your help. And answering my basic questions,
Dave
<<Always happy to share… Eric Russell>>
R2: 75 Gallon Sump Setup – 04/08/14
EricR,
<<Hey Dave>>
After reading through Wet Web's FAQ and Articles this afternoon I seem
to have a better understanding of the sump idea.
<<Ah!>>
In my previous email I tried to convince myself to go with a pump
already purchased. The articles pointed out my own misconception about
the sump itself. I was looking at the pump to provide the circulation
for the main tank, not to actually do what the sump is intended to do.
Skim off my surface water, add water volume to the tank and provide a
place to house a majority of my equipment.
<<Indeed>>
If I have it correctly, moving water through the sump to quick would
actually hinder the skimmer in doing its job.
<<Different schools of thought here…but I am of this opinion, yes>>
In theory I thought I could get away from all equipment in the tank.
<<Can be done (e.g. - “wet boxes” mounted to the exterior to hold the
prop pumps), but for most folks…no>>
It looks like some powerheads would be required for additional water
movement.
<<For certain…even in a fish-only system…but do look at the
“propeller-style” pumps for this versus simple powerheads. Many to
choose from…>>
Thank you again for pointing me in the right direction. The plan is to
do it correctly instead of rushing it and not being happy with it.
<<Is the best approach>>
Again appreciate your help, and the all the information provided on the
site.
Dave
<<Any time, mate… EricR>>
R3: 75 Gallon Sump Setup – 04/17/14
EricR,
<<Hey Dave>>
I was hoping you could review my attached design with the following
notes to see if my fuzzy math works out, or if I might be missing
something.
<Sure>>
The overflow box is rated by Glass-Holes at 750gph, I need to drill a 1
1/2" hole.
<<Actually I believe the ‘bulkhead’ has in inside diameter of
1.5-inches…meaning you will need to drill a larger hole. Bulkheads can
vary a bit, check with Glass-Holes for the correct size hole-saw for the
bulkhead supplied>>
The overflow will feed the skimmer section of the sump below with a ball
valve controlling 25% of the water into the refugium section at the
opposite end of the sump.
<<Okay>>
The sump is a 30 gallon tank 36"x12"x16" high. Both ends of the sump
will flow into the pump section in the center. For some reason my center
brace on my stand is off center so I will come straight up with the
supply. Additional water movement in the tank will be provided by two
Hydor Koralia Evolution circulation pumps 1150 gph.
<<Excellent>>
Skimmer Section of the Sump:
The skimmer section is 12"x9"x12"H for 1296 cubic inches or 5 gallons.
My current skimmer is a hang-on Aqua-C Remora, from your FAQ's found
that it could be placed directly in the sump. (Because of height
clearances I can't be a hang-on.)
<<Should be fine>>
The 9"x12" dimension will allow for a future skimmer, the 12" high
dimension works with the outflow of the skimmer.
The Refugium:
The refugium section is 12"x12"x13" high for 1872 cubic inches or 8
gallons, (a little over 10% of the tank volume). The 13" high dimension
will allow for a 2" high volume of empty tank above. It will have a 3"
DSB, lighting and macro algae. I will need egg crate at the top of the
glass panel to prevent macro from entering the pump section during power
loss.
<<Okay>>
The pump section:
The pump section is 12"x12"x 9" high, same 5 gallons as the sump. The 9"
water depth will allow for the water flowing into the tank during power
losses. The pump is a Mag 7.5. Directly above the pump I will have a
quick disconnect and a gate valve.
<<Very Good>>
The fuzzy math:
I guesstimate that I have about 14 feet of PVC, (1 1/2"). The table in
the link below tells me for each foot of 1 1/2" PVC I have .103 gallons
of water. With 14' of pipe I have to account for 1.5 gallons of water.
http://www.harvel.com/technical-support-center/engineering-design-data/design-properties-pipe/schedule-40-pvc
Using a 1" deep of back flow from the main tank during a power loss, I
need to account for 8.64 gallons of water, which is the same as my empty
zone in the 30 gallon sump, noted in the Fuge section above. The pump
section of the sump is approx. 12"x12"x12" high, 1728 cubic inches,
about 7 gallons, by filling it only up to 9" instead of 12" will account
for the water in the PVC piping.
<<Looks fine ‘on paper’…but do simply play around with the overflow and
return heights on the display to determine what best will contain all
transient water volume>>
From the two schools of thought I decided to go with the overflow water
feeding the refugium.
By having the "T" on the horizontal, slightly sloped to the fuge will
give me a steady water flow to the fuge which will be controlled by the
ball valve. If I decided to go with the pump feeding the fuge it would
have to be on the vertical and would rely on restricting the flow to the
tank to get water to feed the fuge.
<<“Gravity” feeding water from the display to the refugium is best IMO>>
Hope it makes since, again thank you for your time.
<<It does…but no need to rush…take your time and test your plumbing as
you go and you’ll be fine>> Dave
<<Eric Russell>>
|
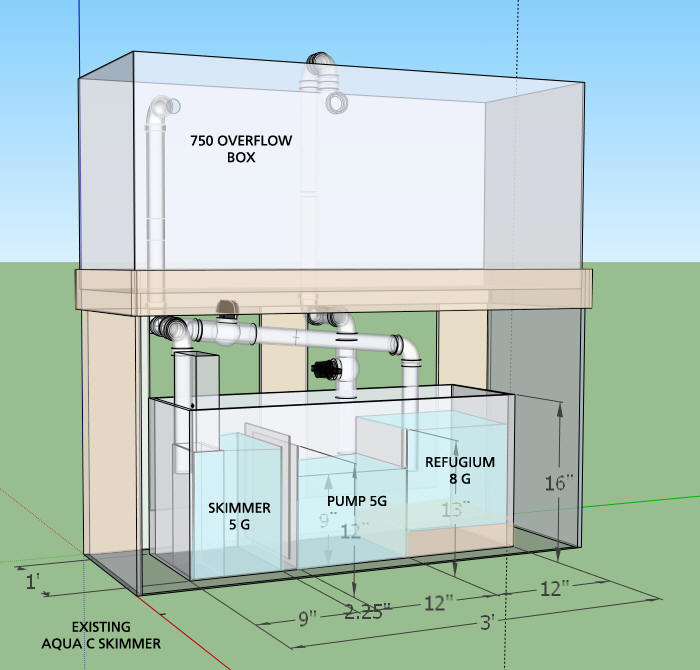 |
|
Re: the time has come for a refugium - Help... pb recipes
for disaster 10/11/13
Hello Mr. F,
<Andrei>
How are you?
<Fine, thanks>
As I stated in my last email I have started my refugium " successfully"
but I have a big problem : I cannot keep the levels between the
refugium and sump balanced.
<... per your drawing... no; this can't be done... without utilizing
level sensors, electro-magnetic switches for pumps/pumping... Things I
would NOT do>
I included a drawing so you can better understand my system.
<I thought we'd been over this. I would NOT utilize two (different)
level sumps/refugiums, overflows... fraught with danger>
The problem is that I cannot regulate with the valve that is on my
return pump from the refugium to sump the level.
<Nope>
Sometimes they stay balanced for even 6 hours, then in the morning I
find 1-2 cm disbalance, and that influences the automatic top up system
that is located in the mid sump and that influences the salinity.
<Yep>
After trying for several days, the only thing I can think of is that the
overflow is not feeding constantly the refugium, even if the level in my
DT is always the same. I have 2 Vortech MP 40 plus 2 AquaMedic
powerheads that move the water a lot, and maybe that is what
changes.
<No>
So I was thinking of an alternate solution described in the drawing : a
closed vessel that should take the variations of the
level and feed the refugium constantly from a hole in the bottom.
<Won't work either>
But this is valid only if really the overflow feeds the refugium non
constantly. Please tell me what do you think, I am playing a very
dangerous game here with the salinity for my SPS.
Thank you very much,
Andrei sbarcea - Romania
<Back to the drawing board... Again, one sump is enough for all of us...
(Police song, from Synchronicity I recall). B>
|
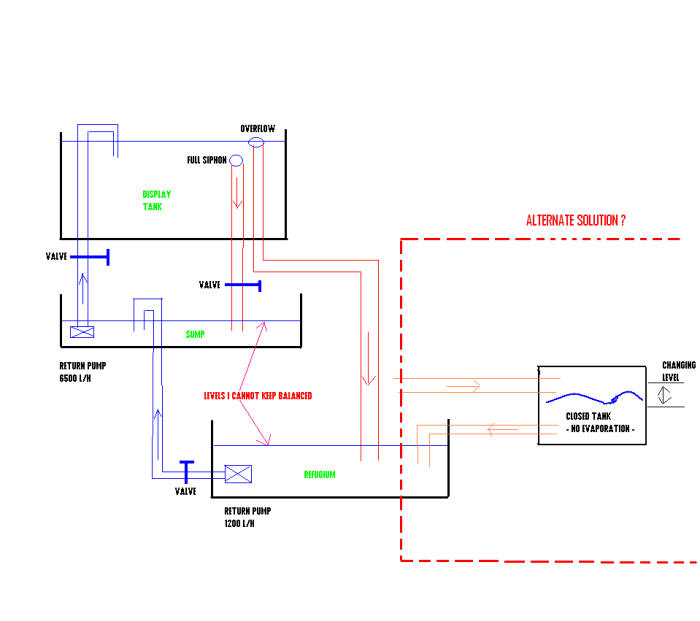 |
Indian Ocean sps Zoa reef flat
biotope tank: Sump design
9/13/13
Dear Friends and Bob San :)
Would be awesome to get thoughts on the below. Please feel free to comment
on any point below.
<Sure>
Am I on the right track?
<... of what? Oh, guess I've got to read below>
Any changes you would suggest?
Anything to be aware of?
What am I looking to achieve?
I just started a new tank and looking to recreate a reef flat biotope.
<Neat!>
I wanted to keep the main focus on a Harem of dwarf angels darting between
coral heads.
<Okay>
Tank specs
The tank is a custom rimless tank with a sump included in the back side
(dimensions and design attached)
<I see this; and have read your small written notes>
Since my previous tank was Aiptasia infected horribly (hundreds of big ones)
I decided to play safe and used dry live rock.
<Mmm, where will you "get" the biota from otherwise?>
Basically freshwater dip for few weeks then dry for a week and then
freshwater dip again (twice the same cycle)
Finished scaping (a pleasure with dry rock I must say) and cycled for 4-5
weeks.
Here are the equipment specs..
Lighting- 3x Mazarra P modules
3x 24W T5 (2 actinic and one purple plus all ATI bulbs)
Lights are hung 6" above water line
<Okay>
Circulation - 3x MP40W Vortechs with anti sync on slaves using nutrient
export mode.
1 return pump of 1700LPH with around 12" head.
<All right>
Filtration
Deltec 1060TS skimmer rates for 1500 litres.
7" DSB in second chamber of sump (moved the algae to in tank refugium)
<Sounds good>
Bare bottom (hope to get a Zoa carpet)
<Are toxic; for you as well... DO see WWM here>
Using Chemi pure elite 4 bags of 11oz
Changed every 15 weeks (change is slowly bag by bag)
<I'd change one out every four weeks, leaving the newest/newer ones in
place>
Husbandry tasks
- water tests every Friday (CA/Alk/NO3/PH4) PH is on continuous monitor.
CA is ranging between 420-450
Alk is 160-170 using Hanna meter
NO3 is <0.5
PH4 am still to start testing from tomorrow :)
- 120 litres ( approx 25-30%) WC on Saturday. Still toying with idea of 15%
every 3-4 days
Feeding
Daily approx half cube size portion of mix of frozen brine, Cyclopes, Mysid,
angel formula.
5-7 pellets of spectrum
Vacuuming - every 3-5 days
<Once a week is fine; easier to keep on schedule>
Livestock
3x 2" African Flameback angels added all together (first fish in tank)
2x true percula clownfish
Can I add a trio of flame angel??
Can I add a group of Chromis (5-7)??
Can I add a mandarin goby pair??
Can I add a group of royal gamma (3)??
Can I add a pair of purple fire fish??
<How large is this tank? 120 liters? I'd stick w/ just the intended/stated 3
and 2 fishes>
Am totally fine to not add ANY more fish other than existing 3 dwarf angel
and 2 clown!!
<Good>
Inverts
2xmontipora digitata
1x Montipora reniformis
1x Montipora (unknown genus)
6x Acropora species
2x Zoa (multi color colonies)
Planning a group of 3 (cleaner or peppermint shrimp)
<A peaceful Lysmata species is what I'd use>
Other info
No QT possible due to space constraints. So, added all existing livestock at
one shot
I dip the new additions using CoralRX.
Questions
1- what are lighting considerations based on colour or shape of Acropora?
<See WWM re... You need to learn/use the site; ahead of writing us>
2- can I afford to feed more given current filtration and WC regime?
<I wouldn't be concerned re overfeeding here>
3- should I add more light modules?
<I'd wait and see (a few months) if you like what you have>
Cheers
Ranjith
<Cheers, BobF> |
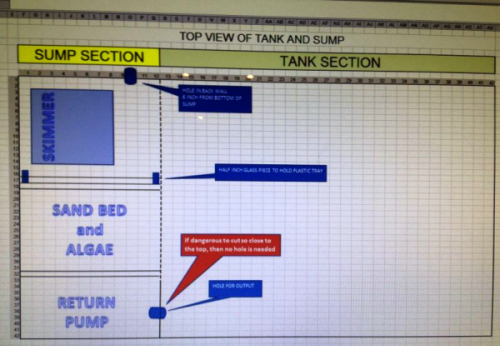 |
Sumps, design; joining under/ w/in a cabinet 11/18/12
Hi WWM,
<Andy>
Thanks for always answering my questions so clearly...
<Welcome>
I'm trying to read up on marine set ups there <they're> so cool. I've
seen some great threads online and I want to try to convert a Fluval
Roma 240 as these are already drilled.
<Ah yes; the aquarium>
One thread I read had a 30" sump in the cabinet which meant the
supporting strut had to be removed and a special support cage made. Is
there a way 2 smaller tanks could be used somehow running in parallel as
a sump so the cabinet could be unchanged?
<Yes... the better choice here to drill fit for one (or two) through
puts (bulkheads) of size (1.5-2" ID) and connect the two tank/sumps with
a bit of flexible PVC>
Many thanks
Andy
<As many welcomes. Bob Fenner>
Sump design and suspended food
10/6/12
Hi All,
<David>
It's quite possible I have over thought this until I am back where I
started but here goes.
I have been thinking about how to provide a more consistent method of
feeding. At the moment I feed a number of times a day with the return
pump turned off for 30 minutes or so. I would like to have a more
automated system that would dose at night but this would have to happen
with the return pump running.
<Ok>
The ultimate goal is to increase the amount of food, available to fish
and corals, suspended in the water column at any time.
On the other hand isn't a sump designed to remove as much suspended
matter as possible from the water as efficiently as possible?
<Mmm, not necessarily, no>
Once food / waste hits the sump it is either skimmed out or lies there
breaking down into nutrient components that are then removed by nutrient
export via pellets, Chaeto or DSB.
With the proviso that there is sufficient water movement in the DT to
keep everything in suspension would it not make more sense to design a
sump where any water not entering the skimmer is allowed to flow back to
the DT relatively unimpeded while the outflow from the skimmer is
allowed to feed Chaeto or DSB, so allowing the occupants of the DT
maximum exposure to suspended food matter.
<Perhaps... some or all>
I'm sure you will quickly point out the flaw in my reasoning, if not,
I'm ready to go modifying my sump.
<There are arrangements where the sump is higher than the main/display
tank... little or no mechanical filtration... BobF>
Thanks for your help,
David
|
|

