|
|
| Home | Marine Aquariums |
Freshwater Aquariums |
Planted Aquariums |
Brackish Systems |
Ponds,
lakes & fountains |
Turtles & Amphibians |
Aquatic Business |
Aquatic Science |
Ask the WWM Crew a Question |
| Please visit our Sponsors | ||||
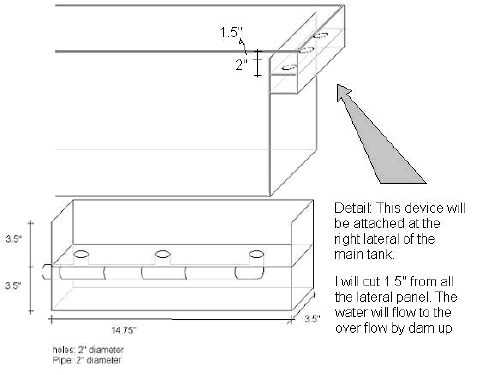
|
-A few questions...- Hello, First, Thank you for the extremely valuable information you provide freely on WWM. I am just getting started with this hobby (probable obsession it seems). I have read nearly all the FAQ pages on your site over the past 2 weeks, and have posted my proposed setup on the forum for some valuable insight from the veterans of this hobby. I am attempting to plan my system carefully before even starting to assemble it. I am sure I will still find many questions along the way, but I hope to harm the least amount of SeaLife in my care in the process. <Sounds like you have the right attitude!> After all this reading, I still have a question about plumbing my overflows, a question about the overall flow, and a question regarding lighting. I am setting up a 125gal 48x24x24" tank, and am in the process of arranging to have it built. <That's what I have! The standard AGA or Oceanic 48-24-24's are 120's, when I think 125 I think of a 6' tank> I plan on ultimately having a reef setup...after a long period of fish and live rock only. Even though this is in the future, I am planning for this from the outset. <Good idea> The specifics of my proposed system are in the forums, and I will not waste your time with them here. I plan on having a 25 gallon sump and a 20 gallon refugium set up below the main tank in the stand (already have measured everything out for this to fit). I plan on having the sump baffled with the final chamber receiving overflow from the refugium and pumping this chamber back to main tank with two Eheim 1262 pumps in parallel for the redundancy factor. Now, for my questions: I have never seen a direct answer to this question...will two 2" inside diameter overflows (one in each rear corner) provide adequate return flow for the two Eheim pumps listed (898 GPH at 0' head, I will have approximately 4.5' head so I am guessing about 1200 GPH between the two pumps) <Since we generally use 2 1" drains on pre-drilled tanks, a pair of 2" drains should be more than enough.> Next, will this be adequate flow for some of the hardier coral species? I plan on the pumps returning to opposite sides of the tank and going through a SCWD on each side for 4 total nozzles (one in each corner). <Nice, you'll like the "squids". The flow needed will depend on the coral that you have in the tank. Increasing flow means simply buying a powerhead or two or setting up some sort of closed loop. Not a biggie, nothing to worry about.> Finally, I have read and read on this site as well as done searches on google and everyone seems to gloss over this basic Newbie question. I know I need timers for my lights, but even looking in the online merchants, I can only find IceCap timers specifically for aquarium lights. I plan on using PC lighting (tank is 24" deep because of this, I didn't want to go to MH lights). <24" is pretty deep for PC's> I cannot find timers specifically for these PC lights, and have even looked on the manufacturers sites...all that is ever mentioned is "timers" does this mean to use standard home lighting timers like you can purchase from a hardware store? <Yep, you can find analog or digital timers at pretty much any store. You don't treat the PC's any different than you would a household lamp.> Sorry for the long post, but I really did try to find discreet answers to these questions before mailing you. I just don't want to end up with a system that is poorly planned from the beginning and limits me in the future. <Sounds like your heading in the right direction, I wish you luck! - Kevin> Thank you in advance for your time, Kevin (SaltwaterNewbie on the forums) Size Does Matter! (Bulkheads and Standpipes) Hello again, <Hi there! Scott F. back with you tonight> I appreciate your help and insight on setting up my new 180g tank, but I have a few more questions about the overflow. I finally got a reply from Oceanic about the size of their overflows and their philosophy about those sizes. Apparently their theory is that 7-10x turn-over in an hour is sufficient. For that turn-over rate the drain is a 1-inch bulkhead and the return is a 3/4-inch bulkhead. Now to go along with what you recommended and I agree, a Dolphin pump (3200+ gph), will the above size drain and returns be sufficient or should I have them drilled bigger by Oceanic? If so what size? <If it were me, I'd think about 2 inch bulkheads...> I don't want to have problems with my system because of limiting bulkheads. Secondly I was thinking about adding Durso Standpipes. If you suggest 1 1/2-inch drains what size standpipe? The same with 2-inch drains? I have read that for 1-inch drains you should use 1 1/4-inch standpipes. <I believe that you're correct, but the exact proportions seem to have escaped me...You can visit Richard Durso's website (do an internet search to get the URL) for his input regarding sizing and configuring overflows...> Lastly, I was thinking that I might need to put a single union ball valve where my pump will connect to the bulkhead at the sump and regular ball union valves at the bottom of each bulkhead of the aquarium drain for when I do tank or pump maintenance. Does that sound advisable. <I do that with my pumps, and I think it makes perfect sense. In fact, you'll really appreciate it when it comes time to replace the pumps...> Thanks for your help. Daniel <Glad to be of service! Regards, Scott F> Internal Overflow Sizing... I have asked this question on multiple forums and haven't got a satisfactory answer. I just picked up a used 180 gal to upgrade my reef tank. It has two- 2" holes already drilled in the upper back glass, approximately 4" apart. I would like to build an internal overflow with "fence" or "teeth" type construction to prevent fish, et al. from taking the journey down into the sump. Ideally, I'd like to have roughly 3000gph as a turnover rate. Can you point me to a formula or make a recommendation in regards to dimensions for an internal overflow which can handle this rate? (including the width of the spaces and teeth)? Looking forward to hearing your solution for this. Jeff. <Well, Jeff, the 2" diameter standpipes in the tank can handle a decent amount of flow (at least 1500gph. However, for a lot of ideas on the proper construction, sizing, and configuration of overflows, you can't beat the resources found on the DIY site, ozreef.org. Check out this link: http://www.ozreef.org/diy/index.html#OVERFLOW Hope this helps! Have fun with this project! Regards, Scott F> Plumbing a 180g AGA Tank Crew, <Hi Jeff, Don today> I'm ready to start plumbing my 180g All-Glass tank (pre-drilled for 1" and .75" bulkheads -2 corner overflows) to my sump but have a few concerns. <Fire away> I have searched past FAQs on this site and have read that the AGA corner overflows have the capacity of about 600 gph per overflow. My return pump is a Iwaki MD70RLT, so I may not have quite enough overflow to cut it. Is the "weak link" here the 1" bulkhead or the small slots at the top of the overflow wall? <The bulkhead> I have seen that Steven Pro has suggested, in the past, to use the .75" return bulkheads as overflow drains to supplement the 1" drains. If I do this, do you think I would have to cut wider slots in the corner overflows to help supply the addition drain throughput? <I have no direct experience with this so cannot answer directly. What I would do is wait until you do a live test with fresh water to check the plumbing, leaks etc. At that time you can determine if the overflows give enough volume.> Also, the sump is up against the opposite side of the same wall that my tank is up against, in another room. If I plumb this with rigid PVC, I am going to need to put two elbows on each drain; One directly below the bulkhead fitting on the tank and one directly above the top of the sump. Do you think these elbows will induce any significant drain restriction. <Yes, use 45 degree elbows if you can.> If so, would using a thinner wall pipe, like sched. 26 help improve this, or adapting it to a large pipe, like 1.5"? <I would use 1.5" for all plumbing. You might want to look into the Durso Standpipe as these corner overflows can be noisy and the Durso Standpipe really helps. Just put Durso Standpipe into your favorite search engine.> Sorry for all the questions. It is much easier for me to ask experienced folks and get it right the first time than go it alone and screw it up. <No problem, let us/me know how it goes. Don> Many Thanks, Jeff Re: Bye-Bye Bulkhead? Scott, <At your service...!> I thought of another question...sorry. You recommended to switch the order in the filter from live rock/skimmer to skimmer/live rock to get the most nutrient-rich water through the skimmer first. I thought of that, but this filter has a lid for the first chamber that has the bulkhead built into it. The skimmer is too tall to fit under that lid. Would it be okay (safe-I have to keep things safe as possible with 7 kids!) to not use the lid for this chamber and just let the inlet hose from the display tank sit directly in the chamber (not connect it to the inlet bulkhead)? <Well, to give you my blessings on disregarding the bulkhead would be irresponsible on my part, but...I think that if you could properly attach the inlet hose to the inside of the sump, so that it won't pop out, it could work out okay...Just be careful> I would have a pump of some size running the skimmer. The guy I bought it from had a Rio 2100 running it, but I plan to use an equivalent sized pump of another brand...maybe the mag drive. I was also told that the Dolphin pumps are good...know anything about them? <I have not used them myself, but a number of my friends have, and they find them to be quite reliable. Do a little research on the options that you have, and select the pump that will best do the job. Good luck!> Thanks, Paul <Any time, Paul!> Overflow sizes and placement How many inches of hole equals g/hr? Best place for overflow holes? <I would use the calculator at Reef Central or look at the pipe sizes for aftermarket overflow boxes for a guide. Best to shoot for a higher flow and control with valve on the return pump. 10-20 times tank volume total turnover. The best placement depends on the size, layout of the tank, inhabitants (make special considerations for anemones, small fish, soft bodied inhabitants, etc.). Best to check out marine set-ups at WetWebMedia.com or perhaps a good basic book, it will come in handy. See the books forum at WetWebFotos.com for revues by hobbyists. Craig Drilling for overflow Hello everyone! >>Hello, Dave! >I like the new prompts before asking a question...it should slow down the redundant questions. You guys have helped me a lot, and your forum is great too! >>Fantastic, good to hear. >I have a 30L AGA, and I wanted to drill it for an internal overflow. I was told to drill only the drain at a 1" bulkhead approx. 1" below the top frame of the tank. I was also advised to run the return( 1") over the back of the tank instead of drilling. What kind of prefilter could I then use? >>There are marine aquarium supply centers that sell a device that looks like a cone-shaped sieve. >What about a skimmer box to hide my prefilter? This seems to be more complicated than drilling through the bottom as I could use a 16" tall internal box that would cover the whole thing? >>Personally, I agree. If you're going to go to the trouble, and *still* need a skimmer box, why not go with a Durso standpipe-type design? >I plan on using an Aqua C Remora skimmer, and a sump underneath filled with live rock. >>Sounds like a good plan to me. >I also plan to have live rock inside the tank. I looked on the "wetdryfilter.com" site and it seems that drilling the bottom is standard...please help! >>You're avoiding the wet/dry in favor of a deep sand bed/refugium type of filtration methodology, yes? Again, I would want to go with drilling a hole in the bottom rear corner of the tank and then utilizing a Durso standpipe design. This would require the use of the skimmer overflow, but you were going to use that anyway. This way, everything except the returns would be contained within this overflow area. Look here--> http://www.rl180reef.com/pages/standpipe/standpipe_menu_nj.htm >>And here--> http://www.aurx.net/saltwater/durso.html (a Google search has turned up much in the way of designs and information.) Also, besides the WetWeb site, good information can be found at http://www.reefs.org/library >I have great appreciation for your advice, and anything you could help with would be great. Thanks in advance.-- Dave Adams >>You're very welcome, please do let us know how everything works out. Good luck! Marina How much rock and drilling tanks.. 3/10/2003 Hey Guys...hello from Bonnie Scotland <Hey!! And you got Scott V., the Scottish guy. Not to get too far off track, but I really am and have only been able to visit there once so far. I can't wait to go back! I just need to know in advance this time how many beers I need to drink to see Nessie. I guess I didn't have enough when I was there!> I am very new to this scene, and am getting excellent information from your site, IMHO it seems to be the most informative of all the sites I've trawled through, and I'm delighted to have found it. <We're glad you found it too> With regard to being new to the scene, I mean Marine, many years ago I had up to 3 tropical tanks on the go, two 4 foot, and one 2 foot hospital/breeding tank. However, once I had seen my first clowns playing around their anemone in my LFS, well over 10 years ago, I always knew this day was going to come (yeah, I know, better late than never). <Well, welcome aboard then :)> My old ball and chain <You don't get in trouble for saying that?> and I got a new house, and finally I found the right spot to situate my dream, so now here I am, I have just ordered a 6x2x2 all glass tank and it'll be arriving next week. As for Bio filtering, originally I was going to go for a Plenum system, but you have no idea how hard it is to get the egg-crate stuff over here, and even when I did locate some, would only sell me 4 foot x 2 foot in packs of 10, they would not split it. So, I've decided just to go DSB with LR probably about 75lbs(would that be about right)? <Hmmm, you're in Scotland. Would those tank dimensions be in feet? If those are feet, then that's about a 180 US gallon tank, and you'll need more rock. I think you should have as much as the tank will hold and still look good to you, but plan on one pound per gallon to start, at the least. A friend of mine, who I am helping, has a 55 gallon tank that already has 120 pounds of rock in it and there's still plenty of space!> Now I know a very important factor is the water circulation, so I was thinking of letting the water from the main tank run out via gravity to a smaller 4 foot sump underneath, housing a refugium of plant life, then to the skimmer. (I'd recommend it go to the skimmer first, but sounds good otherwise> I'm assuming chemical filtration won't be necessary here (Y/N)<Yes, it may be. I have to admit I don't personally, because I'm too lazy to change it probably, but a bag of carbon is never a bad idea! Even if you decide to forgo carbon on a regular basis, you still need an appropriate space for it as you never know when it, or something else, may be needed.> and out via a heavy duty pump (not sure what type or size to go for here, REEF)), and then back up into the main tank <Here's a great link on circulation! http://www.wetwebmedia.com/circmarart.htm It's the one I always refer to every time I forget :) But, don't forget to take head height into account when you are selecting a pump.> Now, this mostly seem reasonably okay up to this point, BUT, today I was reading that it was unwise to drill a number of holes (for outflow pipes, I was thinking 4 or 5 at 1") into glass, because it causes hairline cracks around the drilled areas, which apparently will eventually split and burst. (this was compared to the likes of a crack on a car windshield, which keeps getting bigger until it bursts). So now this has really dampened my spirits about this method, because I really wanted to do it this way. I know from just reading the posts in here that a lot of the guys use a pump to extract the water down to their sump<Very bad idea! What if either pump fails?>, but you all seem to agree as do I that just gravity alone is best. Any recommendations as to how I could solve this, maintaining the same kind of system I'm aiming for, or is the thing about drilling the glass just rubbish?? <Well, neither really. If you drill glass there is always that risk. That's why any glass shop that will drill a tank offers no guarantees. However, it is rare. Any other way of getting water from the tank to the sump is fraught with even more dangers. An overflow can lose its siphon, and pumps can fail. As for how many holes, what size, how to configure it, I would start by reading all you can here first: http://www.wetwebmedia.com/plumbingmarart.htm, along with the associated FAQ's.) One more note of interest is that I have noticed that a number of people who post here, when setting up a new tank, during the cycling period talk about introducing a few Damsels to help the process. Well, I kind of understand why they would do this. Check this out!! I have a few books on setting up your first Marine Aquarium and inside, when they discuss the cycling period they actually STATE that introducing a few hardy fish (Damsels) would help this process along, as well as introducing some welcome activity in the tank! Honest they really do. Don't get me wrong, I would never dream of doing this, it's suicide if you ask me. I'm quite content to let the LR do its job for about 6 - 8 weeks before even thinking of introducing anything. But it just shows you, if there's one, two or even three books that say this, there's probably others. <I know without a doubt that there are MANY books that will say this. However, most of those same books probably don't even mention live rock, much less discuss it. As in many other areas, the technology and knowledge is constantly changing. I can't keep up with myself. It really wasn't all that long ago when live rock wasn't even an option. The only decision was what kind of fish to risk first. And yes, in that scenario, the damsel won hands down. But, we have live rock now, deep sand beds or plenum systems, and protein skimmers.> Many regards, and thanks for your time <No problem. It's too early for bed and too late to start a new book anyway!> Sorry it's more like a tome than a query question, I just like to think introductions come first.. P.S....my postman seems to be taking his time delivering Bobs book...I hope it comes soon :-) <Scotland has mail???? :) Enjoy the book once you finally get it, and enjoy the tank. Again, I really hope those dimensions you gave were in feet and not meters! Have fun. Scott V.> Cheers guys Raymie (Scotland) Overflow volume and noise Hello, Getting ready to drill a 120 gal. tank and have a concern about the noise from the overflows. I am hoping to turn over the volume of the tank at 20-22 times per hour. I have read that a 1.5" overflow (PVC) can drain water from the display tank into the sump at a rate of 600 GPH (I plan to "T" the 1.5" PVC on the outside of the bulkhead so air can escape as the water runs through the overflow into the sump). <Easily 600gph. <<Uhh, not so. RMF>> Go to one of our sponsors like Foster and Smith, Quality, etc, and look at the flow rate of add-on overflow boxes with 1.5" pipe. If you are concerned with noise, under-using the overflow/plumbing size and using Durso style vents (like you intend) is a good plan. The water actually doesn't make any noise....it's the AIR being *sucked* into the drain that makes the noise. If it flows rather gently with enough room for a reasonable amount of air while draining it will be quieter.> I think I read somewhere that the 1.5" overflow can move 600 GPH, BUT will create a lot of noise as it moves that amount of water. <Probably not. A 1" pipe is rated for 600gph, <<As a gravity drain? Not even in a perfect universe. RMF>> so 1.5 is considerably more. Still, you will do well to use oversized overflows for noise reasons.> The suggestion was to plan for the 1.5 overflow to move only 300 GPH (1/2 it's capacity) and it will move the water much more quietly. <Please do check out the rating of the overflow boxes with 1.5 " pipe.> Is this true? <The theory is true, the sizes/flow rate need to be changed to protect the innocent.> If so I will refigure my plumbing and drill extra hole(s) and only expect the overflows to carry 300 GPH- but quietly. I continue to use your wonderful site daily! Thanks <Bigger is better, but 300 gph through a 1.5" pipe is probably a little overkill. They will do 600 gph without much problem. Check out the overflow plumbing, it will help! Craig> Re: Flow Rate Thanks in advance for the help! What rate of flow could I expect from a 2" pipe stemming from an overflow with two 45 degree turns? I have six such pipes on my tank and I want to match up the two return pumps correctly. Thanks. signed--- "Waiting to Buy Iwakis" <2" pipe can drain approx. 2000gph passively, <<You're high! Or dreaming... no way. RMF>> but do be conservative in your estimates. I have two vats with 2" overflows, one drains 1800 gph easily, and the other drains 2000-2400 gph, but with an elevated water level as it is almost at capacity. Hope this helps! Craig> Drilling size Thanks for another quick reply....I just got off the phone with the salesman....he told me the largest return openings he could drill for was 1"....then he mentioned that neither he nor 3 other wholesalers carried 1" lock lines. He advised me that 3/4" lock line is what everyone uses and that he couldn't even find 1". He then advised that the way the system comes drilled standard is 3/4" returns and 1" drains so draining won't be a problem. <<They're incorrect... RMF>> <Just have enough drains to drain more than the pump capacity and enough returns to use the full capacity of the pump. Remember, the return is pressurized, the drains are *passive*. It's really just a matter of quantity now, not size.> He also advised that 2100 GPH was a ton of flow....said 15.5 turnover was way plenty and that if I wanted more current I should be using Powersweeps on either side to get the current rather than using the recirculation pump to get it. <I wouldn't waste a single cent on Powersweeps, they are complete trash and will last no longer than three weeks max. The required flow is 10-20 times, so 15 X isn't a big deal. Your LFS needs to update info! Regardless, 2100 GPH is sufficient for most corals, perhaps not for others, like SPS.> AND he also mentioned that I may have wasted 800 bucks on a chiller... With a 14" high canopy and 3x250 MH I could have used a fan to keep the temps down. He advised that even if the temps got up to 82-84 degrees I still wouldn't have to use a chiller, I could just keep the temps around 82-84 all the time. I dunno...maybe I need to look into sending back the chiller and get more live rock!! <Well, depending on where you live and your summer temps, he may be right! You can use fan(s) inlet (pushing) and outlet (pulling) to keep the hood/air cool. I would still shoot for enough fans to keep it as close to 80F as possible. Up to 84 for short-term is alright. I would return it myself unless you live in FL or CA. without air conditioning. Craig> Re: Drilling size Hey guys, me again I ordered a Clarity Plus acrylic 135 Long tank, I believe the mfg puts the center positioned box in the tank, but as I understood the salesman, the drain and return holes are drilled by the salesman not the mfg. <This is good, it will give you some time to plan your circulation.> Either way the tank hasn't been made yet, what diameter holes for drains and supply should I have them drill for? <You will need anywhere from 1350 to 2700 gph for a reef, depending on your chosen inhabitants and their needs. I advise planning to accommodate the upper end which gives you the ability to update/size your equipment. It's not difficult to get more water pumped into the tank, the limitation is drilled drains, so plan those to take 2700 gph and you should be safe. Go to one of the WWM sponsors that sell add-on overflows, match your desired flow rate to the closest box9s) at or over 2700 gph and see what size plumbing they use to drain them. Perhaps oversize one size.> I ordered the tank originally with 2 drains and 2 returns. At the moment I have only the Ampmaster 2100 pump which should have a straight shot up to the outlet at no more than 5ft head. At that rate I should be getting 2100 GPH according to Dolphin, that's assuming I'm using 1.5 inch piping. <Slightly less due to plumbing loss, but close.> Should I have them drill all holes to 1.5" , 2 returns and 2 supply using that pump or in the future if I wanted to add another pump I would just add another 1.5" pipe for return? My first intention was to Y from the pump from 1.5" to 2 1" but if you suggest 1.5" holes then I'll just Y from 1.5 to 2 1.5......I guess I need to let them know ASAP. And should that 2100 flow be enough for a 135 reef at a listed 2100 GPH? Thanks again and again <All you really need to hassle is the drain/overflow size(s). You are wide open on return designs with no holes drilled! Your Dolphin at 2100 gph at 5' is likely fine for now. If you really want more you could add a closed loop with a pump in the overflow box, a manifold, etc. Take your time on the returns and think about what you want to keep. Think about your rock work, circulation, dead spots, etc. 2100 gph seems like a lot of water, until it gets divided up into all the necessary places! That additional 600 gph or so can come in handy if you are inclined to additional. redundant pumps. Redundancy can be good when a pump goes out, but it is rare...and added expense. Again...2700 gph is the upper end, plan to drain 2700 gph and how you get it there is much easier to plan and plumb anytime. Splitting the existing 2100 gph return with one pump will work and then your drains will easily handle it. You really need more than two return outlets. Please see WetWebMedia.com google search on "marine set-ups", refugiums, sumps, plumbing, for much more info and ideas on circulation. Hope this gets you there! Craig> Overflows in Glass Tank Hi to all and thanks for the answer Anthony, I have the 55 gal corner bow tank Aqua C Remora, and magnum 350 canister Here is a picture so we are on the same page. I did all the things new fish keepers do and bought everything without any research. That was a year and a half ago. I built the Cabinet as well as a matching one in another corner with a TV on it. Maybe some day that will get a matching tank on it after I throw a brick through the TV haha. We are currently going to add a DSB (in the trashcan to the left) and live rock (in another tank). I have discussed an upstream refugium and the wife doesn't like the idea of another tank on the wall. She dislikes it enough that she has given up on having the Green Mandarin. I want to put in a sump in the cabinet below and a 20 gal high will fit nicely. That way I can hang the Remora Pro down there as well as the heaters. Are there any other reasons that a sump is a benefit (to convince the wife hehe)? <Hiding all of the heaters, pumps, powerheads, etc in the sump makes the tank look cleaner and less cluttered. The added water volume stabilizes the system and allows you to make water changes, supplement etc. in the sump. Much easier!> If I do put a sump it seems like I would need to drill the tank. The bottom is tempered glass so that is out, but I could drill the back. Could you please explain how to determine the height of the hole so the 20 gal does not overflow when the power goes off. <The hole should be <sic> several <<a few. RMF>> inches below the desired water level, a 90 degree ell threaded/glued into the bulkhead turned UP to the surface. Insert pipe into ell as long as needed to place top of pipe at the desired water level, minus about 1/2 for water to flow over the top of the pipe. IOW, the water is pumped into the main from the sump, UP to the top of the overflow pipe, and then when it overflows the pipe it drains into sump. If pump goes off, the water cannot be pumped over the top of the pipe and it all stops. Make sure you put siphon breaks in your *return line* so they don't siphon in a power outage as well. Ask your local glass supplier about drilling glass.> Also what size and how many would you put in this tank? There are so many different schemes for doing this that my head is killing me. (could be the Guinness though). You have really helped us out in the last six months since finding your site so I really wanted your advice. This seems like the time to do any modifications since is nothing in the tank. Thanks for your help Bryan and Dana Flanigan PS sorry this is so long. We are stuck at home in this blizzard with nothing to do except yell at the kids and dream of ways to spend money on fish. <Depending on what you want to keep, 10 to 20 times turnover is needed. So, from 550 to 1100 total turnover. The WWM sponsors sell overflow boxes that are flow rated with various pipe sizes, head over to one of the sponsor sites and size your overflow bulkhead(s) according to these flow rates/pipe sizes. Oversize by a safe factor. IE: I would likely go with a 1/1/2" overflow in case I want a closed loop circulation system in the future or if increased flow rate is desired with growth, change of plans, etc. I suggest over-sizing plumbing by one or two sizes to allow for adjustability/growth. Best of luck! Craig> Bulkhead placement and noise 2/16/03 Hi guys real quick one. I have 2, 1.5" bulkheads drilled in the top back of my 75 gallon tank. I decided to add a glass overflow (like Anthony describes in his book) about 1" wide along the entire back of my tank. This has been siliconed and really looks good. So I filled my tank up (again) w/ tap water to test everything out. Well....I don't think the overflow works quit like I hoped. Don't get me wrong, it pulls a sheet a water directly from the surface, and works great w/ a simulated power outage, but the problem is the water going into the bulkheads. I don't know how I thought it would work, but here is my problem. As the surface water runs over the overflow there is about a 1-2" space at the top of overflow where there is no water and the bulkheads are sucking the water in, in fact the very top of the bulkhead is not in/under the water so I am getting a sucking noise. <if I understand correctly... the top of the bulkheads are actually slightly higher than the top of the overflow? If that's the case... no worries... drain the tank slightly and silicone an extender piece of glass to the overflow> I have been told b/f that this could be from a pump pushing more than the bulkheads can handle <almost certainly the case... not a problem even with your high placement of the bulkheads... that has nothing to do with creating a siphon> (pump is CSL velocity T4) but I have tried turning down the return w/ a gate valve and it doesn't help (turned the flow almost off even). <Doh! you fit the bill, bubs. A common problem where aquarists don't drill enough holes or put too large of a pump on. The ratings for bulkheads are a joke. What they can run under pressure (or creating a noisy siphon like you hear) and what will run safely and quietly (half filled pipes) are two very different things. The common 1" bulkhead is rated at 500-600 GPH per hole. But at that rate... it is noisy as all get out! 1" bulkheads really should only handle about 300 PGH each to be safe and quiet. Thus... to run a 1200GPH pump, you need 4 bulkheads! With your 1.5 inch holes... I'd guess you could only run about 1000PGH trough them quietly. If your pump is pushing more than that... you have your answer IMO> I always read that the best way to have tank is drilled for bulkheads, instead of built in overflows w/ bottom drains to pump. <not much difference in flow here... just noise (the floor holes/towers are much louder)> But it seems almost everyone has these and builds a Durso standpipe and everything is quiet. <this is just an engineering issue, my friend. Holes drilled on the back wall and sized correctly for the pump do not require a modification like the Durso. You just don't have large enough holes/bulkheads> I don't have this type of set up, my tank is drilled on the back w/ bulkheads and I can't hardly find anything about how to get flow from the tank/bulkhead to the sump and the quietest way to do it ( Nightly I read over WWM, reef aquarium guide, reef central and reefs.org) Please Help. I'm ready to get the tank going again but have been dealing w/ this issue for about a month or so. I might even rip the overflow off and try 90 degree elbows again and try to rig something else up. <will not solve the problem bud... cut that pump flow back to 1000GPH and you hear it quiet down> I even tried the elbows b/f, but again had a terrible sucking noise, and yes tried turning the pump down, still did not help. Any suggestions, I'm just feed up. Thanks Bryan <no worries bud... a miscalculation. Easily corrected. Best regards, Anthony> Overflow capacity Hi, I was just wondering if you happen to know what the max rate (gph) a prefilter can handle with a 1" tube at bottom of tank, as far as how many gph pump could I use w/out overloading. I was thinking of a little giant pushing 1000 @ 3'. <A 1" overflow pipe will not handle 1000gph, better surf over to one of our sponsors and look at what flow 1" overflow boxes will accommodate. Foster and Smith carry CPR overflows with 1" pipe that have gph flow rating.> What external pump in your opinion is the most quite for an external pump. Thank you for your help ! <Iwakis (Japanese, not American) and Custom Sea Life are popular quiet external pumps. You will need the overflow capacity to handle these! Craig.> DIY overflow box Real quick one here. I have 2 1.5" bulkheads on the back of my tank, and about 3" or so from the top of tank. I have added some 90 degree elbows to function as overflows and surface skim. I got to thinking tonight. I have a lot of extra acrylic from my sump I made, and thought...maybe I could make some overflow type boxes to put around the bulkheads. What do you think? can this be done? Main problem I'm having is how to attach around the bulkheads so flow only comes over the top of overflow. any suggestions? << Hi Bryan, Oh YEAH this is a good idea. Make a slotted dam/weir along the back wall deep enough to accommodate the bulkheads, elbows. Quite beneficial. See here for ideas http://www.wetwebmedia.com/plumbingmarart.htm. Note on the diagram that you can extend the bottom of the internal skimmer box and make a shelf for coral, etc to help hide the box. You say 'around the bulkhead'. You want to skim as much surface as possible. A small 4-5" box around each bulkhead is not going to do nearly as much good as one the length of the tank. Gonna make a leap here, the tank is also acrylic? You can try silicon, may not hold acrylic. If not, me thinks the next step is 'gluing' with acrylic solvent.>> Thanks Bryan <<My pleasure, Don>> Bulkheads and return flow Hi guys have some questions regarding bulkheads and my return flow. I have 2 1.5" bulkheads drilled into the back of my 75 gallon tank. Can you possibly tell me how many gph I am getting thru each bulkhead? B/f I had it drilled I ran by WWM about 8 months ago and they said a 1" bulkhead can handle 300gph. Reason I am asking is b/c I have run into a little problem. I'm finishing upgrading my tank and have the 2 bulkheads going to a sump @25-30gallons. return flow is by way of a Velocity T4 (about 6' of head) BUT....when I fill tank and turn everything on, my 2 bulkheads are draining more than my pump can pump. Each time I have to turn everything off and drain part of the water so my sump doesn't' overflow. This is my 3rd pump (I love how quiet the T4 is...had a little giant 1st) I may have to go with a dolphin Ampmaster pump (2100gph) and try to adjust the flow on the return w/ a gate valve. <Bryan, regardless of the pump, you should be able to put a gate valve on the output side of the pump on the return line. Use this to govern flow Don><<Mmmm, actually the "problem" as stated is one of excess transit volume... per the placement (and size to an extent) of the through-hulls, the main tank, plumbing... and too-small capacity of the sump... Put simply, there is too much water "in play" with the system going for the sump to accommodate the transit volume with the pump turned off... or too little for it to hold once it's going from a standstill (powered off) to supply the return pump... the likely solution here is a much larger sump... This or possibly threading street ells into or pushing slip ones into the inside of the through-hulls in the tank to raise the water level... RMF>> Thanks Bryan Drilling a tank I have a 2 month old Reef Ready Oceanic 58 gal tank with a 1" bulkhead in the bottom. The tank is currently set up with sand, live rock, fish, etc. I would like to re-drill the tank for a 1.5" bulkhead to accommodate a larger pump (MagDrive 1800). My question is, can I drill the tank if I drain only the overflow box or does the whole tank need to be drained? Thanks, Randy <The whole tank... needs to be taken down, drilled while empty. Bob Fenner> Overflow Prefilter Greetings, <<Hi, Don this afternoon>> Always a pleasure to read this web-site. It is great to see that you have some more "Pros" other than Steven helping out. yuk yuk yuk! <<uh, Thanks, I think, Oh, Pro, now I get it;)>> I have a overflow box that has a coarse sponge pre-filter. I typically rinse this about once a week. It always has some decaying food and mulm attached to it. I think that it needs to be cleaned more frequently maybe even daily. For a lot of reasons like travel and procrastination, daily cleaning of this pre-filter won't happen. What are my options? The overflow feeds into the sump where I have a protein skimmer. Should I remove the coarse pre-filter to provide more "raw" water to the protein skimmer? <<Recommended course. See here for more http://www.wetwebmedia.com/marmechf1.htm>> Knowing that food gets caught on the pre-filter....will the protein skimmer collect the food or will the decaying food just get moved to the next coarse pre-filter just before the return pump? <<Ahh, maintenance never stops eh? You can try a micron bag on the end of the overflow into the sump to catch crud, but it too will require regular (every other day if not every day) maintenance. Maybe best to go without either and try to get to the other filter more often. >> Also, I would like to drill the 40 gal glass tank for a 1" overflow.<<Just an observation as I don't know what your intentions are, but maybe two holes? easier now than breaking it down, again, later>> My understanding for this procedure if you do not want to remove everything from the tank and there is adequate space to drill the hole is: 1. Drain the tank well below the overflow - add filtration and heat to the lowered water 2. Clean the inside surface where the overflow box will be mounted 3. Silicone the overflow box 8"W X 5"H X 3"D in place 4. Drill the hole using the overflow box to catch debris on the inside of the tank 5. Install the bulkhead in the hole ensure that the bulkhead id is at least 1" 6. Attach plumbing to the bulkhead to the sump 7. Ensure that the silicon is dry (6-8 hrs) <<I would wait 24 for any silicone job>> 8. Re-fill the tank and restore heat and filtration in the sump. Where is the best place to get the glass bit and lubricant? <<I used water>> Is the above too risky? I do have a 20 gal tank that would be ready in case of a serious (i.e. crack) situation.<<While the above may work and for others successfully, I would not advise to drill anything but an empty (completely) tank. I got the first hole drilled in a 20H for a refugium and about half way through the second, BOOM, well, lets say I then waited for the glass shop to get a replacement cut for me. I got a bit locally, but there are many web sites selling them. Google search? Also, see if you have a marine society in your area, they may have some you can rent/borrow>> Again, thanks for the help. << Happy glass drilling Don>> Kinzie Re: DIY bulkhead overflow HI guys, Don thanks for the support about my bulkhead overflow idea. <<My pleasure, glad you were able to follow the ramblings of an old man>> I had thought about just placing a box around each bulkhead, but then Don made comment, and I remember Anthony touched on in his book, that an overflow the length of the back of the tank is a lot more efficient. So...I did some measuring today to start making plans. This is what I have so far. I have a glass 75 gallon tank w/ 2 1.5" bulkheads about 3" from the top of tank on each end. I want to make this out of acrylic. The overflow about 44" across to each side, roughly 5.5" tall/high and the top lip of overflow about 3/4" or so from the top of the tank. This is where I need a little help. How wide/ deep should this thing be? <<Obviously, enough to handle the elbows. 4x4 or 5x5 I would think. Unless I am missing something here>>I remember my CPR siphon overflow and even though it hung on the tank the overflow part was probably 1/2" or so wide where the water flow was. So I was thinking between 1/2" and an 1". This is the big question. How to attach to the tank? Right now I'm thinking about adding/connecting 1/4" to 1/2" edges/strips to the back of the overflow that I described above, so that now, I only have to silicone 3 edges to the tank (2 sides and the bottom)...(hope you can follow) instead of a whole big piece the length of the tank. How does this sound? <<Sorry Bryan, can't say I have ever read/heard positive thoughts about using silicon to attach acrylic to glass. I would think you would be better off using glass. Or, figure a way to support the acrylic overflow with brackets>> any suggestions/comments? See any problems or change anything? Thanks Bryan <<Sorry I didn't have better news, Don>> P.S Craig, the elbows on my bulkheads worked. I filled the tank like you said and everything leveled out. sump and main. Thanks for your help. <<Ain't he something :)>> Re: DIY bulkhead overflow (part III) Don thanks for quick response about my DIY acrylic overflow for my bulkheads. <<Glad to help>> Let me run a couple more things by you. <Walk please, I'm an old man and can't keep up>> I forgot to add that I 'm not going to use the 90 degree elbows on the bulkheads with my overflow. <<OK>> I thought that this would make it not as wide/big. Have the bulkheads open or bare and let the flow go over the acrylic overflow and down the bulkheads to the sump. <<Ahh, good>> (this way I can make it say 1/2" to 1" wide and won't take up a lot of room or be that noticeable.) Does this sound fine or are there any problems you foresee? <<IMO it is better to over design than under. Last thing I want to do is tear down/redo stuff. Experimentation is good though too. Let me know how this works for you>> I was a little disappointed that people don't have luck with glass to acrylic silicone contacts, sooooo, back to the drawing board. OK I'm at the drawing board, <<Quick Trip!>> what about this? Add or put brackets to the overflow so that its main support is by the brackets on the tank, then use silicone around the edges of the overflow so that flow does not seep in around the sides (only over the top) and that way if in the event of a power outage there is no flooding of water seeping through the sides of overflow down the bulkheads and into the sump. Does this sound like it might work? <<Again, hate to be the devil's advocate, but remember Murphy? Well, when the thing misfires, if it ever does, it is gonna be while you are asleep or at work. At least that is my luck :(>> Oh yea, last thing. I posted this overflow idea on reef central and someone thought I was crazy for wanting to do this b/c I should be getting enough surface skimming from my bulkheads and elbows, what do you think? <<To each his/her own. Different folks, different experiences. Maybe you should try the open bulkheads first and see if that works for you. Make sure to screen for livestock benefit. Add the overflow later if the open bulkheads are not to your liking>>Thanks Bryan <<Forge on, and let me know how it comes out, what you decide. Don>> Bulkheads and return flow Hi guys have some questions regarding bulkheads and my return flow. I have 2 1.5" bulkheads drilled into the back of my 75 gallon tank. Can you possibly tell me how many gph I am getting thru each bulkhead? B/f I had it drilled I ran by WWM about 8 months ago and they said a 1" bulkhead can handle 300gph. <300 gph easily> Reason I am asking is b/c I have run into a little problem. I'm finishing upgrading my tank and have the 2 bulkheads going to a sump @25-30gallons. return flow is by way of a Velocity T4 (about 6' of head) BUT....when I fill tank and turn everything on, my 2 bulkheads are draining more than my pump can pump. <Um Bryan, how can your bulkheads be draining more water than they are being fed by the pump? This isn't possible, UNLESS the overflows/bulkheads are under water and siphoning? This would be very wrong! The overflows should be at the top of the desired water level (or just below it) so they only drain whatever the pump will pump. When the pump stops, they stop draining!!!> Each time I have to turn everything off and drain part of the water so my sump doesn't' overflow. This is my 3rd pump (I love how quiet the T4 is...had a little giant 1st) I may have to go with a dolphin Ampmaster pump (2100gph) and try to adjust the flow on the return w/ a gate valve. Thanks Bryan <This isn't your pump Bryan. The overflows are gravity fed and are to be AT water level when the pump is off. They should only be able to drain the capacity of the pump returning the water. When the pump is turned on, the bulkheads SHOULD be capable of carrying more water than the pump is returning OR the main will overflow and flood! The sump and main water level should be SET when the power is OFF and the water in the main is at the top of the overflows (it's lowest possible level) and the sump level is NOT overflowing but still at it's highest desirable level. Then, when you turn on the pump, it will pump water from the sump to the capacity of the pump and overflows and stay at a constant level. If it doesn't work this way, you have a siphon through the returns or overflows. Please let us know if this helps! Craig> Re: Bulkheads & Return Flow II Hi Craig, <Alright Bryan! The eagle has landed! Cool! Glad you found the problem! Yeah, the elbows will fix your siphon and draw water from the surface.> Again, thanks for all your help with my bulkhead problem. With all the reading and researching I have been doing about other aspects of this hobby, I seemed to have overlooked a very important detail...HOW to fill my tank correctly. My first FO tank had a CPR package wet/dry, siphon overflow and Rio. I just put it in the tank plugged her in and there we were going. But when I had the tank drilled for 2 1.5" bulkheads I didn't grasp the whole concept about fill levels. Like you said, each bulkhead is about 3" or so below the top off tank, so when I would try to fill the tank at the level I had my first with my setup, I kept flooding my sump ( I did know that I would have a problem in the event of a power outage)...i.e., my bulkheads were creating a continuous siphon. So, I am going to add a 90 degree elbow into the bulkheads so now they will act as an overflow and hopefully get everything worked out. I do have a question though. I have included s/t I believe Steven wrote me about a year or so ago regarding filling a tank, but at the time It didn't matter. Here it is: "When you first fill the tank up, only add enough water to get the return pump to operate. After it is working for a few minutes, shut everything off. This will allow the water to back siphon down (simulated power outage). Once water has stopped, fill the sump. Now turn the pump back on. When it has reached an equilibrium, mark that water level. That is now your maximum fill level." Then I talked to a rep at Dolphin pumps (very nice and informative) and he said to "Fill the tank till you start getting flow to the sump, once the water has filled the sump to the level you would like, turn on the pump, this is your fill level. This is a little different than Steven's. What do you thank Craig? IYO/IYE what seems to work the best? Again, thanks for everything Bryan <They both will get you to the same place, more or less. Steven's way is a little cautious (the consummate aquarium professional) has a built in test to see if the siphon actually breaks and stops in his "simulated power outage". You could do the same by filling according to the Dolphin guy and then unplugging the pump to make sure all is well in the event of a power outage. Six of one, half a dozen of the other. Now, go forth and have FUN! Craig> Re: Almost made a big mistake (big tank plumbing) First off I'd like to say that today was the first time I've visited your site and I'm totally blown away by the wealth of information offered. I will definitely make this my first (and quite possibly ONLY) destination when posed with aquaria-related problems. That said, I am building a 300gal "freshie" tank to house my ever-growing Clown Knife, and would like to bounce my ideas off someone who knows their schtuff. My original plan incorporated a CPR Overflow Bow with two 1" outflow bulkheads rated at 1400 GPM. <Mmm, do make this two overflow boxes... just in case one fails... you are likely familiar with how "frisky" Clown knives can be during the night... One unlucky swipe at the single box might knock it out of commission... the pump/s below will continue pumping, overflow the main tank, drain the sump/s...> The 1" lines would run to two separate 30gal sumps, each containing a Quiet One Pump (an okay choice for freshwater I'm assuming). <Yes... but please do check around re this pumps reliability... and consider other makes. The bulletin boards are great here for input. Ours: http://wetwebfotos.com/talk/> The pumps(2) are rated at 750GPM at 4' head height, so with my head height of 5.5' I was counting on getting that down to under 700GPM per pump so that the CPR would keep up. <Best to tie those sumps together (thru-hulls, pipe) in case of mechanical failures... am an old worry-wart with plenty of water damage clean-up experience...> Now my problem: I've read over and over that siphon tubes (especially the CPR models) are nothing but trouble waiting to happen. I am re-designing my setup to incorporate holes drilled into the back of the tank just below water level to allow gravity flow to the sumps (which will be easy as my tank is of mostly wood construction w/glass front). Since the CPR box has two 1" bulkheads, and claims a 1400GPM flow rate, am I wrong in assuming that two 1" holes drilled in my tank will provide the same flow? <Please oversize them... 1 1/2" inside diameter is much better... easier to arrange to not make a bunch of noise> Also, if the holes are below the water line, and I make them too big, wouldn't that cause more water to enter the sumps than the pump could remove, causing sump overflow? <Mmm, no... at least if you don't "overfill" the sumps... the amount of water "in play" is all you're concerned with. Start the pumps with the sump and main tank full, mark the sumps at the level they drain down to with the pumps on, and never fill the sumps beyond this level... the transit volume of water is the difference in starting, pumping levels> Would using ball valves on the line to the sump and the line to the return head allow me to achieve a balance? <Don't count on this... or even float valves... count on gravity and what sources of blockage, trouble you can anticipate. Bob Fenner> Thanks for your help, Brand Smith - Anderson, Indiana Re: Skimmer Box / Overflow design Hello WWM Crew! I'm pondering an approach to get water out of my tank and into the sump without using a siphon-based design and without drilling the bottom of my tank. I've attached a design in both PDF and JPEG format and I'm hoping you can give it a sanity check. The goals are to achieve a good flow and to minimize noise. A couple of points I'm wondering about are: - Is the (downward pointing) elbow in the skimmer box necessary, desirable, or irrelevant? (I borrowed it from the Durso design without really knowing why) <It's not necessary, but reduces sucking air sounds at water surface, esp. if the skimmer box has enough capacity to feed bulkhead flow. Box size should be large enough to accommodate flow, plus. The deeper in the box the bulkhead is placed, the less this is needed. They sell bulkhead with screened intakes which could/should replace the filter/screen/light grid idea which will cause problems. Install a drip plate in the sump if you want this.> - Is the tee with vented cap necessary, desirable, or irrelevant? <Absolutely, this is where the venting/air will come from with a submerged bulkhead skimmer box/intake, so the water can drain into the sump.> - Should the tee w/ cap extend above the top of the skimmer box teeth? <It should rise above tank water level/skimmer box teeth by a few inches or water will drain out of the vent.....> - Would fixing an air valve into the cap to allow adjustment of airflow be a good idea? <Nope, you want a 1/4" hole that will allow air to enter and exit at will. The air must pass through this hole to equalize the pressure in the drain.> - Should the outtake, tee, & drain pipe be the same size or should there be a reduction/enlargement somewhere? <These can all be the same size, as long as they are sized for the desired flow rate.> - Is having a pre-filter here a good idea? I like the idea of keeping gross objects out of the sump & drain line with the understanding that the pad or piece of foam will need to be rinsed frequently. <Try a micron bag or drip plate in the sump instead.> - If so, is a simple piece of light diffuser (egg crate) resting on small ledges inside the box a reasonable choice for supporting the filter media? Is this material generally considered to be aquarium-safe? <Yep, as above.> - Assuming a bulkhead sized for a 1.25" opening, how deep would you make the skimmer box and where in relation to the top of the box (waterline?) would you make the centerline of the outtake pipe? <Many make these full tank depth. The depth is related to overall skimmer box size/capacity to feed the bulkhead water without sucking air at water surface or outpacing the box capacity. This is also true of bulkhead depth. The large the box and deeper the bulkhead, the better. Some skimmer boxes run the full length of the tank. I would prefer a deeper box and bulkhead near the bottom. In the event of power outages, the water will stop siphoning at the bottom of the box teeth. You don't supply tank size or flow rate, just oversize box and plumbing to accommodate needed flow rate. Shop siphon type overflows to see what plumbing sizes/capacities they use.> Well, that's it. Any other thoughts or comments you might have are highly welcome. Thanks as always, Tim <Looks good Tim, have fun! Craig> Re: Overflow Question Thanks! Just to clarify, there won't be any no problems (noise or otherwise) with having the 3 2" bulkheads installed on the back wall of the tank, at the water line. With this configuration, no overflow will be set up. The water will free flow through the bulkhead into the vinyl type pipes behind the tank, into the sump below. <Should be sweet, esp. with vents (similar to Durso) just above the vinyl pipe fittings. A tee with riser and a drilled cap (1 - 1/4" hole) works great. I like ells in the tank, but they can introduce water noise. Will 3 2" free flow piping handle 3000 gph? <Sure. To double check look at the overflow rates of aftermarket boxes with 2" pipe. My vats use 2" overflows and they handle around 1400-1500 gph +/- . Craig> Re: Overflow via Durso vs. Back Wall.... Greetings to WWM, If you were setting up a new tank which would you go with... Either 2 1.5" overflows w/Durso standpipes or a couple of bulkheads at the top back of the tank? <Either will do the same thing. One is less expensive than the other unless you use overflow boxes in which case they are roughly equal in cost/flow/noise, depending on size (of box and plumbing/bulkheads), depth (of overflow box and how far, if any distance, the water falls into the boxes.> Rather than personal preference I am looking for the configuration which will A. minimize the amount of overflow in the case of power outage and B. minimize the amount of noise. <This depends on how the boxes are set-up and the height of the overflows/Durso pipes. The water will only drain as far as the top of the overflows unless it is designed differently AND if there are holes drilled in the *pump returns* just below regular operating water level so the pump return doesn't also siphon water into the sump, backwards through the pump.> Is there an inherent problem with having your gravity fed overflows high on the back of the tank? <No, unless you want to make them adjustable, in which case having a 90 degree ell (coming out of the bulkheads) and perhaps a threaded screen/pvc fitting will allow you to raise and lower them to the desired height.> I built a sump/refugium this weekend of about 18" in height and my first baffle is 14" tall so it doesn't have a lot of room in case of power outage which led me to the back drilled idea... any comments, suggestions? Thanks Guys! Your invaluable! <Just remember, gravity and siphons are very reliable. Make it work for you! Let us know if you need more assistance. Craig> Re: Overflow Question I'm looking into replacing my current 180 gallon aquarium with a new one. Would like to know the differences between the standard corner in tank overflow versus using standard 2" bulkheads (x3) drilled into the back wall along the top at water level. Obviously both will serve the sump below the tank. The main thing I'm concerned with is the noise level. The corner overflow in the current tank uses a Durso stand pipe, so it's relatively quiet already. Sincerely, Craig <There is no real difference between the two. The bulkheads can also be enclosed in a skimmer box like the corner boxes if you wish. The noise depends on how the overflows are vented and the size of the overflows/boxes, and how far the water falls into the overflows/boxes, if used. Hope this helps you out! Craig> Overflow modification Hello again... <cheers> I have a question about one of the FAQ's I read in regards to the overflow described in Anthony's book. The person wrote that he wanted to set his tank up without the overflow box on the upper back wall, just have the bulkhead holes with screens over them. My question is, won't this keep the water level too low? <Well... it could be too low for aesthetics IMO and it would at that point have none of the benefits of the horizontal overflow described in my book. It would simply be a traditional bulkhead application. Those bulkheads could simply have an elbow with a screen strainer turned upwards to raise the water level (and in fact give control over changing that level by swiveling the elbows higher or lower... some advantage there)> If you have 4 1.5" holes about 3" to 4" from the top to the center of the hole, the water level will never climb much higher than that, right? <correct if screen only are used... but elbows with screens can correct that (raise water level)> If you do fabricate one of these overflows, I assume then that it should only touch the back wall, <capturing the bulkheads yes> hence your reference in my prior email to it being almost 48" in length. <indeed.. thinning the overflow water and improving proteins collected> Then I don't have to worry about the tank bowing and the overflow separating from one of the walls, correct? <correct... the flow of the long horizontal overflow is a tremendous support... prevents bowing> Thank you! <Best regards, Anthony> Overflow- undersized as usual Quick question I keep forgetting to ask. I have 2 1.5" bulkheads drilled into the back corners of my 75gallon tank. I am wanting to surface skim by putting 90 degree elbow attached to the bulkhead in the tank. (also help in the event of power failure/siphon) But... I can not get rid of the water swirling/sucking into the elbow. Looks like a tornado sucking into the 90 elbow and in sounds terrible. Any suggestion on what I can try? Thanks Bryan <this is a common problem bud... the overflows are simply too small in size or number. A common problem. What is happening is that your "oversized pump" (really not too big... just too much for the lack of holes/size) is pumping faster than they can gravity overflow and a siphon is being created (the sucking noise). Put a gate valve on the outflow of the pump and slowly restrict its volume returned topside until the noise stops. How ironic... you'll have to restrict the pump and then add power heads in the main tank to compensate for the lack of water flow (adding heat, electricity, eyesore, etc). Bummer dude... but a common problem from bad advice and poor overflow design by the manufacturers of tanks. Best regards, Anthony> Great plumbing article Hey folks, Thought I'd pass this along. Advanced Aquarist's Online Magazine has posted its latest issue, with a number of good articles, including "An Engineering View of Aquarium Systems Design: Pumps and Plumbing," by Sanjay Joshi, Ph.D., Nathan Paden & Shane Graber. It can be found here: http://www.advancedaquarist.com/issues/jan2003/featurejp.htm I only scanned through it, noting that it has a lot of equations and tables, and is based on fluid dynamics and hydraulic engineering references. Should be great for those with technical circulation questions that I see pop up in the dailies from time to time. Hope you can pass this along to those who need it. Later, Jeremy M. Dawson, Ph.D. <Thank you for this lead. Will post the link. Bob Fenner> Can anyone guide me on a detailed, photograph rich diagram on how to drill a hole in the bottom of an acrylic tank, install a bulk head and perhaps a stand pipe or something similar? <Hi Steve, I don't know of any photograph rich web pages illustrating this, but it is as simple as drilling a hole with a hole saw, installing the bulkhead and gluing/threading pvc pipe as the standpipe (as tall as the desired water level) and the plumbing from the bulkhead to sump. Make sure you put tape on both sides of the hole to avoid the acrylic chipping when the hole saw breaks through. Glue the fittings ahead of time so they have time to cure before you install them.> I'm having SERIOUS problems with my siphon overflows failing once power comes back on after a power failure. They lose their prime, and then the tank overflows as the return pumps water into the main tank from the sump, with no way for the water to return back to the sump via the P.O.S j-tubes. <The other way to solve this is to put airline fittings in the top of your J-tubes (drill and glue) and connect them to venturi powerheads that will pull the air from the j-tube upon powering up after a power failure. This will restore the siphon and avoid floods. This is the second best way of doing this after drilling the overflows.> I'll be doing this job today, as it is my only day off. I'm in hell. Thanks, Steve <Hope this gets you to a cooler spot! Craig> Marine plumbing Here's a drawing of the proposed tank layout. The overflow box is approx 8 x 8-1/2 deep for a single 1-1/2 drain. I am targeting about 1500 GPH through this drain (although this may be hard to fine tune since my pump will be in the basement). Any thoughts as to whether the drain should be 2" rather than 1 1/2"? <You won't regret going larger, especially if you decide you want more than 1500 gph later. Will also help with "sucking" sounds from drawing air.> The plan contemplates the use of a Stockman standpipe. (I noticed that R. Gibson asked whether the Stockman was better than the Durso. Were there any conclusions drawn from his query?) The 1" returns on each side of the box will be powered by a single pump with an actuated or motorized ball valve. To me it depends on what fits best. They are both designed to draw air to displace the vacuum which develops at the bulkheads which pulls in air and makes noise.> I like tall vents with end caps drilled with a 1/4" hole. This draws plenty of air and reduces noise through the drain vent.> On each side of the tank is a 1" return and 1 1/2" drain which all be plumbed together as a closed loop powered by a single pump with an actuated or motorized ball valve. I will target about 2000 GPH through this closed loop. <Better up the size of the plumbing/bulkhead to handle 2000 gph. If 1 1/2" is borderline for 1500 gph, this 1 1/2" bulkhead won't handle it either. I would go 2" myself.> I have taken to heart your suggestions about have a second circulation loop from the sump, but there doesn't seem to be an obviously good place for the additional returns and drains. <There never is! Remember, placement of bulkheads just needs to be well below the desired water level, ells and threaded fittings can make the water level adjustable.> Wishing you a healthy and happy new year. <Our best wishes to you as well! Craig> Re: drilled overflow tanks & flow - FOLLOW UP So, you don't like overflow boxes. What do you mean? <The standard ones are generally inadequate for my desired flow rates, they hog up space, they are small and difficult to work inside, etc.> If you drill to your own specs, don't you still need an overflow box? <No, but it is helpful. You can merely use an elbow and strained off of the bulkhead and drain from there, but this does not provide for a very thin surface skimming.> Do you then stick you own overflow, like buying a kit? <I have built a glass overflow box, similar to Anthony's CAD drawing found here http://www.wetwebmedia.com/plumbingmarart.htm There is a PDF or larger GIF file for better viewing.> Are you referring to dislike of prefab tanks? <Prefab overflows. They are like anything that is one size fits all.> And the 1200gph you mention; is that for a single 1" hole? <I assume so, but am waiting to hear from Ralph for confirmation. -Steven Pro> Re: drilled overflow tanks & flow Hey guys/gals and groovy people: After much research and many questions, (including previous discussion below) I am researching an upgrade from my 55 gallon All-Glass standard tank to a drilled overflow in a 55, 75 or 90 (thanks to an unexpected Christmas Bonus!). <Congratulation!> I searched the web and the number of hits is crazy. So a few (hopefully good) questions: 1. Can you please point me in a good direction for tank/stand? <They are all reasonably good. I will say I don't like overflow boxes. I much prefer to drill the tank to my specifications.> 2. Does a 1" overflow allow for 600 gph? <A reader, Ralph Gibson, has done some experiments and reported the results to us. I found one reference in my quick search where Ralph reported an All-Glass overflow as being able to handle 1200 gph. Perhaps, Ralph will see this email on the daily page and respond with the specifics, but really we could use him to write an article on his experiments for us to refer others to (hint, hint)!> Is there a mathematical equation for this? <There likely is, but I don't know it.> 4. If not, how many overflow holes do I need for the 55, 75, 90 sizes, assuming I want the maximum (20x?) flow for the future? <A 55 is only going to come with one overflow box. The 75 and 90 may come with two if you specify. These should be ok.> 5. What size holes for the least possible noise? <The standard is 1" bulkheads in any overflow box.> Thank you very much. Without you (and you, and you), I wouldn't be able to advance with so much confidence! Regards, Rich <Have a great weekend! -Steven Pro> Drilling Tank... Good evening, I seem to want to make it hard for myself. I purchased a 300 gallon acrylic tank about eleven months ago and it has the standard overflows to my skimmer, calcium reactor, and return pump. I also removed two temporary power heads and plumbed two external pumps on each side of the tank up and over the tank so no holes were drilled. Well now that the tank has been going for ten months, I would like to drill the back of the tank for two inlets to the pumps on the side of tank. If I remove approximately 110 gallons out of the tank, (here's the punch line) should and could I drill the two holes needed? <It is possible.> Part of the reason to do this is to re-incorporate my refugium back into the line up. One of the pumps would pump water back to main tank and a fraction to the gravity return refugium. As always thank you for your time. <Be sure to use extremely sharp bits/hole saw for this and go slow. -Steven Pro><<And some sort of "bucket" device to catch the bits just the same. RMF>> Drilling Aquariums for Overflows Hi Anthony... Hope you are well! <cheers, Jenny! With hope you are too> I sent an e-mail to you at your home address regarding further info I needed for my new tank. As I have not heard from you I guess you didn't get it or you have been to busy to check your mail there. Should I not have sent it there? <my sincere apologies dear... I did receive it but have been buried in communications as of late. It has been a struggle just to keep[ up with our WWM mail. My apologies again> I thought I would because it is the same subject I have been asking about and so thought you wouldn't want it on WWM to bore your readers with. <not at all... we prefer to share all with the WWM readers for our mutual benefit and information exchange> In short the LFS I'm getting the tank from say that the tank manufacturers won't do the spec he has sent them (which sounds like 6 holes of 53mm) without a signed waiver in case the tank fractures. <not a surprise...they are all conservative... and look for ways to skim extra profits on "custom" orders.> They say there must be a second 10mm back panel of glass siliconed to the first and also a 6mm safety panel in the overflow shelf you recommended (don't understand or see the need for the overflow shelf bit) <I totally agree... the extra back panel is sensible... the internal piece is a sham> This means 12 holes in all at a cost of approx. 22 USD per hole i.e. 264 USD just for holes! <that's ridiculous... they should have just suggested 2 large holes instead and none of this would be needed. The number of holes is unimportant when an internal overflow box is used... that's what stretches the skimmed water and concentrates it. I did not/cannot recommend a specific hole size as I am not familiar with the available metric plastics/bulkheads in the UK. Still... you get the point from the diagram: any number of holes large or small to get the flow you need. Mfg specs for bulkheads will confirm flow ratings> Can you just tell me a safe number/size of holes to drill to give me the flow rate of 2000 gph without the need for all this reinforcement they are saying is needed (6 holes sounds a lot to me anyway). <six small holes (1"/25 mm) would not be a lot for this tank. But 2 or 3 larger holes (say... 40-60mm) would likely work as well> If you can tell me this then I will tell them to do it and sign whatever they want just to get my tank! <If the back reinforcing panel is not expensive, it is sensible and worthwhile. Too bad the extra hole drilling is priced so ridiculously. It sounds to me like this manufacturer does not have much experience with custom work. For this we are blessed here in the US, I suppose> Anyway thanks a million for all your help and I promise not to bother you with this one again. (notice I only said this one) Thanks again - Jenny <no bother at all, my dear... best regards! Anthony> He Has BIG Bulkheads! Wow!! I just got my bulkheads in, I had ordered 4, 2" bulkheads (2 for the tank to drain water to the sump and 2 for the sump to receive water from the tank) and 2, 1.5" bulkheads, which were to be used for my 1" pumps, so the pumps would always have enough water feeding them, I read this was a good idea. <I agree, especially if you're like most reef enthusiasts, and will one day up the circulation in your tank with a larger pump> So, I'm looking at these 2" bulkheads, and they are HUGE! Do I really need to use 2, 2" to drain the tank to the sump? I guess you can't have to much overflow, but wow, I didn't know how big these bulkheads would be! <Yep! Those are large bulkheads! However, I think it's not a bad plan. Was it Billy Idol or Donald Trump (what a contrast) who said in the 1980's that "...Too much is never enough?"> The tank is a 125Gal, and will have about 40gal worth of sump/refugium, and plan to use a MD55RLT as a return pump, should I really use both 2" bulkheads for overflows? or maybe just 1? wow these are big lol... <Maybe install both, cap one, and have the other available for future expansion...?? Mark <Good luck, Mark! You'll have a lot of options in the future with this setup! Regards, Scott F> Holy Bulkheads Batman! Wow!! I just got my bulkheads in, I had ordered 4, 2" bulkheads (2 for the tank to drain water to the sump and 2 for the sump to receive water from the tank) and 2, 1.5" bulkheads, which were to be used for my 1" pumps, so the pumps would always have enough water feeding them, I read this was a good idea. So, I'm looking at these 2" bulkheads, and they are HUGE! Do I really need to use 2, 2" to drain the tank to the sump? I guess you can't have to much overflow, but wow, I didn't know how big these bulkheads would be! The tank is a 125Gal, and will have about 40gal worth of sump/refugium, and plan to use a MD55RLT as a return pump, should I really use both 2" bulkheads for overflows? or maybe just 1? wow these are big lol... <Do use both, two... better too many, too large than the opposite... for redundancies benefits. Imagine one of the overflows blocked... Bob Fenner> Mark He's Got Big Bulkheads (Pt. 2) Well, I think if I build and hide them behind an internal overflow box it may not be so bad...2" is hard to plumb...the parts are hard to find and expensive (compared to 1 1/2"). The biggest eyesore is the elbow and intake screen in the tank, to get this to work with this threaded bulkhead, it will stick out like 5 inches and look awful in the tank! <Yep- not the most pleasing thing to the eyes...> If I were to pick up some scrap acrylic (I assume any kind will do for this since there's not much pressure) Could I drill the hole in the back wall of the tank, and build an overflow box that didn't go all the way down to the bottom? Just to skim the top and cover up the bulkheads? <Yes! This is exactly the idea presented by Anthony Calfo in his "Book of Coral Propagation". It's a great idea..> It looks easy enough to build, is there any special size or gap the grates need to be in the overflow to work with this size bulkhead? <Nope. My only recommendation would be to have more than you think you need- you can always cover them...> Would the below 'picture' work? assume the "O" is my 2" bulkhead in the back wall of the tank. | | | | 0__| | | | Return line from sump Hi Bob, I just setup a CPR Overflow (800 GPH) and a CPR Wet/Dry sump on a 50 gal tank. I have it connected to a Mag 9.5(950 GPH). I would like your advice on spray bar design on return line. I would like to drop the two 802 powerheads in the tank and just use the sump pump as water movement. The tank is a fish only, but near future a reef. Should I extend the spray bar from one end to the other with PVC and cut slots in it to dump the water? Thanks Jamie <The PVC idea should work fine, when the tank is converted into a reef you may still need more circulation, it is hard to tell with out the spraybar being set up already. You could cut slots in the PV or drill holes. Check out the links below for more information. Best Regards, Gage http://www.wetwebmedia.com/circmarfaq3.htm http://wetwebmedia.com/circmarart.htm http://wetwebmedia.com/plumbingmarart.htm> Plumbing Questions Hello Crew, <<Hello Michael!>> I have been reading your Q and A section have found it to be very informative. Thanks for all the good work. I am planning a 300 gallon reef tank and have some questions regarding design/plumbing that I am sure you can answer. The tank will be a 300 gallon acrylic with two overflow boxes - one in each corner. I am fairly certain that the standard drains are one - 1" in each overflow, which I am certainly not crazy about. <<way undersized>>I was considering having the 1" increased to 2" or adding a second 1" inch in each box. <<at least>> The return pumps will be 2-Little Giant 4mdq's with 3/4" returns. In addition to the standard returns, I was considering adding a one inch return out of the sump split with a "Y" (pump unknown at this point) and hooked to two 1/2" or 3/4" lines <<For <sic> SeaSwirls <SCWDs?> of this size, likely 3/4">>connected to appropriately sized sea swirls. I want to avoid using powerheads so I was considering adding one additional draw off of the sump to hook into a pvc manifold with two outlets (gate valved for control measures). One 1/2" line would be hooked to a spray bar along the back bottom of the tank. The other would be a 3/4" inch or 1" return line that eventually splits at a T Ball Valve electrically controlled by Aquacontroller or similar device. <<Size plumbing to the valve needed>> The T valve would split into two returns - one for each side of the tank (probably returning through the bottom of the overflow box and out the side of the overflow into a centipede splitter) to act as a wavemaker. While I think I have some good ideas, I am not sure if I can draw all of these lines out of the sump or how to size the returns, predict noise levels, which line to run through the skimmer, chiller etc. Should I bag drawing the additional lines out of the sump and use a typical closed loop system. If so, what size lines should I use out of the back of the tank, where should they be located, what pumps would you recommend, etc...??? I want to nail down the plumbing ideas so I can have the holes pre-drilled etc. Any ideas would be greatly appreciated. Thanks Michael <<Wow! Lots of goodies! Your turn over (10x tank volume minimum, can be more) is the base figure. It appears you need to size the returns to a minimum 3000 gallons per hour. To get a good idea of the size plumbing and overflows to do this you can see how overflow box manufacturers size their pipe, then go the next larger size. (check out web sites carrying overflows) My own personal experience is to go larger on the overflows and use Durso type overflows for noise reduction. Any vented overflow pipe that draws air from anywhere but the overflow itself will help in reducing flushing sounds which usually come from sucking air with water into the overflow. Flush! Even a small hole will draw enough air and be quiet in comparison to a closed overflow W/O a vent. (Vents work like the roof vents for home plumbing). Then you can size your pumps to provide the needed turnover without fear of limited overflows. As long as there is enough return flow or a dedicated return you can run as many lines off the sump as you have room for pumps, lines, flow to accommodate. My own choice would be to run the skimmer and chiller on their own line, but they could also be run off a line split off the return and valved for proper flow. To sort this out, start at the needed turnover/flow rates and work backward from there, sizing as needed. You won't regret having larger overflows. Don't forget to factor head height in your flow/pump calculations. With the exception of return lines you intend to split (which require larger pipe to accommodate flow) you can stick with pipe sizes matched to pump outlets. Your closed loop/sea swirls design needs to provide enough flow to the SeaSwirls (they have a minimum flow rate to be useful) Make sure if you do this that they get what they need to run. Lots of work and plumbing but sounds like a blast! The pumps you site are good, many choices out there. Too many variables to name brands/sizes, they need to be sized in combination with all the other flow schemes. Again, start at needed turnover and work backward from there. Quite the project! Go for it! Craig>>
Overflow sizing Hi Bob! First let me say that your book is excellent, I just finished reading it and your site is packed with great info. <Thank you for your kind words> I am setting up a 100g acrylic tank and I am building a 30g sump for it. I will build an overflow box on one side of the tank with a standpipe in it. I am using a Turboflotor skimmer with an Eheim 1060 pump feeding it and an Eheim 1060 pump for return. <Very nice gear> The question that I have is on sizing the overflow. I am planning on making the standpipe 1 1/4 in the box and then from the box to the sump 1". I will then use a "T" with valves controlling the flow to the skimmer and the sump. The return will be 3/4" on the opposite side, and all of it will be with flexible pvc. Do you think this setup is ok and do you have any suggestions. <Mmm, just to be on the "safer" side... I'd increase the diameter of the lines stated to 1 1/2 and 1 1/4" respectively... Bob Fenner> thanks in advance Jim Overflow Tube Size Hi guys/gals- <<And hello to you...>> I am looking for your guidance once again. I am setting up a 125 AGA salt tank & 2 corner overflows with fish and live rock. An upgrade from a 5yr old 55gal set up. <<Interesting, just moved my 54 into a 180... have fun!>> I have been told that the 1" bulkheads will move about 600gph each. If I stepped the 1" pipe up to a 1 1/4" right after it is connected to the overflow at the bottom of the tank ,will this improve the flow rate at all? <<Not above and beyond what you can get through a 1" bulkhead, but I think that is actually higher than 600gph - I think this specification may be that of the overflow.>> I would still have the 1" bulkheads but I thought the larger diameter would move more volume from that point on. <<The bulkhead is the limiting factor, even though it's not really limiting you.>> I have a 2 magdrive12 pumps and am not sure if I need both or not. If I used both I think would need more overflow than the 1" bulkheads can provide. correct? <<Well, I think this pump is rated at something like 900-ish at a 4' head, and even this would be more than 600-gph per overflow. I'd try it when you do your leak test, and just plumb in valves on both pumps so you can dial them back a notch. More flow is always better if you can do it.>> I am keeping Tangs (Naso, Sailfin, regal blue and yellow) ,live rock and 2 Condy anemone, lots of snails/hermits. Plus an arrow crab. I have a 30 gal refugium and a 20 gal sump. Do you think that my tank would benefit from the increased flow from two mag12 pumps? <<Oh yes.>> Could I use both pumps and close down the shut-off valve a little bit on both without damaging the pumps? <<Any restriction/valve placed on a pump should be done after the pump... if there is a valve in front of the pump, use this only to shut off the line and remove the pump for service.>> I am not sure if this idea is nuts or not...... <<nuts... you mean like true-unions? These are excellent - use them everywhere you hard-plumb. Or do you mean the nuts on the bulkheads? If these make you nervous, smear some aquarium silicone on the gasket and put it together. It will be fine.>> Could I tap off of a overflow line with a T and run some water into the refugium and have the overflow from the refugium tap back into the same overflow line farther down line? No pumps involved. Both T's would be before the sump. <<You could - might be best to try and arrange the refugium above the sump so that it could overflow into the sump. Is this what you were thinking?>> The reason I ask is that I am hoping I can keep the refugium under the main tank on display but sump, pump, skimmer, etc.. would be on the other side of the wall in the room next door. <<Oh... sure. If you are taking the time to do a built-in with separate room, for certain.>> Thanks and have a good weekend!!! Den <<You too. Cheers, J -- >> Overflow drain size vs. flow rates I'm finally doing it, converting my FO tank into an SPS tank. After exhaustive research, I've pretty much settled on my final tank parameters and equipment list, except for one thing: flow rates. From reading through the correspondence on your website and checking various other sources, I've been convinced that I need more than 10X GPH flow rate for a successful SPS tank. <agreed that VERY dynamic water flow is necessary.... please save your money on silly wave timers/oscillators. Simple and strategic random turbulent flow from converging outlets grows coral VERY well> Since I have a 180, this translates into at least 2000 GPH, which I would like to achieve without the use of powerheads. <agreed on both counts> The tank only has a single 1" i.d. bulkhead in the corner overflow, however. <wow!!! that is staggering and a fraction of what you need> Am I correct in assuming that this single overflow is not going to be sufficient to handle 2000+ GPH? <more like 300 GPH!!! without a siphon or sucking noise> I can't seem to find a chart or any other hard data on overflow size vs. flow rates. Do you know where I can find this information? <yep... Rainbow lifeguard and any other manufacturer of bulkheads> What are the maximum gravity fed flow rates through a 1", 1.5", 2", dual 1", etc. bulkheads? What do you recommend? <no more than 300 GPH per 1" drain. I have 4 holes (!!!) in a 50 gallon getting 1100 GPH and that is barely working> I appreciate any help/advice you can give. Thank you, Will FYI - my tank/equipment list so far: 180g acrylic (already had it) 3 - 250w MH 6500K 2 - 140w 60" Super Actinic AquaC EV-180 skimmer <excellent lights and skimmer> Korallin reactor 1/3hp chiller DIY sump return pump(s) tba <I recommend Iwakis> <best regards, Anthony>
Tank Modify Anthony thanks for the help. Follow up to previous questions. I called the manufacturer of my 75 gal tank (ALL GLASS) and they said that the sides were not tempered glass so I think I'm going to have it drilled for overflow. One concern I have is a prefilter, should there be much of a problem if I have just a filter pad in the sump? any suggestions here? <Emperor Aquatics makes filter socks that attach to PVC pipe and catch everything that drains down. Here is a link to their description http://www.emperoraquatics.com/mediafelt.html Emperor Aquatics calls them "Filter Enhancers Super Filter Felt Bags". Another question is how many gph would a 1.5" bulkhead handle, I was told a 1" would handle @300 gph. I was thinking 2 1.5" bulkheads on each side of the back glass about 2/3 the way up... sound alright? <I would put them as high as possible to fit the bulkhead in with the tank trim. I just had a 120 drilled to house three 1 1/2" bulkheads and I expect to run 2400 gph through them. This was an educated guess I my part from other people I had talked to. I will also be venting the drain pipe, so that when the water rushes in, the air pulled along will have a place to go.> Since I don't want to "T" them together how should I make the flow to the sump...2 separate lines to the sump? <Separate lines to the sump is best.> Thanks again Bryan <You are welcome. -Steven Pro> Tank Modify Bryan Here, Great info guys, w/out this site I would be lost. Trying to piece everything together on the modification of my 75 gal Tank. I want to run this by and see if it sounds good. For overflow I'm having the tank drilled for 2 1.5" bulkheads on both sides of the back of tank towards the top. 1-1.5" PVC/flex line down to the sump (separate lines/ emperor aquatics filter bags. In sump have mechanical and chemical filtration. Small submersible pump (@250 gph) to a small 20 gal refugium (raised higher than sump) contain a DSB of 4-5" of Carib sea special grade <I have this sand in my 55 and have not been very impressed. I have seeded it numerous times, but the critters do not seem to like it and its coarseness allows detritus to settle between the grains of sand. Go with the Aragamax or other similar fine grain sand.> and LR w/ a 1" bulkhead allowing for gravity to flow back to the sump. External Mag 9.5 for return flow to the main tank w/ check valve after pump. Possible "T" off to 2 PVC returns of 3/4", <Start with 1" pipe off of the Mag-Drive and then at the T go to 3/4".> to each side of tank for circulation/return w/ water blowing towards each other. 3 maxi jet 1200 PH in tank..2 at the back corners w/ flow to the middle front and 1 PH located more towards the bottom of tank. Aqua C remora hang on skimmer. 1/2-1" of special grade sand in the tank and LR added. Hope not to hard to follow. Any suggestions? <See above> My concern is placement of valves to limit flow in any area, and what to do to prevent an overflow of sump from the drilled overflow in tank if s/t happens to pump. Thanks again Bryan <When you first fill the tank up, only add enough water to get the return pump to operate. After it is working for a few minutes, shut everything off. This will allow the water to back siphon down (simulated power outage). Once water has stopped, fill the sump. Now turn the pump back on. When it has reached an equilibrium, mark that water level. That is now your maximum fill level. Best of luck. -Steven Pro> Tank modify follow up <Anthony back again> Bryan again, Thanks for the very speedy response Steven. Couple of follow up questions on earlier e-mail. I'm having trouble on how to tie in 3 overflow holes to the sump. Would some type aft" work? <never use "tees" on an overflow... an accident waiting to happen> Need a little help on this issue. Also in what part( or configuration) would the bulkheads be located on the back of tank. On each side and middle and how high on the tank should they be placed. <no on has ever demonstrated an advantage to any specific distribution of holes that I am aware of> One last question Steven. Would going to 2 bigger bulkheads, say 1.5 to 2" work w/ as far as gph instead of 3 1" bulkheads. <possibly, but check fitting specs to confirm> Thanks for great info Bryan. P.S Is putting a ball valve after each bulkhead a good idea or not? <very dangerous...please don't...risks clogging/overflow and flow can be controlled on outflow side of pump with a gate-valve (restricting water that will overflow eventually. Anthony> Tank Modification Hey Bob, Bryan here. <Hi Bryan, Steven here.> I am in the process of redoing/upgrading my 75 gal tank. The last few days I've been coming up w/ some ideas. The main one I want to run by you is this. I was using a CPR overflow down to my sump. I would like to drill a hole or someone else) in the glass tank, attach a bulkhead with PVC and let gravity do the work, plus it would clean up the inside of the tank. I was thinking about a hole to fit 1" bulkhead w/ 1" PVC to the sump. Does this sound fine? Big question is how far up on the back should the overflow hole go. clear towards the top or about 2/3 of the way up going to use a Mag drive 9.5 for main pump. Last and most important question.. can my glass tank even be drilled, I believe it is tempered glass. Thanks again Bryan <Tempered glass cannot be drilled. Check with the manufacturer as most do not make the entire tank out of tempered glass. Most times it is just the bottom or the long sides, but it varies by brand and model. Each 1" bulkhead can comfortably handle about 300 gph. I have and would recommend drilling 3 holes in a 75. -Steven Pro> Drilling Question Hello again, WWM crew ! This is Luis Santos from Portugal, do you read me over...? <Loud and clear, over.> I have this 65gl already established marine tank (8 mm glass). Since I'm waiting for a new custom built steel stand (not only for the weight, but also to get space for a future sump), I'm beginning to think about getting the tank drilled. But what would be, in your opinion, the ideal drilling diameter, and also where to drill, side or bottom? <I would drill the tank to fit whatever bulkheads are available. If you can get 1" I.D. bulkhead fittings (the most common), I would get three to four holes drilled in the back spaced out and about 4" from the top of the tank to the center of the holes.> Also I would like your opinion on return pump size and... <A pump capable to 650 gph at whatever head pressure you have as a minimum.> Yes I know sump size the bigger the better, right? <Yes> Thank you again! Luis Santos <You are welcome. -Steven Pro> Plumbing (cutting through put holes in/for a sump) I am making a sump from a Rubbermaid container for my 100 gallon tank. What do I need to drill (?) or cut (?) holes into the container? Can I buy the tool at Home Depot? <What an exciting question. Really, we (our old service companies) used to have a "museum" collection of such tools, materials... some really neat to work with (for drilling through very thick acrylic especially). I would go with a simple "hole saw" kit like those sold for fitting lock/door knob sets in wooden doors here. If you think you might want to drill more than one size/diameter opening, splurge on a multiple size set with interchangeable mandrill (the pilot bit that goes in the middle)> I know that ideally water would move through the sump from one end to the other, entering dirty and leaving clean. However, since I have two overflows it would be convenient for the overflows to empty into opposite ends of the sump with the skimmer (T1000) in the middle of the sump. <Yes, good idea> I probably will mount the return pump (external) on the end (not the middle). I guess I'm worried about unclean water entering and then leaving the sump, bypassing the skimmer. What are your thoughts? <No worries... all gets about as clean as it were going linearly/in series... Only a bit of a percent lost in apparent "efficiency"> I have no room for a refugium in my sump but I am considering getting one of the CPR hang ons (24''). Will this improve my water quality? <VERY much so. A friend who lives with us, Peter, has been "experimenting" with these for years... Many advantages in their use> Since I'll need to buy a CF for the refugium, is it worth the effort and expense? <Yes, of a certainty> Thanks for all you do Bob! <Thank you for your queries. Bob Fenner> David Dowless |
|

|
Features: |
|
| Featured Sponsors: |