|
|
| Home | Marine Aquariums |
Freshwater Aquariums |
Planted Aquariums |
Brackish Systems |
Ponds,
lakes & fountains |
Turtles & Amphibians |
Aquatic Business |
Aquatic Science |
Ask the WWM Crew a Question |
| Please visit our Sponsors | ||||
Why Worry About Your Tank?Sounds facetious, doesn't it? Of course that tank is important, it keeps your fish from swimming on the floor. Lights, plumbing, sump, heater, they are all important aren't they? What is so special about the tank? Having recently experienced a cracked 210G tank, I can tell you that the tank is a very special piece of equipment. Along with the stand, it is the only thing that you cannot replace without massive effort. To replace a tank or stand you need to tear down the entire tank occupants, hold all the stock and as much of the water as you can manage and put it all back together again. Most likely, if you try to do it all in one day and have a sizable tank, you'll stir up enough gunk and disturb the bacteria enough to cause a minor or major die-off in the process. Not much fun. Consider the cost of a tank with respect to the cost of a fully loaded reef system. It's usually about 5-8%. Consider both the heartache of having to disturb a thriving reef tank as well as the possible loss of prize specimens as well. A little extra care and money on the tank will go a long way towards peace of mind and preserving your investment. In the course of investigating why my tank cracked I learned a number of things which I'll gladly share here in the hopes of avoid future catastrophes. Realize that I am not an expert on acrylic tanks. I learned some of the following from some very helpful people on the web. Most of what I learned came from an extremely helpful professional acrylic tank craftsman who happened, by good fortune, to live only miles from my house. Definitions and ContextFirst, some definitions and context for our discussion. A basic acrylic tank is a box with bottom, four sides and a top. The top has cut-outs in it so that you can reach inside the tank. These cut-outs are usually rectangular. The main cutouts are large and allow you to place rocks and large specimens. There may be smaller cutouts for access to the overflow and for rotating returns.
When making the cutouts in the top pane, it is a very bad idea to make a sharp, right angle cut since this concentrates the stress in a very small space. Instead, the corners should be rounded as shown in the picture below. These round corners are also called "corner rounds." Tank ConstructionIf you are in a hurry, here's the short list of what to look for in your acrylic tank, assuming a 24 inch tall, 72 inch long tank.
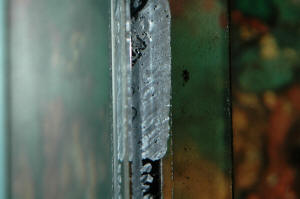
Acrylic ThicknessRequired thickness has nothing to do with length of the tank and everything to do vertical height of the tank. Water pressure is a function of height only, not of the horizontal cross-section of the water column. The taller tank the thicker acrylic you need. Half inch acrylic is typical for a standard 22 to 24 inch tall tank but it is easy to find only 3/8 inch thick. I would recommend at least the half inch and see if you can spring for one inch. Thicker acrylic means a stronger tank. With thicker panels you get much less bowing. Bowing is the outward warping of your tank due to water pressure. Bowing is not in and of itself dangerous but the less bowing you can observe the more margin you have in your tank and therefore the less risk of failure. On a 72" tank, sighting down the length of the tank you should notice just a little bowing, maybe an eighth of an inch with 1/2 inch acrylic and perhaps almost nothing noticeable with one inch acrylic. With 3/8 inch thick acrylic, you will see a frightening amount of bowing: your tank will look like it is ready to burst. And it might. The Top PanelThe purpose of the vertical and bottom panels should be obvious. The top panel's purpose might be less obvious to folks. This is ironic since assuming adequate thickness to your acrylic, the top panel is the most critical for tank health and the one most likely to fail. Unless your tank is fairly shallow, not very long or made of very thick acrylic your top panel is an important structural element. It is holding your long sides of your tank together and is containing considerable forces. A failure in the top panel means that your vertical panels are now holding the full force of the water column by themselves and most likely will soon crack. The top panel is a sheet of acrylic with one or more cutouts. In a large, long tank it is typical to have two or more large cutouts under your Metal Halide bulbs and smaller cutouts for your overflow access and maybe for your returns, especially if you are using rotating returns. The remaining acrylic in the top panel provides front to back and side to side bracing for your front, back and side panels. In a full tank, these side panels contain a lot of force. The top panel is key in containing this force. Failures in the top panel can have several causes. Severe leveling problems (more on this later) might be a problem but in general acrylic is flexible and unlike glass fairly tolerant of imperfect level. More likely causes for failure in the top panel are too much heat from a Metal Halide bulb placed directly over an acrylic surface and long term failure from crazing cracks that eventually progress into deep cracks. As everyone knows, Metal Halide bulbs run hot. This heat can caused thermal expansion in the acrylic. Allegedly, it can also soften the acrylic also making failure more likely. Failure will typically occur as a crack radiating from a corner cut. Most available tanks have quarter inch radius corner rounds. Acrylic tanks are not cut with right angle cuts. Instead the corners are round. This is important as a sharp cut concentrates stress and leads to cracking. By rounding the cut, the stress is distributed. A quarter inch round can be made with a standard half inch drill it is is therefore quite common. In general, it seems adequate but it is safer to go with a one inch quarter round or even a two inch one if you can get it. The fact that most cracks begin at a corner round indicates the importance of minimizing the stress at these points. It is simple to avoid MH bulb induced failures: don't put a bulb over the acrylic. Put your bulbs over the cutouts. If it means less light in your tank than you wanted, live with it. Bulbs over acrylic are the single greatest cause of acrylic tank failures. CrazingCrazing is the term for the network of fine surface cracks that can appear on acrylic. It is generally harmless but the cracks can deepen and lead to failure. When I asked a local tank manufacturer how serious crazing was, he showed me an acrylic pipe that had failed solely due to crazing. He suggests crazing occurs most on polished acrylic surfaces. Most tank manufacturers polish the top pane so that you don't cut yourself on the sharp edge of the cut-outs. It is nice to not cut yourself here but a better way to avoid both crazing and scrapes is to give the edge a bevel (a 45 cut). Things You should and shouldn't Tolerate in your TankLevelYour tank needs to be level but it is not critical that the tank be perfectly level. Over a 72 inch tank, about a 1/4 inch off of level seems to be tolerated by acrylic tanks. Acrylic will flex and can take some of this stress. This is not true for glass tanks. Glass tanks require more care in leveling. When leveling, keep in mind you do not want to concentrate the stress of a fully loaded tank on a small area. A fully loaded 72" tank can weigh over a ton. Sticking a couple of quarters under one corner of the tank to level it means you are concentrating much of that one ton on a small part of the bottom of your tank and it will certainly crack. You can shim a tank between tank and stand but you must be very careful in order to avoid unnecessary stress on your tank bottom. Therefore, this is generally not recommended unless you are good at making large perfect wedges. It is better to level you tank by shimming underneath the stand. Here again, you need to avoid concentrating one ton in just a few spots. Wood can crack, too. You can use thin strips of wood or other material to spread the load out. If your tank has a dark stain, it might not hurt to stain the shim a similar color so that you don't have a strip of white wood visible under your tank but that is aesthetic touch. If you forget, you can also darken it with a black permanent marker later. Just watch the carpet. Again, though, a perfectly level tank is not critical and I would only shim for more than a quarter inch off level. Remember that unless your tank is on a concrete slab the floor will give a little when loaded. If you are worried about level, you'll need to fill the tank with water, check the level and empty it to shim it if necessary. Therefore, you'll want to use freshwater on first fill so that you don't lose a lot of salt mix if you need to empty it. (I.e., add the salt mix after you check level.) Strut BowingThe center piece of acrylic located between your main cutouts takes a lot of force. It is normal for this force to manifest itself as some upward bowing. For a 30 inch tank, front to back, about 1/8 of an inch or even a quarter inch seems normal and is not a sign of impending failure. I'm not positive why this strut bows upward. My guess is that as the front pane bows outward, the top of the front pane pushes in a little and this compresses the strut. That is, when the front pane bows, the middle pushes out and the edges push in. If I am correct, then if you don't like the idea of your top strut bowing (it is a bit disconcerting the first time you notice it), then use thicker acrylic. The less the front pane bows, the less the top strut will bow. I couldn't figure out why my tank had cracked where it did (see picture earlier) until I noticed this upward bow on the center strut. The crack was relieving this upward stress. It is just the strut that bends upward, the rest of the top pane is firmly attached to the vertical panes and wants to stay flat. Even so, all would have been fine if a MH bulb had not been placed over the strut. The extra thermal expansion from the bulb is the most likely cause of failure, not the degree of bowing on the top strut. CrazingCrazing, as discussed before, is a fine network of surface cracks that run in random directions and are often so shallow they look like scratches. These are not necessarily bad but if they begin to deepen, they can ultimately lead to tank failure. If you have these scratches, you should just keep an eye on them. If you notice lots of cracks running all parallel to each other in lines or arcs, then this could be the sign of an imminent failure, especially if these cracks are located around a corner round. However, rather than immediately panicking, I would suggest you take a photograph and post it on a newsgroup or message board devoted to saltwater fish keeping for advice. These cracks often mean nothing. What to do if you have a crackIf the crack is not progressing and is not in the water then don't panic. Mark the end of the crack with a permanent marker so that you can tell if it is growing. Take pictures and consult a tank manufacturer or the web for advice. It is possible to repair a tank but you must be very careful when doing this. It is very easy to simply move the stress to another place in your tank and create a new crack. The link at the end of this page provides some real-world experience with repairing a tank. Others on the web can offer advice as well. In the end, though, it is safest to replace the tank even if the crack is not progressing. I can sympathize with you since I have to do this myself but a new tank and setup that corrects the reason for the original crack is safest. If the crack is progressing or you are leaking water, then it is time to save your livestock and empty your tank. Try to use powerheads or airstones to keep the water moving and heaters if you can, both in the collection tubs and in the tank once you shut off the pumps. You may be able to drain the tank to below the crack and give yourself more time to rescue your stock. In an emergency, just make sure house is about as warm as the tank and you will be okay. Some LFS will keep your stock for you while you replace your tank. If you have a large tank and time to prepare for the tank swap, you can use livestock water troughs purchased from a feedstore to hold the stock. These are wide and shallow as well as very tough. It is a much better place to house your live rock than a narrow, thin walled trashcan. Be warned that emptying the tank and disturbing the substrate is likely to result in some die off of your de-nitrifying bacteria and consequently, some death to your livestock. If you have another tank or a friendly LFS, try to keep as much of your stock out of the old tank until the new setup stabilizes. Diagnosing the FailureIf you experience a cracked tank, you will be very keen to avoid a repeat. Here, it helps to know what went wrong in order to fix the problem. I can offer a partial list of what to look for. If my list doesn't help you then consult the collective wisdom of the web on a newsgroup or message board. Even if you like my list, it doesn't hurt to confirm your diagnosis by consulting the collective intelligence of the web.
ManufacturersThere are lots of manufacturers of acrylic tanks. They need to make a living and don't want to scare away customers with expensive tanks so their tanks are delicate balancing acts between cost and toughness. Most will be all to happy to make you a tougher tank. It will cost more but compared to the total cost of your system as well as the expense and heartbreak of tearing down a tank to replace a cracked one, I strongly advise an overbuilt tank. If you really want a good tank, your LFS may know someone who makes professional tanks for public aquariums. As you can imagine, public aquariums insist on tanks that will last. If you want a beautiful, sturdy tank, find someone who builds this class of tank. Put it on a solid stand, keep Metal Halide bulbs away from the main struts and you'll have a problem free foundation for your hobby. Someone Else's DisasterThere is a very informative tale with good pictures of another aquarist' brush with catastrophe here. Feel free to send me e-mail but realize I'm just a hobbyist that had to learn more about tanks due to an unfortunate experience with a cracked tank. I'm no expert.
|
|

|
Features: |
|
| Featured Sponsors: |