|
FAQs on Acrylic Aquarium
Repair and Modifications:
Scratches, Pits, Stress Fractures and Crazing 2
Related Articles:
Aquarium Repair,
Related FAQs:
Scratches, Pits, Stress Fractures & Crazing 1,
Scratches/Crazing 3,
Scratches/Crazing 4,
Acrylic Repair 1,
Acrylic Repair 2, & FAQs on Acrylic:
Design,
Leaks,
Drilling/Cutting, Construction, Solvents, & Glass A
quarium Repair,
& DIY Gear 1, DIY
Gear 2, Tanks, Stands, Covers,
Custom Aquariums, Stands,
Covers...,
|
|
|
Acrylic Question
8/27/14
Bob,
<.... please send all future petfish corr. to me/us at
Crew@WetWebMedia.com>
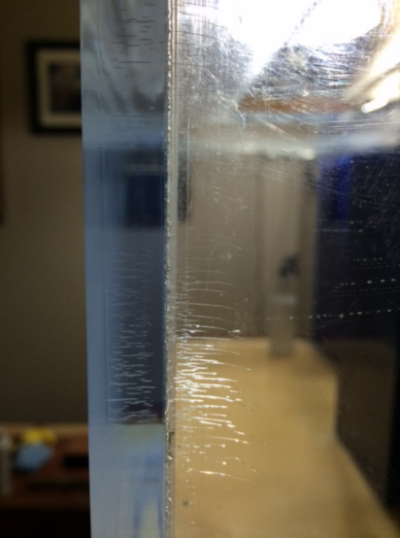
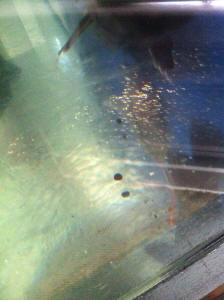
I have a 125 gal acrylic aquarium that is about 8 years old. I recently
emptied it out to refurbish my system and noticed some crazing along the
seams (pictures below).
They do not appear to be deep, but do run along the entire seam. Is this
okay, perhaps with reinforcement. Thanks.
<It is IMO/E... may not look nice, but should be structurally sound>
BTW – I love your book. I used it to start my first aquarium. My kids
recently picked it up and started looking at it which led to the
decision redo my system.
<Hey! Don't blame me! Cheers, Bob Fenner>
Thanks,
Alex
|
 |
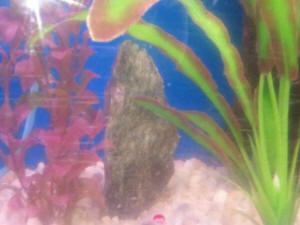
Used 90 gallon, too much crazing for comfort? 8/18/14
I probably visit your site daily so thanks for providing such a great
source of information! On to my question which I think I know the answer
to, but wanted a second opinion.
So I just bought this tank off CL which is supposedly 2 years old. The
tank
holds water fine and was being used until I bought it. Here is what I
noticed when I got home though (see pics).
<Oooh>
I know some crazing isn't that uncommon with acrylic tanks, but does
this tank need support added or am I just being paranoid?
<I would not fill this tank w/o putting in internal corner supports. See
WWM re>
Tank specifics - standard rectangle SeaClear 90 gallon (reef ready) with
two openings on top (euro style?). Unfortunately the tank is 3/8
thickness, but when filled I didn't see any bowing anywhere.
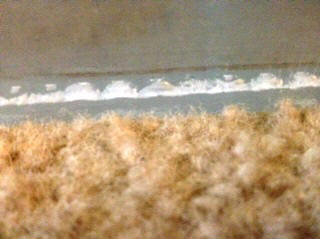
The only crazing is at the bottom seams and a little on the corner. The
top brace seams are fine all around. The pics included are the worst
spots and they were taken with the tank dry. The seam is completely
smooth on the outside and inside when I run my hand along it. So the
"frosty" spots are in the seam itself.
Rest of the tank looks great, just not sure what to make of the crazing.
<Structural weakness. Bob Fenner> |
.jpg)
|
|
Re: Used 90 gallon, too much crazing for comfort?
8/19/14
Ok thanks for the reply. Kind of what I thought also. This might be a silly
question, but with the reinforced seams is that a very long term fix years)
or a short term (a year) assuming it is done correctly?
Many years (decades) of life to this system w/ the reinforcing square
doweling inserted (solvented) into the corners. I would definitely be doing
this job. BobF>
|
|
Surface repair of acrylic aquarium
11/21/12
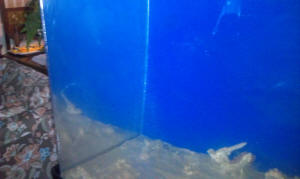
Hi. I bought this 150 gallon tank and currently have it cycling. No sand
or rocks in it yet (well, in the pic there is one). There is fine
bubbling along the exterior surface of some of the tank. This is causing
some distortion when looking from the side into the tank.
Can this be buffed out?
<Mmm, if quite shallow, yes... Think on the process here: you're
grinding down the areas around... Can the tank be turned around, viewed
from the less-damaged side?>
Thanks so much for any advice.
Rich
<Do see WWM re scratched acrylic tanks. Bob Fenner>
|
 |
Re: Surface repair of acrylic aquarium
11/21/12
I did read thru that section.
<I see>
Is what you see in my tank called crazing?
<Mmm, looks more like some sort of external physical damage to me>
You can definitely feel it with you hand. I'm comfortable working with
sanding and polishing equipment (I've refinished
fiberglass kayaks) but don't want to start this project unless I'm certain
what the defect is.
Thanks.
<As you state, could be crazing from too-thin material, perhaps a
non-planar, unlevel stand... There are some good polishes about for the job.
BobF>
Re: Surface repair of acrylic aquarium
11/21/12
it is also on much of the front of the tank. Almost looks like tiny bubbles
in some places.
<May be imperfections in the material itself>
Sounds like what ur saying is regardless of what it is, if its only
superficial it can be removed with enough TLC. Is that accurate?
<Yes, IF>
Can i send another picture?
<If you think it would help. B>
Rich
Re: Surface repair of acrylic aquarium
Another picture of the surface from a slight angle.
Rich
<... could still be the same possibilities; bad cast acrylic, crazing...
B>
Re: Surface repair of acrylic aquarium 11/21/12
Well thank u so much for your time.
Rich
<Ah, welcome!> |
 |
|
Re: Surface repair of
acrylic aquarium 11/24/12
One last question if i can. Do u
<...>
recommend hand only application of the sandpaper
<I don't suggest the use, ever of such on acrylic>
or can i use a hand held vibration sander?
<Yes, but unless the scratches are huge... like a sixteenth of an inch deep
or so... I wouldn't "do this" period... heat burnishing might be the route
to go IF the acrylic were thick enough. Small encapsulated bubbles in the
material cannot be effectively fixed>
If not, is it fine to use an orbital sander for any of the process,
specifically the polishing?
<It is not>
And i was planning on using Novus products.
Rich
<These are good products in my estimation. Bob Fenner>
Re: Surface repair of acrylic aquarium
11/29/12
Started the project. Went as low as 320 grit but those defects are still
there. I did repair a section all the way out to make sure i could do it.
<Wise>
Finish after the #2 Novus was very shiny. However, i was wondering if u have
used as coarse as 120?
<Dangerous... hard to remove the subsequent scratches, and may well remove
too much material>
Seems like i well definitely need more than 320 to do the job. Just a bit
nervous...
<Me too; having seen so many damaged, destroyed tanks... Have you tried heat
burnishing just a small section? Have you contacted any of the acrylic tank
re-surfacing companies? I've met Matt Conrad, owner of See Clear
(SeaClear@rocketmail.com ,
acrylicscratchrepair.com , seemed like a nice fellow. Bob Fenner>
Re: Surface repair of acrylic aquarium
11/29/12
Started the project. Went as low as 320 grit but those defects are still
there. I did repair a section all the way out to make sure i could do
it.
<Wise>
Finish after the #2 Novus was very shiny. However, i was wondering if u
have used as coarse as 120?
<Dangerous... hard to remove the subsequent scratches, and may well
remove too much material>
Seems like i well definitely need more than 320 to do the job. Just a
bit nervous...
<Me too; having seen so many damaged, destroyed tanks... Have you tried
heat burnishing just a small section? Have you contacted any of the
acrylic tank re-surfacing companies? I've met Matt Conrad, owner of See
Clear (SeaClear@rocketmail.com
, acrylicscratchrepair.com , seemed like a nice fellow. Bob Fenner>
Re: Surface repair of acrylic aquarium
Thank u. I will let u know what i find out.
Rich
<Thank you Richard. BobF>
|
|
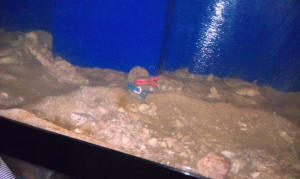
200 Gallon Acrylic Cracks 8/25/12
Hello!
<Erik>
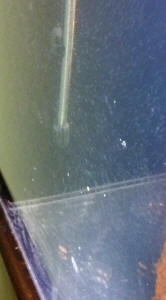
I was hoping you could give me advice on a few cracks I am seeing on my
first all acrylic aquarium.
<Mmm, yes... stress fractures... quite common>
The tank is 200 gallon and uses 1/2 acrylic (I am guessing this is why
it is cracking). These are the only cracks on the tank, minus some
crazing and I am unsure if they are getting larger. It doesn't
seem like they could get much larger to be honest! What will
happen if the cracks get to the other perpendicular panel?
<Likely nothing>
Is this fixable? Is there a way to stretch the life of this tank?
Thank you for taking a look at this. I cringe every time someone
puts their hands on the tank!
Thank you again!
<I wouldn't worry. Use the search tool on WWM for the string: "Acrylic
stress fractures". Bob Fenner>
|
[1].jpg)
 |
|
Help! Acrylic Scratch Repair Nightmare (a not uncommon tale,
actually) – 07/20/12
Crew,
<<Hello Dave…(wow - just had a flashback to ‘2001: A Space Odyssey’)>>
What oh what have I done...
<<Hmm…from the pic it appears you’ve been a busy boy>>
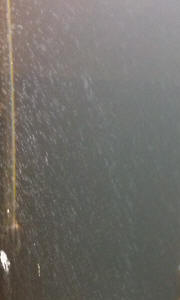
The 200G tank I acquired had heavy coralline deposits on the sides, and
a fairly clear front viewing panel aside from two very prominent/large
scratches that ran along the inside. I tried to follow advice given on
how to use a polishing wheel and a rouge/compound to remove the
scratches.
<<Mmm…>>
Somehow the tool got away from me in a split-second, and put a small but
very noticeable gouge in the front display.
<<The use of power tools to remove scratches from acrylic requires some
practice/experience…as you have discovered. Best for the novice to stick
to manual methods of removal (elbow grease), in my opinion. Aside from
the probability of causing further damage “in an instant,” the use of
power tools increases the likelihood of creating a “lensing” effect in
the acrylic…not that the tool is the problem, but rather going back to
the technique/lack of experience of the operator. The last thing you
want after removing all the scratches is to fill the tank only to find
the contents look like the reflection in a fun-house mirror. You can
also cause this sans power tools, but it’s likely to be to a lesser
degree and more easily rectified>>
I searched WWM and spoke with several, and decided to go the sandpaper
route to undo my damage and try to take out the initial blemishes (the
polishing wheel didn't work as I hoped - likely my technique was poor).
<<And the polishing compound you used…more to follow on this>>
I started with a heavier sandpaper, seeing that one kit online included
a 150 grit for "gouges".
<<Indeed>>
I worked my way down and back a few times. At this point, I fear that
the 300 grit gouges don't seem to be coming out with the 400 sandpaper.
Yikes, what have I done!
<<Fear not…this can be fixed easier than you might think>>
Can someone offer any suggestions??
<<Indeed I can…in fact several. Be sure to “wet sand” the acrylic. The
use of ‘water’ helps to lubricate and cool the surface, and float-out
particles. As you move up through the grits (300 to 400, etc.), do sand
“perpendicular” to the scratches made with the previous grit, and until
all the scratches run in the new direction. I also suggest that once you
go beyond the 400-grit paper that you invest in a “quality” sandpaper. I
use ‘Micro-Mesh’… It is pricey but worth it. The “grains” on the paper
(actually cloth) are all equal in size which means no stray scratch
marks, and a very fine finish. Micro-Mesh comes in grits from 1500 to
12000…the 1500-grit Micro-Mesh is about equivalent to 600-grit paper
from the hardware or auto store. You can buy Micro-Mesh on its own (do a
Net search re the name), or get it in a ‘scratch removal kit’…an
advantage to the latter is it will also provide some further instruction
on its use. You can also get kits that allow use with a ‘magnet cleaner’
for removing scratches/blemishes once the tank is up and running (this
is handy…I know). But… Since this tank is empty I am also going to
suggest you look in to the ‘NOVUS’ line of acrylic scratch removers.
This is a “liquid” compound that comes in varying “grits” and works very
well…either with a powered polisher…or by hand>>
This is 3/4" acrylic, so I assume I have wiggle room to get this worked
out??
<<Some, yes…but don’t get excessive…remember that lensing effect I
mentioned. To keep this to a minimum, you will need to increase the area
polished with each successive grit. The use of a ‘wax’ pencil to mark
the areas as you progress will simplify keeping up with this>>
But, I am very worried right now.
<<Can be fixed>>
I assume a power tool is required at this point.
<<Is up to you… But I would suggest this only when/if you use the NOVUS
product…and then, use light pressure (e.g. – let the weight of the tool
do the work), and keep the tool moving. Otherwise…”hand” removal all the
way>>
Manual efforts don't seem to be working!
<<This is the best for the initial “heavy” removal…less chance of
error/removing too much!>>
Please advise!
<<I have used both of these products and believe in their quality and
effectiveness. With some patience and a bit of sweat, I think you will
be happy with the result. Keep in mind too that although you can bring
the acrylic back to “like new” with these products, very fine scratches
will simply “disappear” when the tank is filled with water>>
Tank you!
Dave
<<Happy to share… Eric Russell>>
|
 |
|
Re: Help! Acrylic Scratch Repair Nightmare (a not uncommon
tale, actually) – 08/01/12
Eric, thank you!
<<Quite welcome, Dave>>
Nightmare resolved!
<<Told ya!>>
Back to a fairly clear tank.
<<Excellent>>
Thanks for the humor/levity, helped set my mind at ease...
<<Was my pleasure…>>
The labotomous fun that amateurs have working against themselves in this
hobby...
<<Indeed my friend…but you are less of an amateur now, eh! Cheers… Eric
Russell>>
|
|
Crazing on bottom of fish tank 7/6/12
Hello Crew,
<Michael>
I've read the entire section on "scratches, pits, and crazing" but have not
seen anything related to crazing on the bottom piece of a tank.
<Mmm, happens>
My TruVu tank is 270g (6'Wx3'D,2'T, 1/2" thick), probably
about 10 years old now. There is a little crazing in the seams but nothing
abnormal and it hasn't changed in the 3+ years i owned the tank. I'm more
worried about the crazing going on the bottom piece. No other pieces have
any crazing and there is very little bowing; really you can barley <barely>
tell it bows at all. Above the stand i have a 3/4" piece of plywood
(no screws or anything just laid on top), followed by 3/4" open cell foam
mat; the puzzle locking kind for kids to play on.
<Good>
My tank is level from left front to right front and left rear to right rear.
The left front to left back and right front to right back are both off by
1/8" equally. The bottom should be planer as well since i do not see any
parts of the foam mat excessive pushed up against the bottom piece of
acrylic. What makes this even more complicated, is that I do not know if the
previous owner caused the crazing or if i did. I just noticed it recently
when i removed the gravel. I'd like to add some new/different gravel
now but worry i won't be able to keep an eye on the crazing. This is a big
risk since the tank is
sitting in my living room. Oh yeah, i also reinforced my living floor so it
shouldn't be causing any twisting to the stand/tank.
Thank you for your time,
Michael
<I don't consider that there's a real problem here. Some such crazing does
"happen" w/ much sheet nowayears... not a structural issue... and you have
good support underneath. I wouldn't worry. Bob Fenner>
|
 |
Acrylic 5 gallon tank 6/25/12
Hello:
<Hello Judy>
I got a used 5 gallon hex tank for $5 the other day. I figured I can't
lose with that. The hood is great, but when I cleaned and filled
up the tank, it was cloudy all over.
<Have you looked down from the top? Is the water cloudy or is the
acrylic hazed.>
I thought it was just condensation, but it isn't. The tank may be 20 years
old, I don't know, but is this what happens to acrylic tanks when they
come to the end of their lives??
<May have been caused by what you cleaned it with.>
Thank you
<You're welcome. James (Salty Dog)>
Re Used Acrylic 5 gallon tank 6/25/12
Hello:
<Hello Judy>
It is hazed when it is filled with water. I emptied it a few hours ago
and it seems to be slowly clearing from the top down. If that is hazing,
what causes that?
<Ammonia based cleaning products such as Windex can cause that.>
Does that mean the tank is useless??
<No.>
The only thing I used on it was a 3000 grit sponge to clear the
scratches.
<You may need to wet sand with that sponge in a circular motion.
This is called polishing is the last stage in cleaning/restoring
acrylic. You may also need to clean/polish the outside of the tank
before it will appear clear.>
Thank you
<You're welcome. James (Salty Dog)>
|
crack in bottom of bowfront glass
tank, & crazed acrylic one
4/5/12
I've been reading your posts for a really long time but
thanks to your specific answers never needed to ask anything
until now. I have been reading tonight about cracks in tanks, but
this tank was given to me free and it looks brand new. The people
I got it from never used it and possibly the people who gave it
to them might have, but again it looks new, my guess is it
cracked when they tried to move it downstairs. It appears to be
about 46 gallons and the crack is in about the right third front
bottom piece and about 2" long starting with what appears to
be a chip and then branching out thinly. I've read where you
say to solvent a piece but not clear on whether to put the piece
over the bottom piece or under it.
<Over>
Also, I've heard to use aquarium sealant first on the crack
and then whatever you recommend to adhere the extra piece. Would
you recommend just sealing it to the joints or sealing it to the
actual piece all over and the joints?
<Over all is best in one go... NOT sealing the cracked area
separately>
And what specifically should I use if I need to seal the crack
first and then adhere the other piece.
<Glass or acrylic... aquarium-safe Silastic. Posted on
WWM>
Sorry I'm sure you've covered this somewhere but
with 2 little ones at my heels I don't have days to read it
all.
<Maybe get some help w/ this project>
Thanks again!
Oh, also, I got a 55 g acrylic off craigslist of course and after
filling it noticed that where it bows on the front bottom half
there are lots and lots of what look like stretch marks that go
in the shape of the bow like a rainbow shape,
<Crazing... see WWM re>
I had fish in it for 2 days but freaked that it would break. I
attached a pic, but not sure if it's worth saving.
<Not an uncommon occurrence... w/ cheap/er acrylic, improper
support... Bob Fenner>
|
 |
Re Acrylic aquarium crazing?
2/13/12
James,
<David>
Thank you!
<You're welcome.>
I have discovered the tank has 1/2" acrylic, a 14" strut and
4" lip around 2 cutouts on the top. The cutouts have right angle
edges, not rounds, and there is only slight whitening along the seams
of the tank (front to side panels, etc).
In all, this seems a good health bill, except I'm worried about the
right angle edges for the cutouts on top (versus having rounded
corners).
Does any of this change your guidance?
<No. What are your concerns with the right angle cutouts?>
Again, very appreciated,
<Welcome. James (Salty Dog)>
Dave
Re Acrylic aquarium crazing? 2/13/12
I was worried based on the article about acrylic tank repair
(http://www.wetwebmedia.com/acrylicaqrepair.htm) that mentions the
benefit of rounded corners for the cutouts. Since it doesn't have
this (i.e. it has the right angle cutouts), I wondered if I should be
overly concerned.
<Since the tank has been in use and hasn't cracked yet, I
wouldn't be too concerned unless these right angle cutouts were
close to the two large openings. And yes, holes etc made with a hole
saw or router would be better to reduce stress.
Is it possible to take a pic of the top of this tank and send to us?
James (Salty Dog)>
Re: Acrylic aquarium crazing? Ammoniated cleaners?
Yep, read it myself. As you know age also will cause this depending on
the type of acrylic used.
<... the citation? Not your assertion. WHERE did you read this, can
anybody read this? I've been under the impression that most crazing
was a sort of "stress-fracturing">
Q. Ho do you clean acrylic sheet?
A. Use a mild soap & water mixture with a gentle cleaning cloth. Do
not use ammonia based cleaning solutions on the acrylic as it will eat
into the sheet and cause it to craze.
The source was http://www.plaskolite.com/faq.htm
<This is their general FAQ site... Where specifically?
B>
Re: Acrylic aquarium crazing?
The FAQ section here. Scroll down a bit.
http://distributionbizwiz.wordpress.com/2007/08/23/acrylic-q-a/
<Ahh, I see it now:
"Q. Ho do you clean acrylic sheet?
A. Use a mild soap & water mixture with a gentle cleaning cloth.
Do not use ammonia based cleaning solutions on the acrylic as
it will eat into the sheet and cause it to craze. "
<Thank you James. BobF>
You're welcome Roberto.
Re Acrylic aquarium crazing? And now leveling 2/20/12
Salty Dog (or other Crew),
<Hello Dave>
THANKS for the help here.
<You're welcome.>
I ended up buying and setting up the tank. I compared pictures of the
top of the tank to pictures on your site, and can see it has slightly
rounded edges on the cutouts, fortunately. I also see no signs of
stress. The crazing seems to all be cosmetic, which has been confirmed
by the aquarium mover (also has acrylic tank manufacturing operation
here in town). As it turns out, it is only 3/8 acrylic, but as there
are no signs of stress for this tank (135g, 60" x 20" deep x
24" wide), it seems I am ok.
My final concern with the setup is whether the leveling could be an
issue. From front left to front right, the water line drops 1/8".
From front left to back right, the water line drops 5/8" (or could
be 1/2".
Seems I have an issue that must be resolved by draining the tank and
shimming (sigh). The concern I have with shimming is that the acrylic
stand does not have 4 legs, but a uniform base that contacts the floor
at all points.
<That's not a big problem. Use full length shims under the base.
If you have, or know someone with a table saw, you could rip full
length shims to the thickness desired. I would not use plywood for
this, especially if on a carpet. The glue could transfer to the carpet
and stain permanently.>
Would you agree that this leveling is an issue, and if so - do you have
any suggestions with managing it?
<My main concern would be if the tank has a slight twist in it due
to not being
plumb. It's always a good idea to put 1/2" Styrofoam sheeting
between the tank and the stand which
helps prevent any twisting. Another issue is that if this tank has a
built in overflow and with the water level being low at the rear, your
front water level may be at the top of the aquarium. If not, I'd
leave it alone barring any twist in the tank. James (Salty
Dog)>
Re Acrylic aquarium crazing? 2/21/12
Salty Dog: Thanks...huge help...
<You're welcome Dave.>
I did some more tank inspection and WWM research to make sure I
understood tank twisting issues you had concern about.
I measured the stand, and see that it has the same exact level issues
as the tank. Taking level measurements around the carpet areas
surrounding the tank seem to be close to the tank/stand measures. So,
seems that I have a floor (concrete slab under carpet) leveling issue.
If I understand your comments, this may not be as much of a concern at
these difference (i.e., biggest slope causes 1/2"-5/8"
difference between back left (higher) and front right corners of tank),
therefore it may be wisest at this point to just observe for signs of
tank stress (such as pronounced further crazing in front right corner)
but not drain/shim?
<By your comments it does not sound like there is any twisting going
on here.
If the water level isn't visually objectionable, then I'd leave
be.>
Also, water level does not touch the top of the front right corner of
the tank. It i 1/4" below top (which I took into consideration in
leveling measurements).
<Good. James (Salty Dog)>
|
Acrylic aquarium crazing? 2/13/12
Hello Crew,
<Hi Dave>
I have researched for enough years on your site, and finally
today have placed a 50% deposit on a tank to begin my dream
aquarium. Now, a few hours later, I am panicked as to whether I
made a mistake.
I looked at a 130 gallon 60"l x 20"d x 24" h
acrylic tank today. The current owner had it for 10 years, and
acquired it from a restaurant that owned it for an unknown time
period. I took pictures of the tank, and noticed what I later
confirmed to be crazing throughout the front panel. Please see
the attached pictures of the tank. In one picture, you can see
where the flash captures the crazing - this pattern was
throughout the front panel (although they seem to be minor and
parallel to the floor). In another picture, you can see where the
flash seems to have caught corner crazing.
Unfortunately I did now inspect the corner seams, top, or front
(for bowing) closely. Do you think the visible crazing is bad
enough for me to abandon my deposit?
<Crazing is generally caused by cleaning acrylic/polycarbonate
with window cleaning fluids such as Windex.
<<Really James? RMF>>
As far as functionality goes, you should be fine here and the
crazing will tone down once water is added. If the price is right
and the crazing isn't objectionable to you, go for it. Might
want to read here.
http://www.wetwebmedia.com/acraqscratch.htm>
Thanks!
<You're welcome. James (Salty Dog)>
Dave
|
  |
Clarity Plus Lifetime Warranty? (and acrylic tank
resurfacing/repair) -- 01/07/12
Hello,
<<Hey Garrett>>
I have recently purchased a 300 gallon acrylic aquarium from c-list for
a couple bucks and thought I was getting a real deal.
<<Mmm, is often the case'¦till one sees the scratches.
But even so, this can still be a 'deal' if you're willing
to apply some elbow-grease. Returning the tank's clarity is not all
that difficult>>
and I may have if I don't count for my labor resurfacing the
tank.
<<Ah!...yes>>
My question is and it's a three part'er; how would one go about
contacting the aquarium manufacturer being Clarity Plus (SeaClear, the
Casco Group and so on) to attempt to cash in on said warranty?
<<If this tank has been modified or repaired (other than
authorized) in any way, it's likely the warranty has been
voided>>
I cannot find any contact info for them anywhere. Wondering if maybe
they shut their doors?
<<Hard to say'¦their products seem to still be on offer
though. You might try contacting a retailer selling their product, such
as FishTanksDirect.Com>>
Second question:
Assuming I am not lucky enough to cash in on that warranty and continue
doing the work myself, how clear is clear enough for acrylic?
<<'¦? You would be surprised at what
'disappears' when water is added to the
tank>>>>
I have dry sanded from 120grit up to 400grit and then wet sanded from
400-4000grit and come back with polishing compound and have gotten it
very clear.
<<This is likely sufficient'¦adding water will
tell>>
However there still appears to be distortion from a few feet away.
<<Mmm'¦ This is from not sanding 'evenly' across
the entire surface of the panel'¦or at the least
'feathering out' the perimeter of the sanded areas. Failing to
do so creates what is called a 'lensing effect' and results in
the distortion you are now seeing>>
I can place a book inside and still read it but can't read it
looking through both panels (just a test for clarity no intentions of
reading underwater).
<<Indeed'¦kind of like trying to read through two
stacked glasses lenses>>
Is the distortion because I boogered-up the restoration process on the
acrylic
<<A likely scenario>>
or because the tank has some age and permanent-bowing to it?
<<A less likely scenario>>
Am I worrying to much and water will fix it?
<<Possibly'¦I would test and see'¦is possible
the lensing effect is not that noticeable/within acceptable viewing
limits>>
(have not finished the resurface part yet to retest clarity with water,
but don't want to waste my time if its going to look like poop)
Third question:
The seams of the tank in various places around the tank have turned
whitish in some spots. Almost like there is frost or ice between the
panels. None are very large maybe 2' at the most , but they do span
the whole 1/2' of acrylic. Never owning an acrylic tank I don't
know the risks involved.
<<Minimal'¦but again'¦a water
test'¦>>
It would be my assumption that the chemical bond broke there just
isn't leaking (have done a 2 week leak test with litmus paper on
the seams to verify leaks).
<<Then you likely don't have a worry re'¦but while
the tank is empty and dry you can easily beef-up these inside corners
with triangular acrylic doweling>>
Do these need to be shored up with the square braces as suggested in
other posts or can I take a needle with solvent and forces it in the
joint? Or something along those line?
<<My choice would be the acrylic doweling'¦applied very
carefully; to avoid any further marring of the viewing surfaces, with a
'thickened' acrylic solvent like Weld-On #16 or Craftics
#33>>
Any and all answers and suggestion will be greatly appreciated.
<<I hope I have served>>
Thanks,
Garrett Crance
<<Happy to share'¦ Eric Russell>>
|
|

