|
FAQs about Stands, Supports for
Aquariums: Leveling
4 Related Articles: Aquarium Stands, Marine
Tanks, Canopies, Covers &
Lighting Fixtures,
Related FAQs:
Leveling 1, Leveling 2,
Leveling 3,
Aquarium Stands 1, Aquarium Stands 2, What to Use, About
Floors Underneath, DIY, Finishing/Coating, Commercial, Modification, Repair, & Tanks, Tanks 2,
Tanks 3, Tanks 4, Aquarium
Repair 1, Acrylic Aquarium
Repair, Used Aquarium
Gear, |
|
|
Metal Stand Leveling and Stand Top
1/30/20
Hi,
<Howdy Bob>
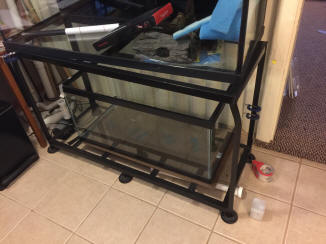
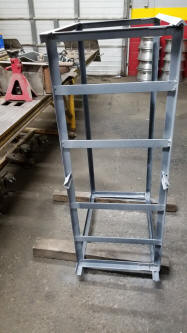
I have a metal stand that is 50" long and 18" wide. It has 6 feet, 4 at each
corner and two mid way in the front and back.
<See this in your pix>
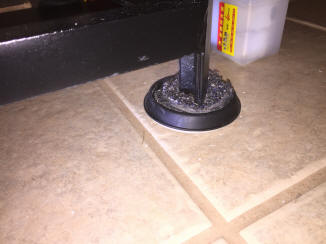
The feet are vertically oriented angle iron (1"). It is going on a tile
floor. Currently it is unfilled and I am putting my system together. I
currently have round slider/floor protectors on each foot with 2 pieces of
indoor carpet in the protector. Display tank is standard 90. Sump is 40
breeder. Pictures attached. I believe the stand is square and true. (Floor
level and top of tank levels are the same)
A few questions:
1. I don't think I need a piece of wood to top the stand for display tank.
Agreed; IF this stand is level, planar... should be fine>
2. Is my "foot" setup ok? Do I need anything? If so, is there something
better than my slider/carpet concoctions?
<I think you're fine here. I do want to ask re the floor... this is on a
concrete slab, like the ground floor? The who shebang will weigh about 1,300
lb.s... >
3. The floor slopes 9/16" down to the right and 3/16 down towards the front.
What is the best way to level this?
<Oh! To put a treated, sealed piece of substantial plywood (1" or more)
under ALL feet and shim this (twixt the ply and tile) in a few places
(plastic shims). CHECK for level a few times as you're (test) filling... as
the floor may move. AGAIN, tell me what is under the tile>
4. For my sump, I have a thin press board sheet. Is this ok?
<Likely so; as long as this too is water-sealed... I can't make out the
support for the bottom rack of this stand. Was it built to have two
aquariums on it? I don't recognize the design>
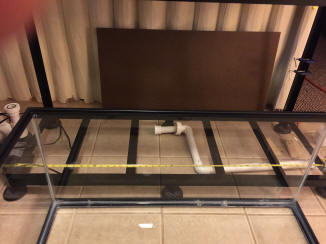
My thought is that I will be biasing it to the back, maybe even overhanging
an inch or two to make the plumbing more vertical (vs. having to curve under
the DT more. If not biased, the tank sits directly on the left to right
rails, but the front to back braces gap the thickness of the angle iron
since they are welded under the left to right rails.
<DO put material under the entire bottom tank/sump edges>
I looked for answers to these questions extensively in your site but didn't
find the same questions. I appreciate your help!
--
Bob McCurrach
<Glad to help. Bob Fenner>
|
  |
|
Re: Metal Stand Leveling and Stand Top
1/31/20
Hi,
<Hello>
Thanks for your advice. A few questions below to make sure I understand
and answers to your questions. Adding new pics.
<Ok>
Thanks!
> Subject: Metal Stand Leveling and Stand Top
> Hi,
> <Howdy Bob>
> I have a metal stand that is 50" long and 18" wide. It has 6 feet, 4
at
> each corner and two mid way in the front and back.
> <See this in your pix>
> The feet are vertically
> oriented angle iron (1"). It is going on a tile floor. Currently it is
> unfilled and I am putting my system together. I currently have round
> slider/floor protectors on each foot with 2 pieces of indoor carpet in
the
> protector. Display tank is standard 90. Sump is 40 breeder. Pictures
> attached. I believe the stand is square and true. (Floor level and top
of
> tank levels are the same)
> A few questions:
> 1. I don't think I need a piece of wood to top the stand for display
tank.
> Agreed; IF this stand is level, planar... should be fine>
> 2. Is my "foot" setup ok? Do I need anything? If so, is there
something
> better than my slider/carpet concoctions?
> <I think you're fine here. I do want to ask re the floor... this is on
a
> concrete slab, like the ground floor? The who shebang will weigh about
> 1,300 lb.s... >
>>It is a cement slab, ground floor. Very solid.
<Good>
> 3. The floor slopes 9/16" down to the right and 3/16 down towards the
> front. What is the best way to level this?
> <Oh! To put a treated, sealed piece of substantial plywood (1" or
more)
> under ALL feet and shim this (twixt the ply and tile) in a few places
> (plastic shims). CHECK for level a few times as you're (test)
filling...
> as
> the floor may move. AGAIN, tell me what is under the tile>
>> Is 9/16" side to side a big number here for out of level? Meaning way
out needing very special consideration?
>> Is 3/16" back to front a big number here for out of level?
>> Do you mean a plywood sheet slightly larger than the footprint of the
tank? That is a significant piece of wood. Wouldn't this flex if I shim
at
3-6 places? Or do shims need to be around the whole perimeter? This
seems
difficult.
>> Seems that metal stands are a pain with their own issues.
>> Or are you saying, 6 individual pieces, one for each foot?
<I'd put/use one piece, under all six feet; one inch (marine if you can
find, afford it) ply. Hard, plastic shims under the plywood.>
> 4. For my sump, I have a thin press board sheet. Is this ok?
> <Likely so; as long as this too is water-sealed... I can't make out
the
> support for the bottom rack of this stand. Was it built to have two
> aquariums on it? I don't recognize the design>
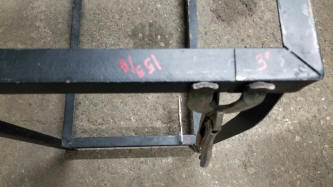
>> I bought this off of craigslist. He is a welder and custom built.
Pics
attached.He sent me many pictures about the build process. The design
does
look similar to metal stand pictures I have seen on the web. The bottom
rack has a mitered corner rectangular frame made of 1 1/4 angle iron, 48
1/2" x 18 1/2". The cross supports are 1 1/2" x 1/4" bars welded under
the
angle iron, There are 4 of them. The outer 2 line up with sump tank
ends,
but they gap to tank by the thickness of the angle iron (1/8" thick). I
have filled the tank and sump for a few weeks to test out his overflow
and
return (which I am re-designing). Everything seemed very solid.
<And this person/welder warrants that a full system's weight can be
supported above w/ these bent legs? I'd get that in writing just in
case>
> My thought is
> that I will be biasing it to the back, maybe even overhanging an inch
or
> two to make the plumbing more vertical (vs. having to curve under the
DT
> more. If not biased, the tank sits directly on the left to right
rails,
> but
> the front to back braces gap the thickness of the angle iron since
they
> are
> welded under the left to right rails.
> <DO put material under the entire bottom tank/sump edges>
>> Makes good sense since if I want to bias back. Will replace my press
board with more substantial plywood. How thick do you think is needed
here?
<Same as above, 1" or more>
How much do you think I could safely overhang? 1"? 2"?
<The (not pressed) plywood likely fine with 2">
> I looked for answers to these questions extensively in your site but
> didn't
> find the same questions. I appreciate your help!
> --
> Bob McCurrach
> <Glad to help. Bob Fenner>
<And again, BobF>
|
|
Re: Metal Stand Leveling and Stand Top
2/1/20
Hi,
Sorry to have so many questions.
<No worries; clarity and completeness is my/our aim>
1. For 1" marine grade plywood, seems on 3/4" is most commonly the max.
Can I wood glue, 2, 1/2" thick ply together and get similar rigidity?
<I'd just go w/ the 3/4" (sealed) alone. >
2. Is the idea that 1" is rigid enough to not deform when shimming?
<To extents, yes>
3. Do I need to shim along the whole perimeter or how far apart can the
shims be?
<Mainly under the leg areas (I would use the coasters you have, but also
under the space/span between the feet>
Thanks,
Bob McCurrach
<Welcome. B>
Re: Metal Stand Leveling and Stand Top 2/1/20
Hi,
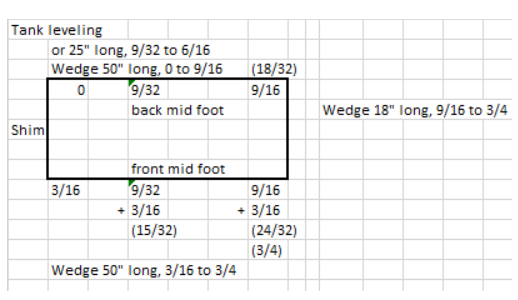
Me again! So when I look at the numbers under each foot, for 9/16 down
right, 3/16 down back to front:
[image: image.png]
<See your figuring>
-Do these numbers look about right?
<Could be... likely the floor more than the stand; but yes>
-You mentioned shimming between plywood and floor. Wouldn't it make more
sense to have the plywood on the floor and 6 appropriate height blocks under
the 6 feet (actually 5 since back left is 0). This way the whole surface of
the ply is on the floor distributing load (vs. with shims under ply, only
having spotty perimeter loading on the floor)
<In actual practice, no... how to put this? Better to have support under ALL
the surface area piRsquared of the coasters, and have this weight
distributed on a number of plastic wedges. IN SOME CASES, folks use a good
two by twixt the wedges and ply... but the amount of mass here, on a
concrete slab. I'd do as I've suggested continuously>
-Of course I may be over thinking this...but would like to look at it from
all angles while it is just design...
<DO take your time; VERY important>
-I think I hate metal stands know, but I really need the room underneath for
my big ole sump.
<Understood. BobF>
Bob M.
|
 |
|
|
Acrylic Aquarium build. 1/20/19
Hi guys/Bob,
<Good morn Mike>
I’ve built a custom (cell cast) aquarium 60”X36”x 24.5” high top and are 1/2”
acrylic, side panels are just shy of 3/4” acrylic. Joint gaps before glue are
.02”. Glue used is Scigrip 42.(you can’t beat 4000psi) Some small bubble here
and there and some crazing. Tank holds water fine. Long side panels bow measured
from Center with a two foot level,
<A note here: I'd use a longer level... >
I get a 1/16” gap from left to right at either end of level. From top to bottom
I get 1/8” gap at either end of my 24” level. Is this bowing ok?
<Mmm; likely so; considering the thickness of acrylic used here. Are you sure
the stand itself is level?>
I get very little bow at the short ends of my tank. I drained half the water and
found the bow very similar than when the tank is full.
<Ah, yes; the material is not going to bow itself>
I was planning on running an old Tunze wave box on the tank as part of a stress
test to test the seams. Tank panels were laser cut and all lasered edges were
shaved off till stress bowing of the panels were relieved.
<Oh! Neat! Not a worry then.>
One of the well known tank manufacturer wanted to make this tank out of 100%
1/2” acrylic. I totally didn’t want that!!!
<Agree/d>
Thanks for your help.
Mike
<Thank you for sharing. Bob Fenner>
|
.jpeg) .jpeg) |
|
Problems with 20 gallon aquarium rack
6/18/18
Hello:
<Tim>
I am having some trouble with a 20 gallon aquarium rack that I built and I am
looking for some advice.
I built the rack out of 2x4s following this video here:
https://www.youtube.com/watch?v=3ffely-t4iw .
<Have reviewed>
I used a circular saw for all of the cuts, but a lot of my cuts were not
straight. I am very amateur
when it comes to woodworking and I did not do that great of a job. I tried my
best using a carpenter's square and a miter square to get everything squared up
as I was building it, but I seem to have failed that. The rack came together
fine but when I bought it in the house to test out to see if it was level or
not, it rocked.
<Best to use the level while assembling>
I checked the floor with a level and it was level. The rack is actually going in
the garage so I was planning on putting some leveling feet on it, which I did. I
was able to get it level to the garage floor, which is slightly sloped for
drainage reasons.
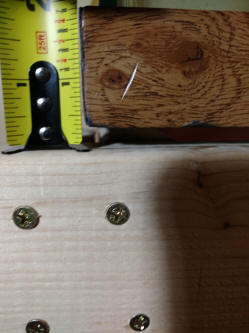
Anyways, after I leveled it, I put an empty 20 gallon tank on the top of the
rack and it rocked.
<Not good>
It seems that the back left corner and the front right corner are too high. As
you can see from the attached picture, the gap created is quite large! I checked
the middle and bottom and both of these have the same problem as the top. I was
scratching my head trying to figure out what I could do to fix this, so I went
and got some plywood cut to fit the rack to turn it into a shelf. After adding
the plywood, the tank still rocks! Why is this?
<The laterals are still not level...>
I am unsure what to do at this point. I see a lot of people using some type of
foam under the tank to help with minor issues, but I feel like the gap is too
big for this.
<I agree>
Is my best bet going to be to take down the corners with either sandpaper, a
wood chisel, or a plane?
<Mmm; no... wedges under the ply that make the plywood itself level is best. If
necessary for smaller gaps, you can put foam between the ply and tank>
I am worried that if I attempt this, I am going to end up taking too much wood
off and end up needing to rebuild the whole rack, which I really don't want to
do. I think I did a decent job for my first attempt at building such a rack, but
obviously not good enough!
What do you recommend in this situation?
<Plastic wedging (you can buy in various sizes at Home Depot, Lowe's....)
as stated>
Thank you for your time,
Timothy Marinello
<Please write back if this is not clear, complete. Bob Fenner>
|
 |
tank support... reading
5/2/18
just built a custom built in stand for 120 gallon tank.. its a tight fit
. had tank in empty and there has been some settling. anyway to
shim the tank itself
<... not the tank>
and how much unevenness will 1/4 Styrofoam compensate for.
<... about a sixteenth>
don't know if I have asked the right or enough questions but thanks for
any input. cheers Morgan
<Read here:
http://www.wetwebmedia.com/aqstands.htm
and the linked files at top. Bob Fenner>
|
The best of times the worst of times. Little glass chip and stand
leveling input to share 2/28/17
Hi WWM Crew,
<Eddie>
"It was the best of times, it was the worst of times." Sorry to get all
"literary" with you, but it seemed to describe accurately my dilemma. It was the
best of times in that, finally, after four and a half years without a fish tank,
I am ready to get wet again.
<Yay!>
The stand was built, the plumbing and sump were worked out in the basement, and
this past Saturday a friend and I moved the stand and tank into the den. I
worked for a couple of evenings on and off getting it perfectly level. I even
learned a couple of neat tricks that I will share below.
The tank is now level and ready to be filled beyond the 2 3/4" that I have
already put in it to level it.
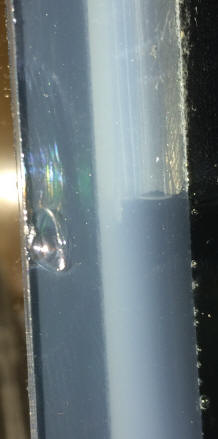
It was the worst of times in that last evening, while I was finishing up the
leveling, I noticed a chip in the front left corner of the tank (see picture).
<I see this>
This tank is a 75 gallon with the overflow offset in the middle of the left half
of the rear of the tank (I think it's an AGA). I got it slightly used four years
ago, and it has been sitting in my basement since then.
When I first got it in the basement, I went over it with a fine tooth comb and
did not see this chip. I'm sure I would have if it had had it then. It must have
happened some time since then. I have also looked over it several more times
since then, but not as carefully. We have been very careful moving it around,
and we didn't bump it into anything any time we
moved it.
<This is a small "impact" chip, scalloped... IF one had to have one, the better
kind>
I've had it filled several times--right after I bought it, to check the stand,
and to check the plumbing/sump. Each time it was filled for several days (once
for a week). The last two fillings were recent (the plumbing check was last
month). I'm virtually certain the chip was there then. I know we didn't bump it
into anything carrying it into the house, and nothing has been bumped into it
since then either. In fact, nothing has been bumped into it at any time (that I
know of). The source of the chip is a mystery.
I have looked over the chip FAQs several times over the years (out of concern
for other tanks for potential sumps/QT's), and looking at the information there,
it is not the nature of the chip that concerns me. It is a "sea shell"
chip with no cracks that is about 1/8" in diameter. It is too shallow
to measure the depth effectively. I tried to take a side-view
picture and you couldn't even see it. What concerns me is where it is.
It is about 2 1/2" to 2 3/4" from the bottom of the tank (measured from
the inside by the depth of the water). It is toward the outside of the glass
panel though (not on the side with the silicon). For this reason, I decided to
seek "professional help" in assessing it.
<I'm not overly concerned re the size, placement>
I don't mind admitting that it makes me nervous. My last marine aquarium was a
55 gallon that the bottom panel burst mysteriously in the night.
Actually it wasn't so mysterious because the stand top was not planar and I
don't think the tank was completely level either (though it was hard to tell
after the fact).
<Yikes>
THIS stand is planar with one tiny gap (less than 1/32") on one corner. I have
used 3/4" Styrofoam underneath the tank to solve that problem. The tank is
perfectly level now (with less than three inches of water) and I intend to keep
checking it as I fill it--if I get to fill it, which is what I'm hoping that
your professional eyes can tell me. I think I know the answer, but is this tank
safe to use? Or do I need to save my pennies for another one?
<I would use it>
I also wanted to share a couple of tips that I learned while leveling the tank.
It may be old information to many, but I don't recall reading them anywhere on
WWM. I have read about putting a couple of inches of water in the tank and
measuring the depth to determine whether it is level. What I discovered is that
it is easier to use a yard stick than a tape measure.
Also, I discovered if I put a small piece of painter's tape on the yard stick to
mark where the water depth was when I measured the first corner that it made it
a lot easier to determine whether the other measurements were the same or not.
It was either right at the tape mark or above or below it. I only taped one side
of the markings so I could tell how much
from the other side. Also I discovered that it helped to draw a rectangle
representing the tank from above and write at each corner and in the front and
back middle the depth so I could look at all the measurements at the same time
and decide where the shims needed to go. Hope someone finds this helpful.
<Thank you for sharing>
As always I thank you SO MUCH for making this service available. I have learned
so much over the years from the site and the few email inquiries I have made.
Thank you,
Eddie
<Welcome. Bob Fenner>
|
 |
|
|

