|
FAQs on Glass Aquarium Repair, Silicone/Silastic... Aquarium- Use 100% (Aquarium Use) ONLY,
8
Related Articles:
Aquarium Repair, Acrylic Aquarium Repair, Cleaning Aquariums, Marine Tanks, Stands and Covers, Used Gear for Marine Systems, Designer Marine tanks, stands and covers,
Related FAQs:
Silicone/Sealant/Sealing 1, Silicone/Sealant 2,
Silicone/Sealant 3,
Silicone/Sealant 4,
Silicone/Sealant 5,
Silicone/Sealant 6,
Silicone/Sealant 7,
Silicone/Sealant 9, & Glass Aquarium Repair 1,
Glass Aquarium Repair 2, Glass Aquarium Repair 3,
Glass
Aquarium Repair 4,
Glass Aquarium Repair 5, & FAQs on Repairing Glass Tank:
Scratches/Blemishes, Cross-Braces, Leaks, Chips/Cracks, Whole Panes, Tools: Cutting Glass, Moulding/Frames; Techniques; Olde Tank (Slate Bottom, Metal Frame,
Pecora...) Repairs, Troubleshooting/Repairs,
&
Acrylic Aquarium Repair,
Used Aquarium Gear,
|
 |
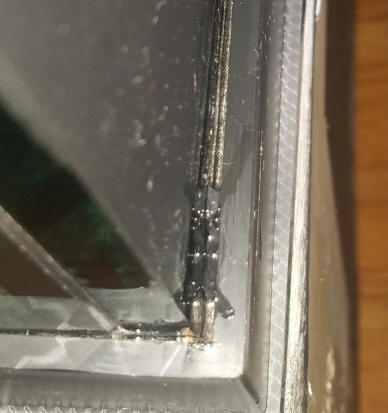
Tank disassembly; Silicone
1/22/20
Hi,
I am trying to disassemble a tank and am having extreme problems.
All the plastic trim is off, all visible silicone has been removed.
However, I can't seem to get a razor blade into the seams. It's like
the seams are almost glass to glass with the very, very thin layer
of silicone holding strong. I've tried 32 gauge wire with handles,
but still can't get through.
Any advice on path forward (before I take a hammer to it!)? I've
found a lot of information on resealing, but not any detail on
difficult to disassemble tank seams.
<This is not uncommon in well manufactured/constructed tanks, razor
blades won't fit between panes, I suggest applying acetone with a
piece of cotton all the way over the pane joints, leave it to
penetrate the union for a few minutes and you should be able to
introduce the blade in between, use a single edge razor blade. Wil.>
Need advice on resealing a tank 1/7/20
Hi folks,
<Hi Rina>
I need some advice with a resealing job gone wrong on a bowfront tank.
Because the front pane meets the side panes at about a 120 degree angle,
the two structural seams between the front and side panes are very
exposed from the inside and I inadvertently cut into them when removing
the inner bead.
<How many gallons does this tank hold?>
So, where those seams should be the thickness of the glass, they're now
only half that thickness.
<Mmm, I would not trust this seam thickness to withstand the water
pressure>
At first I thought I could fix my mistake if I used a strong silicone
like SCS1200 and squeezed it into the exposed seam while laying down the
inside bead. I know the new silicone won't bold to the remaining old
seam, but if the new bead is very thick, could it do a decent job
holding the panes together from the inside?
<It may do a decent job, but I don’t think it would look good
aesthetically.>
Or does that pose too great a risk of leaks down the road?
<Most likely, yes>
If that kind of patch-up method just won't do, could I remove and
reattach just the front panel?
<If this were my tank, I would just remove the old silicone and apply a
new layer between the laterals and frontal panes.>
I know the new seams won't attach to the old seams so the tank could
potentially leak at the two bottom corners, but if the inside bead is
sufficiently thick, wouldn't that be sufficient to prevent them? I know
the surest method would be to rebuild the tank completely but I might
have to move and take the tank down in just over a year so it doesn't
seem to be worth that kind of work at the moment. (If I don't end up
moving I could always rebuild the tank then.) Would either of the two
methods above work in the meantime?
Any advice would be much appreciated. Thank you!
Rina
<You’re most welcome. Wil.>
Resealing a tank from the 60’s/70’s. 10/30/18
Hello, I was referred to you for a suggestion on how to reseal an older tank
with a slate bottom and tar as an sealant.
<Oh yes; I recall... did reseal them w/ heated Pecora et al. and have done so
for "retro" purposes in recent years>
I have a 5 gal with the original light the only thing I’m missing is the lid.
<Do seek out on eBay and such>
I would like to reseal the tank and showcase it since it’s special to me. Any
suggestions?
<Yes>
Is there a tar base out there that can be used that’s safe for the fish?
<There are... sold as liquid asphaltum>
I'd like to keep it in the original condition instead of removing the slate. Any
assistance is greatly appreciated. Thanks, Robin
<I encourage you to "cheat" and just use black Silicone (aquarium sealant).
Folks won't be able to see it, and it will much more likely make a good seal
(that is if you intend to fill it with water) than trying the tar-based
material. Unless you're a big risk taker, I would NOT try heating the present
packing material to remove the slate bottom or glass sides. DO read on WWM re
such repairs... USE only "Aquarium" intended Silicone/Silastic. Bob Fenner>
Re: Resealing a tank from the 60’s/70’s.
11/1/18
Thank you so much for your help Bob. I'll try the black aquarium sealant.
<Ah good. This is the route I'd go, have gone for a long time. The asphaltous
material is a mess... >
I didn't try it before because I was told it wouldn't seal.
<... The same formulation is used to hold glass buildings together>
I'll also look on eBay for the lid to go along with the light I have. Glad I was
referred to you. Thank you again, Robin
<Thank you for your follow up message Robin. BobF>
|
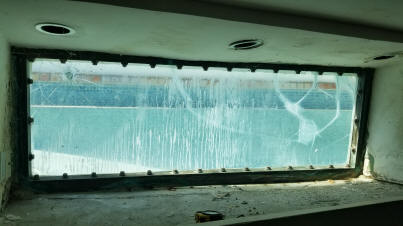
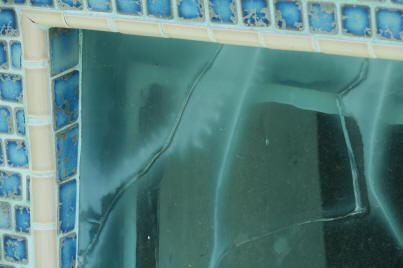
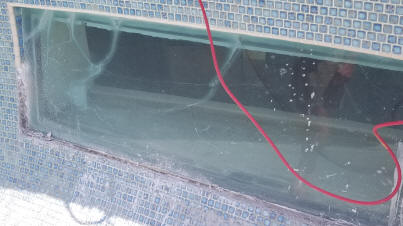
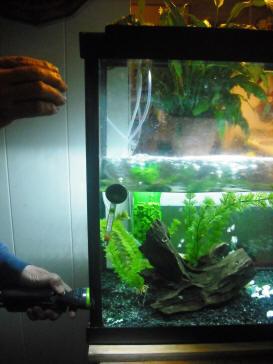
Removing Old Glass Window from Pool (Human Aquarium)
6/6/18
Hello WWM Team -
I know you are mainly about aquariums and not swimming pools, so this is not a
typical question. But not every pool has a window in it. I have to say I was
inspired to put one in after seeing Harry's Underwater Bar in Hawaii (long since
closed).
<Ahh!>
After reading your posts, it looks like you guys have the expertise to recommend
a solution to my problem.
<Okay>
I've attached some photos of the pool window in question.
>Some?//// 28 megs of pix Matt? Why do we ask that folks limit pix to hundreds
of Kbytes?<
The current window is approximately 2' x 6' and is comprised of four 1/4" sheets
laminated together to made a 1" thick window. It doesn't leak, but there are
stress cracks that started to form in the interior layers so I need to replace
it. The window sits on a brass plate and rests against a large 2" x 2" solid
brass frame with a significant amount of silicone sealing it to the frame (as
you can see in the photos).
<Ah yes>
It is important to not damage the brass frame in removing the glass since we
would want to use it to mount the replacement window.
<Yes; agreed>
We had the pool tiled after the window went in and you can see that they
installed tile on the pool side to frame the window. We have removed the tile to
see what we're working with. At this point there is nothing on the pool side of
the window that holds it in. Just the silicone seal that runs the width of the
brass frame - 2" wide and about 1/8" - 1/4" thick all the way around. Strong
stuff to say the least.
<Yes>
What would you suggest I do to break, dissolve or otherwise remove that silicone
seal? Heat doesn't seem to be an answer. It seems like an oil-based product
would help loosen the seal on the glass side, but getting a sufficient amount
worked into it appears to be near impossible.
<Mmm; no solvent will work, and no to heat. What you need, want are sturdy,
sharp tools... AND careful use. There are "razor blade" tools that can, will cut
the Silicone away from the glass AND brass AND surrounding area. Most all this
needs to be cut away to remove the glass, THEN single edged
razorblades (in a holding tool) to remove most all the rest, THEN a solvent
(Toluene is my favorite) to remove all the remainder of the olde Silastic>
FYI - Our plan is to replace the broken glass with 1" thick acrylic.
<Okay... 1.5" would be better, deform less... I'd put up a sign on the outside
asking folks not to touch (scratch) the acrylic>
Looking forward to hearing back from you. Any help or suggestions are welcome
including a company or someone in the Southern California area that may be able
to remove it.
<Mmm, there are fabricators that could find you help here. Call Ridout Plastics
(www.eplastics.com/)
in San Diego and ask them>
Thanks,
Matt B
<Welcome. Bob Fenner>
|
From outside
 |
|
Silicone Mistake 4/18/18
So despite knowing not to use GE 2 silicone, I decided too many things were
going right and said what the heck. Anyway, just spent hours scraping and
cleaning the silicone and wanted to see how much trouble I was in. So the
project at hand were teeth blocks on the overflow to raise the water level in
the display tank. Luckily, my T attachment for the return wouldn't fit and I
never cycled water over the silicone. However water did make contact with the
bottom most edge (skin thin) for around 18 hours. Also water made contact during
application when I was using a paper towel to wipe excess and water ran off it
into the tank. Finally a few specs broke free while cleaning, but I recovered
most of these.
<Okay>
So with that info in hand and photos of my cleaning so far, would you mind
advising me on my next steps (no live anything yet btw)? Am I safe to
replace with aquarium safe silicone and move on?
<Likely so>
Is there anything I can do to neutralize the threat after covering it? Basically
is this tank doomed forever?
Thanks in advance!
<Only time, experience can/will tell, but with the use of activated carbon
regularly changed out...
You should be fine. Bob Fenner>
|

 |
|
Re: Silicone Mistake 4/19/18
Thanks for the reply, I'll let y'all know if there's any issues.
<Real good, thank you. I might suggest trying some bio-assay "test fish" for a
month or so. Bob Fenner>
Re: Silicone Mistake; now: sand sifter choices
5/1/18
Not sure how I missed it but I now see the reply you put to that reply.
There have been 0 issues with the tank despite my mistake (at least nothing
I can see). I'm currently working the nitrates in the tank (no ammonia no
nitrites) and watching golden brown algae bloom/assuring my family it isn't
poop.
<Aye ya; reads as all is progressing as it should>
I did have a question though (surprise surprise) about a possible substrate
cleaner in the form of a tiger tail sea cucumber.
<Mmm; not a fan of this Cuke... gets too big, and though apparently slow
metabolically; produces copious wastes. >
I need to get the nitrates under control first but I was considering one as a
sand sifter in my tank (150 gallons) to deal with algae on the sand and
detritus.
<Am a much bigger fan of other sand sifter groups... Please read here:
http://www.wetwebmedia.com/marsiftfaqs.htm
Sand sifting goby species, Goatfish if you want/need something bigger... are
really neat animals, and very productive. Some snails (Nassarius a fave genus)
are also useful>
However, I am very concerned about a "Cuke nuke" as it's apparently called... I
read on your site that you believed it was less threatening with this species
but that was years ago and my searches on your site yielded little information
on this subject.
<Mmm; well, the "Sea Apples", Australian and not, and other larger species with
a propensity to extend their Cuvierian Tubules are to be avoided. Not so much
for this reason the Tiger Tail>
What fish are actually a threat to these cucumbers?
<Well; the usual suspects: big wrasses, puffers, angels... Triggerfishes and
oblivious eels...>
Can the nuke a 150 gallon with a 55 gallon sump running 500 ml of carbon?
<Could>
V/R
James Williams
<Bob Fenner>
|
|
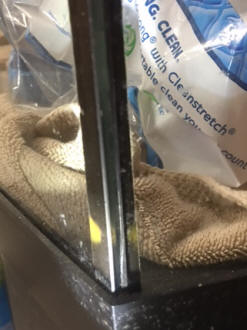
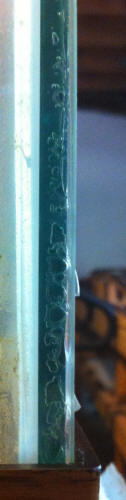
120gal leaking from bottom rim! 2/15/18
Hello! I attached a photo to show where the leak was occurring.
<The old, original tank....>
I had purchased a brand new Aqueon 120 gal tank.
<Is this the same tank? The one shown in the pic?>
The silicone seemed fine, no pulling away anywhere. But as I was filling it up
with water, by the time it reached past the bottom rim, I noticed water leaking.
It was all around the top of the bottom rim.
<What? This is the new tank? Ugh!>
AS i quickly emptied the tank, I wiped up the water and it seemed to be
originating from one spot (in the photo). I
see no cracks in the bottom of the tank, water has not pooled underneath
thankfully (just whatever trickled down from the side). Is this just a
resealing issue?
<Re? It's an original sealing issue. Take this tank back>
In this circumstance, what can I look for as the flaw in silicone... a small
area with a gap?
<Yes; but it will NOT likely be obvious... I.e., the leak and Silastic will only
show when there's water in the tank, lifting the seal>
Or maybe I wont be able to see it anyway?
<Likely, yes>
I'm concerned that at this size of a tank (48.5 × 24.5 x 29.5 about) I will have
issue resealing the tank with the silicone drying too fast as I work with it.
<What language is this?>
Thanks for your time. If you need more pics, let me know.
<.... Have you read on WWM re Glass Tanks, Siliconing? BobF>
|
 |
|
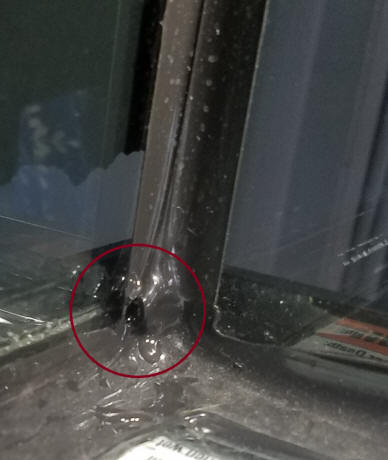
Re: 120gal leaking from bottom rim! 2/15/18
Yes, the tank in the picture is the new 120 gallon tank I’m referring
to with the leak. I posted another photo because I found what seems to be the
point of leaking.
<Ah yes>
I meant a resealing issue as in I just have to reseal the tank.
<This is a poor initial job. Again; I'd return this tank>
Sorry for any confusion! I have read through WWM on other submitter’s leaking
issues and resealing. There is always more to read though so I haven’t finished,
but I will. In your opinion, could the structural seal have been compromised or
can I only tell if that is the case by removing the inner silicone seal?
<What?>
Thank you for your time!
|
 |
|
Re: 120gal leaking from bottom rim! 2/15/18
Aqueon is also telling me to return the tank, so I guess that’s that.
<Good>
Not sure how I’ll get it back out the house as I won’t have the same resources.
<Mmm; do you have friends, family that can help?>
What a nightmare. Could be worse.
I meant, if you could tell, is the hole just an inner silicone seam issue?
<Ahh!>
Or could it be seen somehow that the silicone joining glass panes is the reason?
<There is a defect in both seams; yes>
I attached an image I found to show what I mean. Thank you for your help.
<Welcome. BobF>
|
 |
|
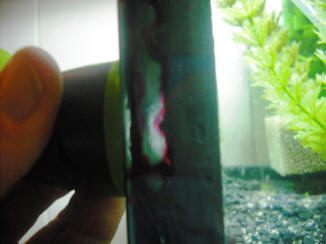
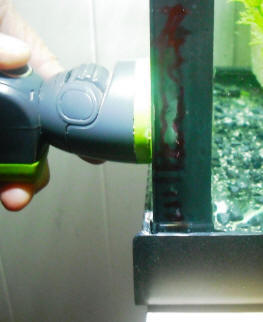
Black silicone turning orange 12/27/17
Hello, I recently purchased a used 72 gallon bowfront aquarium
from Craigslist. I filled it with water for a few days on my porch and there
were no leaks however I noticed a maybe inch long piece of black silicone that
has turned orange all the way through.
<Going bad...>
I'm a worrier and want to make sure it's nothing before I fill it with rocks and
coral and fish in my living room on my new flooring. Please advise. Thank you K
<Is the orange Silicone in-between the glass to glass interface? Or just in the
joint/corner? If the first... no bueno; if the second, I'd cut out that strip
and re-do it. Bob Fenner>
Silicone turning orange. 12/27/17
It's definitely on both sides and it kind of looks orangey in the center on the
3rd pic. What do you think? Thank you K
<Mmm; I might try bleach... diluted about 50:50; with the tank tilted toward
this corner, in the garage (to reduce exposure to fumes)... The spot doesn't
appear to be "all the way through", so/hence the tank may be usable for years.
BobF>
|
|
|
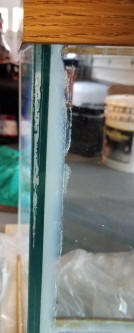
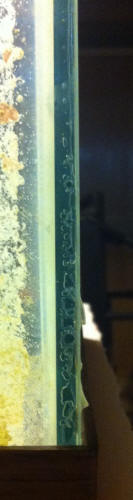
Re: 55 gallon glass cross brace 11/17/17
Hi again, Bob. I was going to up-date you with happy news, at least that was my
plan. I got my fish back into the 1/2 filled 55 gallon. I redesigned all my
filtration as my HOBs were no longer useful with the water level so low. I made
all new internal filters with pop bottles, my fully cycled media, a power head,
an air pump and an air stone. My goldfish was quite shocked by all the changes
but was starting to come around again. (He's old and set in his ways and takes
quite a while to adjust to change.
<Me too>
Kind of like his owner, I guess, heh hee). I was quite pleased... enjoyed the
aquarium for yet another moment... until I saw this (pictures attached). I
assume this spells the end. The inside seams all seem fine and soft and secure
but what this looks like is a rather large bubble / weak spot in the structural
seam between the front and side panel. I am a pretty handy person but I do not
have the time nor the inclination nor the room to tackle a complete tear down
and rebuild of this aquarium. Does this look as bad to you as it does to me?
<... it is bad. When the glass to glass (as opposed to corner joints)
Silastic/Silicone rots like this, to this extent, it loses function. The tank
might fail... slowly, as in splitting a seam>
Is a complete tear down and rebuild the only option for this aquarium?
<Practically, yes>
If so, I'm going to just pack it in and buy new.
<This is what I'd do as well. The tank is still useful... as a paludarium,
critter container....>
Is there a particular manufacturer you would recommend?
<Mmm; for stock, I still like "All Glass Aquarium"; there are more sturdy more
and real custom makers, but they're a bunch more money>
I would like warranty, customer service, quality work, and most importantly
availability in Canada.
<Oh! I don't know much about what's available there... I do think
Glasscages(.com) ships to Canada; but would ask about re pricing, see re
alternates. I live in S. Cal.>
I really hope you are going to tell me that I'm wrong but I'm prepared for you
to confirm my nightmare. P.S. It is not
leaking: has never leaked since I set it up.
<... not yet. Am a bigger fan of acrylic tanks... Bob Fenner>
|
 |
|
Re: 55 gallon glass cross brace 11/17/17
P.S.S I highlighted the area with a red marker on the outside of the glass.
I have no idea how long this flaw has been like this. I will be watching my red
mark closely to see if there are any changes. Thank you so much for responding.
<Good idea (to mark the limits of the fault)... it will grow unfortunately.
Bob Fenner>
|
|
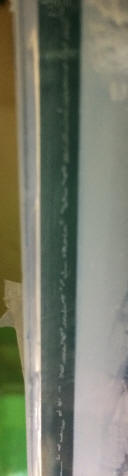
Time to panic? 4/23/16
Hi WWM crew,
<Eddie>
I'm so sorry to bother you with this. I think I have been emailing too
frequently. However, when I noticed this this morning I felt I needed an
expert opinion. The photo is of my sump seam. You will notice the vertical
white line.
<See it... not a bad joint...>
My tank has been set up for 6 weeks. This is a 30 gallon sump (standard 30G
tank that I got used) divided into 3 sections (skimmer chamber, refugium,
return chamber). The picture is of the side where the skimmer chamber is,
so the water is deepest here (less than an inch below the top frame). The
white lines go from the top frame almost 6" down the side. Also about 1 1/2"
from the bottom there is a fainter line that runs up about 2 1/2".
There is another little one 1/2" long in the middle (6" from the bottom
frame).
I'm not sure, but I don't think these have been here the whole time. I
haven't noticed them before, so I'm not sure how long the have been there.
Sorry the picture is blurry. I can send a clearer one later if necessary.
So . . . Is it time to panic? Am I ok? Does it need to be repaired?
Junked?
<Do make the comp. for yourself by reading here:
http://www.wetwebmedia.com/acraqleaks.htm
Thank you so much for looking at this. You don't know how much I appreciate
it.
Eddie
<I wouldn't panic. Bob Fenner>
|
 |
|
Re: Time to panic? GLASS/Silastic seam concern
4/24/17
Hi Bob,
<Hey Eddie>
Thank you for your reply. I'm sorry to have panicked before.
<Mmm; well; the sense that a tank may come apart IS a reason to panic for sure>
I had studied the FAQS regarding Silastic seams before and these didn't look
like a problem in that regard. My concern was that they were new or at least I
hadn't noticed them before. I water tested this tank before making
it into a sump. I even sent you a picture of some bubbles on another corner. But
I don't remember seeing these then or when I set it up. Of course, maybe I was
so concerned about the other seam I didn't notice these. Anyway, I'm getting
ready to put a DSB in the middle section of this sump, so I wanted to make sure
it wasn't about to spring a leak or worse. Seeing something "new" scared me.
Sorry about that.
<No worries>
I do want to clarify one thing about the previous email . . . This is a glass
tank/sump. You linked me to the FAQS for acrylic seams. I didn't specify before
that it was glass. I hope that doesn't change your answer.
<Oh; sorry about that... I should make sure I'm fully awake (a rare occurrence)
before responding. But, same resp. I would not be concerned with this/these
seams>
Thanks again,
Eddie
<Welcome. BobF>
|
Red Sea Max Leaking!!!
4/23/16
Hi, Any one have experience with this?
<Lots>
It's a fairly slow, oozing leak from the bottom of the vertical
compartment that holds all the wiring at the lower right corner
of the 34 gallon tank (130D). I'm hoping to find a way to fix
without emptying tank but so far haven't found any
caulking/sealing product that doesn't say "surfaces must be clean and
dry". Thx in advance! Al Tribe
<IF the leak is coming from a seam, YES to draining, cleaning,
drying.... and putting a new Silastic bead in all internal joints. I
WOULD check first to make sure the water is not originating elsewhere...
splash, spray,
condensation. EVEN if you go to the point of emptying, cleaning, FIRST
fill w/ the tank being empty... over newspaper (to detect water) and
piece by piece, put the gear back on... JUST to detect the origin of the
leak/water.
Bob Fenner>
Re: Red Sea Max Leaking!!! 4/23/16
Dear Bob, Thanks so much for your quick reply, and on a wk-end too!
<Glad to respond Alex>
Your advice makes perfect sense except that I have no way to empty the
tank with its critters, rock, etc. It would be a challenge even if I
weren't recovering from recent shoulder surgery, having no extra tank
available or
close-by LFS who could board everything.
<Mmm; are there other fish friends; perhaps a local club you could
contact?
You NEED to borrow another system for your existing livestock>
The leak is only apparent at the bottom of that "wiring compartment",
so, in desperation, I think I'll have to try a sealant that can be
applied to wet surfaces.
<As far as I'm aware, there is no such thing>
It's not clear if the source is a seam but it definitely does not seem
to be splash, spray, etc. I'll keep you posted. Many thanks again! Al
<Wish we lived closer to each other. Bob Fenner>
Re: Red Sea Max Leaking!!!
Wow! What a kind and "downright neighborly" thing to say! I did find
something called Lexel which claims to be "instantly waterproof", sticks
to almost anything, and sticks to wet surfaces. It's clear and I plan to
try it tomorrow. Thx again, Al
<Seems to be a super product, but see here:
http://www.sashco.com/hi/pdfs/Lexel_TechData.pdf
Note they don't suggest using on/around aquariums... Toxic. Bob Fenner>
Re: Red Sea Max Leaking!!! Plus clownfish pairing
4/24/17
Must say again how much I appreciate your help, even researching this
new product, above and beyond for sure! Since the area inside the wiring
compartment of the red sea isn't really in contact with main tank water
or fish, I may take a chance and try anyway, (even "AMA", against
medical advice).
<Okay... DO provide plenty of air circulation... ALL the fans you can
lay hands on easily, OPEN windows (the carrier has a strong smell while
curing), ON a warm day!>
Actually I have only a few fish left after a disastrous heater failure
about 1 week prior to detecting the leak. The original red sea heater
failed; I woke up to see the tank at 70,F. and many dead critters, even
the gorgeous 4in. female clown I've had for many years....very sad
indeed. Put in two Ebo-Jagers I had lying around to provide redundancy
in case of a repeat disaster.
<Good>
She had a bonded mate, much smaller of course, who survived; they were
inseparable and used to spawn frequently. She killed her first mate
(typical I know), but these two were happily married, so my
anthropomorhic fantasy is that he'll be bereft/lonely and I'd love any
advice you might have about this dilemma since I've never seen clowns
for sale on-line or at LFS anywhere near his size, about 2-3in., and I
don't remember just how clowns mature and change genders. i.e. if I got
a much smaller one, would it remain or become a female simply because of
his presence?
<As you hint... procure a decidedly smaller one still; and your present
male will convert to female>
Or best to find him a new home and get 1-2 smaller clowns to really
start over? Many thanks again, Al
<One new male/sexually undifferentiated specimen is what you want. BobF>
Re: Red Sea Max Leaking!!! 4/24/17
OK, good to know!
<Please do send along your further notions, progress. BobF>
Re: Red Sea Max Leaking!!! 4/24/17
I sure will!
Thx again,
Al
<Cheers Al. B>
|
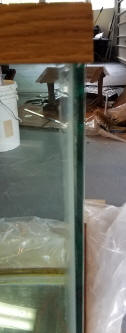
Re: Questions about Sumps and glass tank seams and chips. And
sump/fuge design f' 11/5/16
Hi Bob,
<Hey Eddie>
I’m back with what I hope will be my last ever silicon/seam question. After
our previous exchange about my sump plans, I decided to scrap the plans for
separate vessels for the sump and refugium and look for as large a container
as I could fit to make into a combo of the two.
<Good; this is what I would do>
I looked around and found a used 30 gallon (36x12x16 approximately) for next
to nothing. I had to drive almost two hours to get it, but that’s no big
deal. Anyway, the plan is to make this tank my sump with some type of three
chamber configuration (skimmer, pump, DSB/refugium). I’m still researching
the details on how I want to arrange that part.
<Just saw a really neat new (to me) weir design for sumps et al.
aquariums... on Facebook... A sloped bottom to allow easier, greater
flow...>
I had them fill the tank when I bought it to make sure it didn’t leak, but
in the bright sunlight I didn’t notice some bubbles in the seam at the
bottom on the rear left of the tank.
<Some?! Wow; I'll say!>
The section in the pictures runs about 3 to 4 inches up from the bottom
frame.
<Wish these were up near the top instead>
I went through the seam FAQs again the last few days and found some that
were similar, but I also know that the size of the tank factors in as well
as the fact that I’m planning on using it for a sump and 95% of the time it
will be around half full.
<Yes>
It looks to me like a bad silicon job (you may can see the excess silicon
sticking out between the plates in the picture), but if so it is just on
this back corner. The rest of the seams look really good.
<Ok>
The first picture is of the tank full. The second picture is of the tank
empty. As you can see there is no observable change.
<Agree/d>
I kept it full for nearly 72 hours without any changes. Please tell me that
this tank is safe to use for a sump.
<Yes; I would use it for such a purpose>
I will make sure that the side with the bubbles is used for the shallower
end of the sump (just in case). If it is not safe, can I possibly repair it
in some way without resealing it.
<Mmm; not really... or not what I would do. One COULD put/Silicone strips
(two or so inches) of glass over the bad corners; overlapping the glass
there... on the outside of the tank. I would just use it as is>
Perhaps by somehow putting extra glass around this corner to help support
it.
<Oh! Yes; the same idea likely>
Thanks as always for all your help. I would be lost without the kind help of
WWM.
Eddie
<Glad to share with you; aid your efforts. Bob Fenner>
|
 |
|
|