|
|
| Home | Marine Aquariums |
Freshwater Aquariums |
Planted Aquariums |
Brackish Systems |
Ponds,
lakes & fountains |
Turtles & Amphibians |
Aquatic Business |
Aquatic Science |
Ask the WWM Crew a Question |
| Please visit our Sponsors | ||||
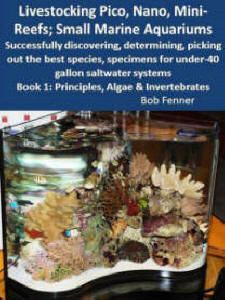
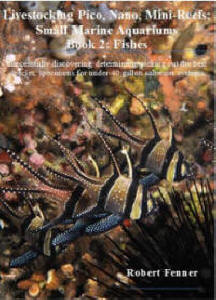
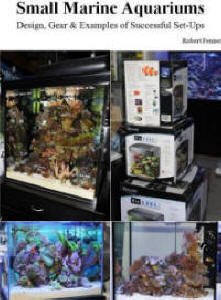
Welcome to the wonderful world of saltwater system set-up and operation where we contrive to control all things to keep our livestock alive and happy; but mostly just modulate everything. We've got more components and gew-gaws then "Carter has liver pills", with many more than a few ideas on how they can or should be put together. You will be amazed at how much you will quickly learn... and be relating to friends and family that are astonished at "your creation". Don't be overwhelmed by all the new ideas and information presented here and with your new products. All that dry-goods assortment at the dealer's comes with accompanying literature spelling out their use for particular applications. This Section Heading will offer you the very basics of all marine system's set-up; the use of the common elements to every kind of salt aquarium. The following sub-Sections will delve into the particulars of the most popular specialties of the hobby, the fish-only, fishes and invertebrates, reef set-ups et cetera. This is a very careful arrangement of presentation, and one that you should bear in mind while reading. As you progress in reading about these marine system variations, you will find a definite shift in "difficulty", or better put, a narrowing tolerance to poor or varying environmental quality. Obviously all types of systems have a fluid-filled box, the aquarium, in common. Reef systems have more stringent requirements of water quality and lighting, and the smaller the reef system the more exacting the water quality concerns. It is a fact that about ninety percent of "fish keepers" in the U.S. are really goldfish bowl, or other plastic "death-trap" aquarists. The remaining ten percent have "real tanks" with "real" filtration. Approximately ten percent of those "aquarium aquarists" are marine types, so we're now down to one percent of the total. The various sub-specialties of marine aquarium keeping are probably like those of freshwater; most are fishes-only set-ups, some with added invertebrates, grading into "true" reef systems of one sort and another. Thus our order of presenting the set-up of all these different and increasingly more "demanding, or difficult" arrangements. Most aquarists I've met who have "been there, done that", agree, "It is better to try your hand at freshwater first, and then a fish-only marine set-up, before embarking on a cosmopolitan algae/live-rock/invertebrate/fishes system". I likewise encourage you to take your time "earning your dues" by practicing on "more forgiving" types of systems. When we meet, years from now, I want to hear you say, "Thanks for the help in your writing; I became a life-long aquarist as a consequence of the approach in your book". Ahhh. Let's journey together through these various components: Tanks: There are two general varieties, plastic (acrylic) and glass (with silicon rubber seams. Some important considerations: They are heavy when set-up and filled; about ten pounds per gallon! Therefore it is important that aquariums be placed on something substantially strong. Another factor is that this "stand" be flat and planar. For these reasons Aquarium manufacturers will generally warrant their products only if they are placed on certified Aquarium Stands. You should be encouraged to purchase the largest system possible/practical. The bigger the tank, the easier it is to maintain, the more stable an environment it will provide, and the more flexible it will be for stocking and decorating. Remember that small displacement engine motorcycle, and hard-drive on your first PC? The bigger, the better. For saltwater systems you need forty gallons minimum for ensuring stability and adequate "cruising" space. The aquarium should be placed in an area where there is minimized environmental fluctuation; away from windows, heaters, etc. Being in the line of frequent foot traffic is no problem; the livestock will quickly adjust and respond. Before setting up your tank it should be cleaned with appropriate tools and materials. Soaps, detergents and ammoniated cleaners are toxic to aquatic life, and should never be used in or around the system. Many "sponges", paper and cloth towels are abrasive for acrylic aquariums. Lemon oil and other preparations are fine for use on stands and surrounding woodwork; alcohol and ammonia-based cleaners are not. Lighting: This is a very important part of aquarium keeping, functionally and for the appreciation of the hobbyist. Photo- quality, strength and duration need to be understood and properly controlled for optimum benefit. Aquarium systems are sold with and without lighting; an assortment of hoods, fixtures, lamps and conversion kits are available for fluorescent, halide, and other novel illumination. Yes, you need artificial lighting; for your enjoyment and your livestock's health. Bo back to Section 3) B) for the theory of lighting types and what they'll do for you and your aquatic charges. For setting up, the important things to remember here are arranging to keep water out of your electrics, and possibly providing for venting waste heat from your light source/s so they don't overheat your system. Please do over-plan for both these considerations. Make the hood/lighting receptacle so large and structurally secured that even a monkey swinging, jumping on top won't knock it into harm's way. How hot is hot? Stick your hand on the fixture's housing after it's been on for a while. Can you take the heat? Would it burn someone or something (like your home) if it came in contact? Filters Where are we at so far? You've got your clean tank and stand situated, making sure the floor will take the weight and leave the whole system level and planar. You're lighting's ready to go with a fool-proof restraint and ventilation. Next is the most confusing, least understood area of setting-up; filtration. Filters are a big category with two major ways of looking at them, by type and how they work. Let's do both. First of all some filter basics review. Filters of any sort are designed to selectively remove and leave something's in a system. We want to take out livestock wastes, but add oxygen. We want to eliminate particulate matter by serving it out, but not our fishes! There are lots of ways to do these things; basically it comes down to how much time, money, general resource a person wants to put in versus the degree of cleanliness desired and required. The best available, most appropriate filtration system will get you the most trouble-free, low input of time and money in the long run. Biological filtration is a must. Unless you have an "open" system with continuous flow through of "new" clean seawater, you will be re-circulating your "closed" system's aquatic medium along with livestock wastes and uneaten food. These materials are toxic to your fishes and invertebrates unless expediently converted to less noxious materials and/or filtered out. This is the realm of biological filtration for most of us; circulating system water through a matrix/substrate housing beneficial nutrient-cycling bacteria. The simplest of these bio-filters are air-driven box or foam filters; these are appropriate technology for treatment/quarantine tanks with small, temporary loads and a need for flexibility in filter media use. Undergravel filters go... under the gravel! These time-tested war-horses are powered by air and/or powerheads that draw or push the water through the substrate, trapping particles and "speeding-up" biological filtration. Undergravel filters are not a necessity for successful marine aquarium keeping; there are whole countries of aquarists that rarely use them. Should you be a U/G proponent make sure yours covers as much of the systems' base as you can, utilize large air-lifts, stones, power-heads to maximize flow, and be diligent in vacuuming your substrate. Biological filtering action is not confined to the above modes. Any suitable medium with the system's water passing over it will sponsor bacteria populations and conversion to some extent. I do not like to rely on just undergravel or any one type of filtration for this vital function, so I urge you to utilize a power filter of some kind in conjunction with undergravel, or two types of power filtration if you elect to skip undergravel. Power Filters come in several formats; inside or outside of the system, hang on the back, under the tank, pressurized and not, wet-dry and canister. Outside power filters are preferred to inside as they minimize the hassle of manipulation while maximizing capacity. The latest and greatest models are quiet, energy efficient and easy to use. If you're unfamiliar with their operation, ask your dealer to take one of each out of their box, review their instructions and peruse their elements. Most all are magnetic-drive pump powered with few moving parts. The fluid-moving mechanisms and filter media replacement should be known to you in terms of cost of operation, repair and replacement. There is a huge difference in the same lines by different manufacturers between efficiencies for intended sizes and types of systems. Not to totally ignore inside power filters; they're great for auxiliary filtration or establishing cycling in a new system; they just take up room, are unsightly and a pain to work on. I'm a big fan of canister type power filters for several reasons; they require the least care, have the longest cycling/maintenance intervals, don't rely on gravity, adapt and can quickly to increased bioload/overfeeding. The best units use very little electricity and have long lasting, reusable media. Wet-dry, reef or trickle filters employ a separate open filter utility/sump, a draining and pumping water-return mechanism along with various remoted filtration components. They typically have a "wet" area where water flow is treated in some fashion as an undergravel filter, a "dry" section where water is "trickled" or sprinkled over a variety of out-gassing, bacteria-supporting media; and possibly an array of other filters, contactors, meters, dosers... We will re-visit these under Section 5) A) iii). Though you don't have to have a "reef" community of organisms to make use of one of these "reef" filters, or in truth a "reef" filter to successfully house a "reef set-up", a well-designed and operated wet-dry/trickle/reef filter has many technical and practical advantages over other filter units. They are by far, the filters most capable of producing and maintaining high water quality. Their costs of acquisition and operation are commensurate with the enhanced and stable environment they produce. My Pitch on Installing Filters: Do it now, as the next step in setting up your system. That's right, I'm encouraging you to fill the tank (and filters) up as is and fire the biological and mechanical filters over. Why waste the water and time doing this at this point? To check to make sure the entire system doesn't leak, and that the filters are going to work as they are arranged. Let me relate one of my notorious anecdotes to you to hammer this point. Years ago, when I was young and foolish (instead of now being middle-aged and more foolish), I helped install an eight-foot tall acrylic system in a San Diego Convention Hotel with a friend/associate we'll call "Hank" (cause that's his name). Well "Henry" decided that we would place the custom undergravel plates and gravel (2,000 pounds of washed #5 coral shell) into the tank without the above-proscribed test-fill. I can hear him now, "Oh Bob, don't worry, I tightened those plastic through hulls (in the bottom leading to and from the remoted filtration) just a smidgen with the channel-locks". Now, Dear Reader, you and I know better than to put a tool to a "hand-tighten only" fixture, and to do a "water test" as I've written here... But oh no, I listened to "Stank" and yes, the system did leak, and yes, we drained the tank, removed the gravel by buckets, and the filter plates to get to the split gasket on that through-hull. Did I mention the thousand gallons of synthetic seawater we threw away? Don't be like me and "Stinky", test your filter and tank assembly right now, before putting in salt mix, gravel... anything else. Thanks. What happened to protein skimmers? I haven't forgotten them, they just don't come into the install picture just yet. Air Pumps and Paraphernalia: These are a source of pressurized air for operating undergravel air lifts, air diffusers (aka "stones"), and air-driven foam fractionators. There are several varieties, the most common/popular are the lines of "diaphragm" type air pumps. These are simple, solid designs that are (hopefully) quiet, consume little energy and are easy to service. The pump must be located higher than water level or employ a suitable back-flow preventer (check-valve) to prevent water capillating, draining out in the event of power or air-pump failure. Air-line tubing is the 3/16" inside diameter flexible material offered in pre-cut and to-order lengths you use to connect your air-pump and air-driven tools through a valving system. Use the better quality that remains pliable for years. Airstones are semi-porous devices used in conjunction with air pumps to produce pretty displays and promote gaseous diffusion and circulation. They are made of several different materials and come in various shapes. Glass (fused bead) types are superior in that they produce bubbles of uniform size (optimum is about 1 mm in diameter), do not clog easily, may be readily cleaned and re-used and don't break. Ceramic/sand, plastic wand varieties are worse for the opposite reasons. Regarding "wood" mechanical diffusers; these are suitable for air-driven protein skimmers only; the fine bubbles they produce for a while are dangerous to livestock, known to cause embolism and other environmental gas- diseases. My strong recommendation is to utilize a separate dedicated air pump for your skimmer (if it's an air pump using type), as they are air and pressure "hogs". Know how to check for the hazard of back-pressure build-up and subsequent inefficiency and failure of your air pump; by disconnecting the air line tubing from the pump and trying to blow through it. If you can't do this easily, neither can you r pump. Periodically (about every month) check and clean, or replace clogged diffusers. Air Valves: These come in plastic and metal. Do not use metal in or around your tank. They are used to direct the desired amount of air pressure and volume to the various uses. Each pump should have at least one extra air valve outlet than you will be using. This outlet should be partially left open as a "bleeder" to prevent back-pressure damage to the pump. A small piece of air-line tubing on the outlet will resolve any "hissing" noise. Do you think I'm some sort of aqua-fossil for my shameless promotion of air pumps for aeration and circulation? Why not just use pumps and power-heads? Well, I like the redundancy of having both, and the animals seem to enjoy the bubbles. Okay, I'll admit it; I like the bubbles, and they move a lot of water for not much energy consumed. Thermal Control: Every system should have a heater, unless it's a truly "cold" water system requiring the use of a chiller year-round. About two to three watts per gallon in the way of a heater is recommended, until you get into huge systems. Heaters come in sealed submersible or not formats. Get and use the former only. If you need one of two-hundred or more watts, get two of two thirds or so of that wattage each and place them in separate ends of the system, not in a sump. Place the heaters low in the tank (but not undergravel) to facilitate heat diffusion, and prevent you from breaking them. Most heaters are accidentally broken by removing or replacing them when they're too darn hot! The should be set in the tank water for fifteen minutes plus before plugging in, and unplugged and not removed for about the same amount of time if you're exposing them for whatever reason. Allow them to cool off; I've broken (sob) dozens. Controls on these units are simple dials on top. Some are more or less calibrated, other's you will have to initially check, adjust, check. Thermometers: There are two basic analog varieties (as opposed to high tech electronic), alcohol (red), and liquid crystal (rarely do you see mercury, and for good reasons). These are all about the same inaccurate, but not to worry too much about this. What absolutely the temperature is, is not as important as that it remain stable. Got big money? Spend a bit more on a hydrometer with an internal thermometer as a "standard". Have little money? Utilize two cheapies inside the system. Substrate, Other Non-Living Decor: Now let's see, where are we? You've got the tank and filtration all checked out for leakage, the lighting situated, air and heating tuned in; you're ready for gravel (if you're using it), rock and other non-living decoration installation! You want my advice? Refer to Section 5) C) Cleaning Coral and Decor and pretend yours are filthy. Please thoroughly cleanse these items and gravel now, before putting them into the system. Unplug everything, drain the system down, and carefully place the substrate over the sub-gravel filter (if you're using them) and the rest of you CC (chemically-correct) decor. Have you set up a "mixing tank" for blending synthetic seawater? This is better than just pouring it into a bucket and trying to "make it on the run". Don't mix it in the system. Whether you're using natural or fabricated saltwater, this is the time to add it. What the? The tank's cloudy from the gravel/decor? Not a big deal, give it time and it will clear up just fine. Are you ready? Power it all up and stand back. Beautiful. Test Kits, Bacteria & Testing Your Patience: What happens next? That universal ingredient, time needs to go by; a few days for certain chemical reactions, funky stuff in the tap-water to precipitate, stabilization of pH... and then: Bacteria. You'll hear no end of ways to go about introducing and establishing oh-so necessary bio-filtration micro-organisms. Certain species are utilized for "cycling" or converting noxious metabolites into less-toxic matter. In general: the primary excretory product of fishes and invertebrates is ammonia (whether they're fed or not). Were it not to dilution by water change, chemical filtrants and/or biological filtration ammonia would accumulate to toxic concentrations. As the story goes ammonia is converted to nitrites by way of microbes, notably by Nitrosomonas bacteria. Nitrites are in turn changed into nitrates by other microbes, especially Nitrobacters. This assortment of populations takes a while to establish itself, the so-called "break-in" period of "popping" a system. This can take days or weeks depending on if you want to take steps to "speed it up" just want to wait for the beneficial microbes to "fall in" and situate themselves. "Used" filter media, substrate from a disease-free "clean" system may be used to bring in these bacteria, as well as numerous commercially prepared cultures for sale through pet-fish outlets. As a provision for preventing poisoning from "new-tank syndrome" is used, you are encouraged to purchase a few hardy individual (typically damselfishes) livestock and feed them sparingly for a few weeks to allow for the establishment of these beneficial microbes whatever means you use of introducing them. Test Kits: How will you know what's going on with these microbes? When can you help your dealer make his/her rent by buying that next aqua-gem? By using simple test kits that give you a window into chemical and biological activity. Don't fly blind, utilize pH, ammonia, nitrite and nitrate test kits. I would not rely on your dealer's good graces to test your water for you. What if they're closed when you need a test? Simple colorimetric (color changing) assay test kits are inexpensive, accurate and precise enough for hobbyist use. More Livestock? When? Well, it all depends... mainly on the type of marine system we're talking about...
|
|

|
Features: |
|
| Featured Sponsors: |
.JPG)