|
|
First Steps In Marine
Fishkeeping
|
By Michael Van Bibber |
I’ve been in the aquarium hobby off and on for more than twenty-five
years. During my twelve years in the military, I’d stuck to small
freshwater tanks due to frequent moves, growing kids, etc. Now that my
life has settled down somewhat I decided it was time to get back into
saltwater.
Things had changed remarkably in the last decade and a half. I started
reading and relearning everything I thought I had known. With the help
of Bob’s book, The Conscientious Marine Aquarist,
WetWebMedia, several other printed works, and repeated visits to
several aquarium shops in the area; I finally got a feel for what was
required when I was ready to take the plunge.
During this whole process, I was taking a lot of notes and writing down
my observations. While there are a lot of “how to” articles out there, I
found many of them to be too academic and did not relate how steps
really work in practice.
It is for this reason that this article is written. I used a narrative,
journal format, relating my own experiences in setting up a tank. To be
honest with myself, I frequently point out my own failures big and
small. Throughout the article I mention brand names that I used, and I
share my opinions on them both good and bad; take them with a big chunk
of salt. As the car companies are fond of telling us “your mileage may
vary”.
I hope you get as much knowledge and enjoyment out of reading it as I
had writing it.
Planning
A failure to plan is indeed planning to fail. After lots of reading, I
had come to the conclusion that I wanted a large tank at least 125
gallons (473 liters), I definitely wanted live rock (LR), and I was
intrigued by the idea of a deep sand bed (DSB) for nitrate control. As
for filtration, I am definitely a fan of canister filters, additionally;
I wanted a sump and a large protein skimmer. I made up a list of what
equipment I wanted and where I could get it at the best price so when
the time came, I knew where to go and what to get. A big part of this
planning will center on where you want to put the tank. A large tank
needs to fit in with your home décor, and not take over the house.
My ultimate goal is a mixed tank with peaceful fish, live rock a few hardy
soft corals and macroalgae. I would start off with “easy” fish, live
rock, and a few tough invertebrates, and over a long period of time,
gradually add more delicate species.
Fish shop shopping!
Here in Central Florida, I am lucky, or as my wife would say, cursed,
with seven pet stores that either carries equipment for, or specializes
in marine aquariums within a 30-minute drive from my house. These stores
range in quality from “excellent” to “abysmal”.
Three of these stores are chain stores with a little to no livestock,
but a good selection of equipment and chemicals. The other four local
stores are dedicated aquarium shops with quality ranging from excellent
to very poor.
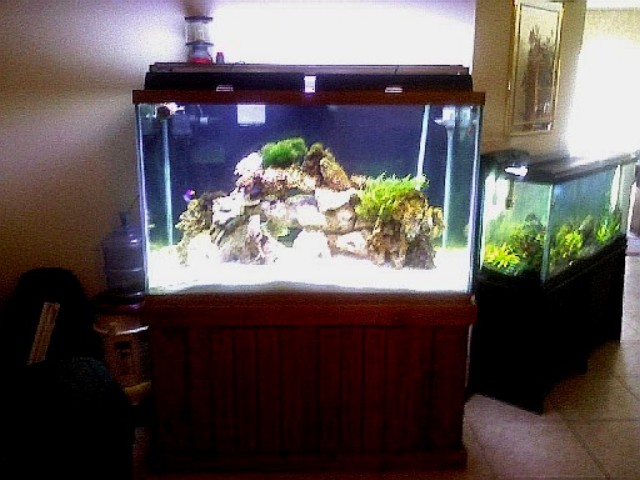
The tank
For my last birthday, wife surprised me with a 150 gal (567 liter) glass
tank and stand. It came with 40-watt fluorescent fixture, and a glass
top. One shortfall to this tank is that it is a “show” tank, 48” x 24” x
30” (122 cm x 60 cm x 76 cm). Additionally, it was not drilled for
overflows. That said it does fit into our home décor better than a
longer tank would. Some compromises would have to be made as far as
equipment is concerned, but nothing insurmountable.
The stand suited my needs perfectly. It is made out of “real” wood
rather than pressed laminate; it supports the tank around the perimeter
of the tank as well as having a center brace, a completely open back,
two large cabinet doors and a closed bottom. Additionally, the stand is
30” (76cm) tall, which provides ample space for equipment down below.
This does make the tank a bit taller and more difficult to work on, but
nothing a small stepstool can’t correct.
Setting up the tank
After clearing the space where the tank was to be located, I placed the
stand in its position. As my stand is wood and vulnerable to water
damage, I applied 100% silicone caulk to all of the seams where two
pieces of wood met inside the stand, as well as caulking the exposed end
grain pieces of wood. After the caulk set, I applied a water sealant to
the inside surfaces. This essentially waterproofed the inside of the
cabinet. As well as making the bottom of the stand leak free, containing
any minor spills or small leaks. This would save me a fair amount of
cleanup and potential drywall damage later.
After everything had dried, I used thin self-adhesive foam rubber
weather-stripping tape on all surfaces where the tank would contact the
stand. This will level out any small inconsistencies in the wood when it
came time to level the tank.
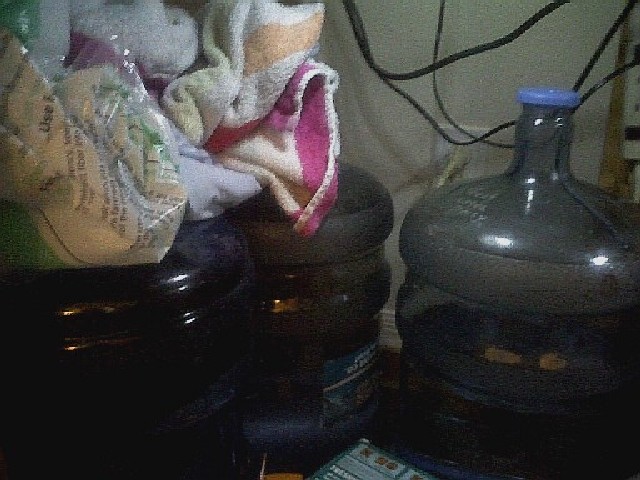
As the tank is within 1 foot (30cm) of an electrical outlet, I purchased
two GFCI outlet strips. I mounted the strips high up on the stand to
minimize the potential for water accidents. As saltwater is murderously
corrosive as well as an excellent conductor of electricity, I purchased
an outdoor outlet cover. This prevents the odd drip from getting into
the outlet and forcing the electrical cords into a “drip loop” for
additional safety.
While everything in the stand was drying, I filled the tank with fresh
water and checked it for leaks. After allowing the water to stand for
eight hours, we drained the tank and wiped all of the surfaces down.
We put the tank on the stand. After checking that the tank was level,
both left to right and front to back, I added three
tap lights to the underside of the tank, securing them with
self-adhesive Velcro™ strips. This gives me more than enough light to
comfortably work under the tank. They are battery operated so they will
not take up any additional outlets, and as an added bonus, you can pick
them up in most hardware stores for less than $10.00.
First purchases!
Sticking with my original plan, I wanted a deep sand bed and live rock.
I also was going to add a canister filter. Since this tank was not
drilled, I would have to get an overflow box rather than using the
traditional bulkheads. Having spent a large amount of time in the local
fish stores, I had a very good idea which store had what I wanted or
needed at the best price. I picked up my canister filter, protein
skimmer and salt mix and a few test kits. Additionally, I picked up
about 60 lb (27kg) of “base reef rock,” which is mined about in the
local area.
On a whim, I stopped by the one of “bad” LFS. A large sign on the door
announces that the store is going out of business and that everything is
25% off. Browsing through the store, I find that they are selling bagged
oolitic live sand for less than $1/lb (454 g). So after picking up
200 lb (91 kg) of it, I headed home to set up the tank. As all of this
was getting quite expensive, I didn’t get a sump just yet, as some
additional planning will be needed to work around the overflow boxes.
I did not purchase a heater. My home temperature is very consistent with
inside temperatures between 78-80 degrees F (25-27 degrees C) all year
long. I do have two submersible heaters in the event of an emergency.
Source water and testing
In my opinion, one of the first things you need to buy
is a good test kit. I’ve had good luck with both the API and Red Sea
test kits Additionally, unless you are going a pure RO or DI route, it
is very important to test your source water as well. Aside from the
“must have” tests (pH, Ammonia, Nitrite, and Nitrate, and Alkalinity) I
found it beneficial to test for Calcium, Phosphate, Silicate, Copper,
and Magnesium right from the start. Some of these kits may be a bit on
the expensive side, but I’ve found it is much easier to correct for
water quality issues before you fill the tank than after.
Here in Central Florida, we are sitting on the remains of a prehistoric
coral reef, and this has a definite impact on our water. Testing of my
mains (tap) water indicated the following:
- pH 8.2
- Nitrite 0 ppm
- Nitrate 0 ppm
- Silicate 0.50 ppm
- Calcium 80 ppm
- Alkalinity 6 degrees KH
- Copper 0 ppm
- Ammonia 0.50 ppm.
As you can see by these figures, aside from the ammonia content and
lack of salt, my mains water is almost seawater right out the tap!
Ammonia is normally undesirable in the marine aquarium, but in a new
tank, it can be used to start the nitrogen cycle without having to add
anything else to the water.
Day One: Filling - the good, the bad, and the downright nasty
With a trunk full of sand, rock, salt, assorted test kits, filters, and
skimmers; I was finally ready to fill the tank.
As fate or luck will have it, the location I placed the tank, while
picturesque, is nowhere near a source of water. Enlisting the aid of my
sons, we set up a relay system. Son #1 fills the bucket with water and
adds Tetra Aqua Safe dechlorinator, which ultimately was a mistake, Son
#2 hauls the bucket to the fish tank, and I add the salt mix per
instructions and pour it into the tank.
Since I am adding a lot of live sand, I cannot add it immediately. We
add 50 gallons of water to the tank and allow it to settle. We also made
up an additional 20 gallons of saltwater in buckets and allow it to
settle.
Six hours later, the salt has dissolved completely and the pH had
stabilized, so I added the live sand. After adding the first bag, it
became readily apparent why the sand was such a bargain – The odor was
foul and as I poured it into the tank a thick tan colored gelatinous
scum rose to the surface and stuck to everything. Clearly, the “live”
sand was pretty much dead. With little choice left (a no return policy)
we add the rest of the sand to the tank and continue topping off with
fresh mixed saltwater, scooping the clots of scum out of the water with
a fishnet.
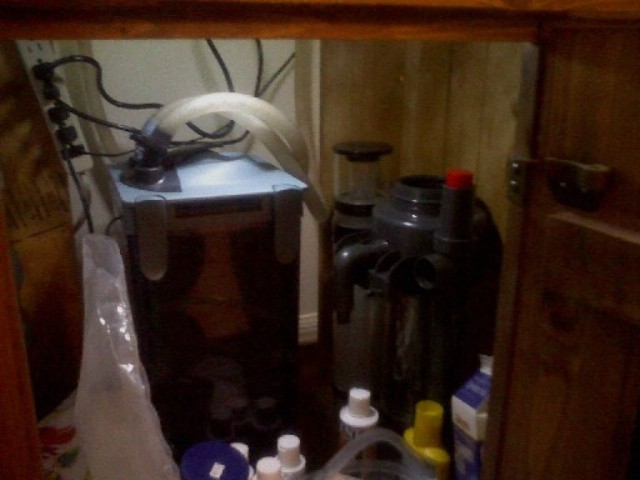
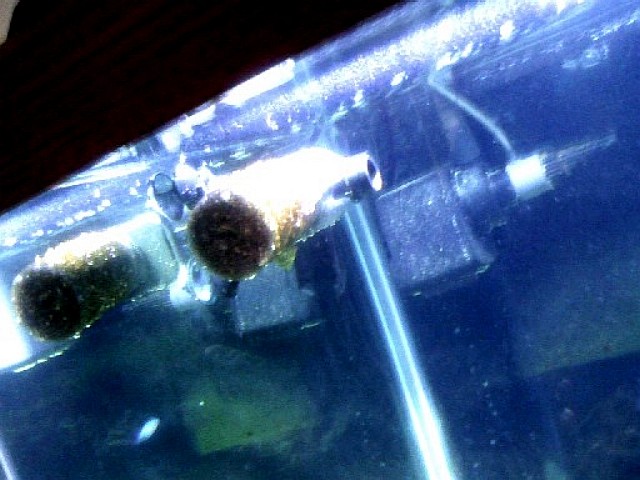
With a tank 75% full of cloudy water, I assembled the canister filter
(Rena XP4), filled it with filter floss and plugged it in.
Day Two: Top off the tank and add some rock
The next morning, I awoke to a tank significantly clearer than I has
expected. There was still a significant amount of scum stuck to the
sides of the tank, but otherwise the water looked pretty good. Grabbing
an old plastic beach shovel from the garage I evened out the sand to a
uniform 4-inch (10 cm) depth. This released yet another cloud of scum
into the water.
After an hour of wiping, scooping, and scraping scum off the sides of
the tank and out of the water, I was able to add the base rock to the
system, stacking it into a nice looking structure in the middle of the
tank.
We added mixed water to the tank until it was full and allowed the water
to settle.
Day Three: Full tank, and the nitrogen cycle
The next day, the water had once again cleared up. I turned off the
canister filter and opened it up. The filter floss was packed with scum.
I rinsed everything and put in new floss.
Now was a good time to start checking the water parameters. The specific
gravity of the water was steady at 1.024. Ammonia was 1.0 ppm, Nitrite 0
ppm, and Nitrate 5 ppm pH 8.3. Much to my surprise, the nitrogen cycle
had already started; that “live” sand still held on to some life.
I hooked up the fluorescent light at this time. It only provides 40
watts of light, so a significantly stronger light will be needed in the
near future. I let the lights run 9 hours per day. The canister filter
is running 24 hours, but it isn’t quite time to hook up the skimmer yet.
Day Six: Nitrogen cycle continues and the first bits of life are
added
I’m growing tired of looking at a barren tank. As the water is not safe
for fish or invertebrates yet, I decide to look for some macroalgae. As
macroalgae needs a fair amount of light, this was a good time to pick up
a light fixture. I purchased a Coralife 230-watt compact fluorescent
fixture. The fixture is well built, and comes with two 10,000K daylight
bulbs and two actinic bulbs. This fixture, 230 watts, coupled with my
existing 40 watt 10K light, and two 18k 15-watt lights gives a total of
300 watts. This isn’t as much light as I will need in the future, but
more than enough to start growing algae.
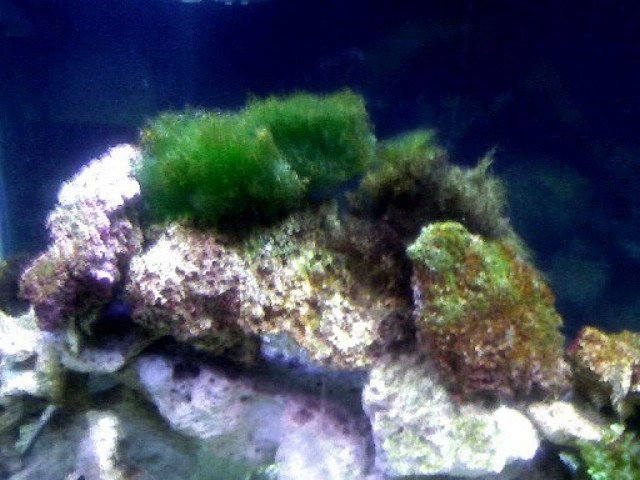
While I was at the LFS, I pick up a fist-sized clump of Chaetomorpha
algae. I added the algae to the tank, placing it on top of the pile of
rock. Within an hour, small air bubbles were forming on the algae,
indicating photosynthesis was taking place.
Water testing indicates that ammonia is holding steady at 1.0 ppm,
nitrite 0 ppm, and nitrate at 10 ppm.
Day Seven: First piece of live rock and a little bacterial help
The algae is doing well. I could swear it has already gotten larger
since adding it the day before. Water testing results are the same as
yesterday. I can only assume that the live sand was rich in the bacteria
that convert nitrite to nitrate, but weak on the species that converts
ammonia to nitrite.
As I don’t have any hobbyist friends, and I have concerns about adding
live sand from a dealers tank, I elected to use a bacterial additive I
purchased a small bottle of
Instant Ocean Bio-Spira from my LFS, as well as a nice looking piece
of not-quite-cured live rock. My hope was that between the two, I would
give the cycling process a little kick. I couldn’t find any evidence of
anything dead on the rock, so I added it to the tank, placing it high up
on the existing rock pile. I then added the bottle of Bio-Spira to the
tank according to the instructions on the label.
As a side note, I have had mixed experience with these products in the
past. I have never had good luck using them to start a nitrogen cycle. I
have found them useful in boosting a cycle though.
Within two hours, my tank was cloudy. A large bacterial bloom had
formed. Testing right before bed indicated that the ammonia level had
dropped from 0.5 ppm to approximately 0.3 ppm.
Day Eight: Cycle almost complete!
By the next morning, the bacterial bloom had cleared itself. Testing
indicated an ammonia level less than 0.25 ppm. The filter needed to be
cleaned, but I elected to wait another day and not risk interrupting the
nitrogen cycle. An oily film is forming on the surface of the water. It
is almost time to fire up the protein skimmer.
Day Nine: Cycle complete, skimmer woes
Water testing indicates Ammonia 0 ppm, Nitrite 0 ppm, and Nitrate 20
ppm. The nitrogen cycle has finished, and the tank is now safe to add a
few “live” things.
I fired up the protein skimmer, and discovered all too quickly the
meaning of a “hyperactive” skimmer. When I filled the tank I
dechlorinated the water with Tetra Aqua Safe. Unbeknownst to me, this
makes lots of wet bubbles in a skimmer. The collection cup was
near overflowing with clear water within two minutes of starting the
skimmer. I also noticed the discharge line of the skimmer is leaking
where it connects to the body.
I turned the skimmer off, and sealed the leak with Teflon tape. Since
the water is prone to making too many bubbles with the water level set
to its lowest point, I corrected the problem by further restricting the
air inlet to the skimmer. This was easily accomplished by connecting an
old air stone to the air inlet on the skimmer. I was then able to adjust
the water level to the point where the skimmer would make good, dry
foam.
I would like to take the opportunity to commend Coralife on their
excellent customer service. I called them up explaining my problem.
Within three days, I had a new discharge hose. When that didn’t correct
the problem, they sent me a new skimmer body, no questions asked. As an
added bonus, “for my inconvenience” the skimmer body they sent was for
the 220 gallon model rather than the 125 gallon – as the collection cup
and pump are the same size, it was a fast, free upgrade.
Day Ten: Skimmer is working, more live rock
Not much to write about today. Testing indicates ammonia 0 ppm, nitrite
0 ppm, and nitrate still holding at 20 ppm; pH is holding steady at 8.3;
alkalinity 15 degrees KH; Calcium 350 ppm; Phosphate 0 ppm; Silicate
0.50 ppm.
Went off to the LFS and purchased 50 lb (23 kg) of cured live rock. The
store had both Fiji and Haitian rock. The Fiji rock had some nice
coralline algae growth, while the Haitian rock was a bit more visually
interesting, but lacking in algae.
I bought a mix of both and placed them in the tank. Spent two hours
moving the rock around and getting everything to lock together. Due to
the different shapes and sizes, I was able to get it all stable without
epoxies or tie wraps. The 60 lb (27kg) of dead reef rock I bought in the
beginning is starting to change color from dead white to a tan color.
The Chaetomorpha algae I added four days ago is now half again
as large. It clearly likes where it is. Lighting is now on a 13-hour
cycle. Cleaned out the canister filter. After rinsing out the filter
sponges and tossing the filter floss, I added 4 lb of carbon and some
new filter floss.
Day Eleven: Attack of the Brown Scum!
Woke up this morning and everything looks great. Came home from work and
seriously thought someone had dumped a can of brown paint in the tank.
My formerly tan substrate is brown, my dead rock is brown, and my nice,
expensive, and painstakingly placed live rock is brown. Wife is now
questioning the wisdom of buying expensive purple rocks if they are just
going to turn brown.
I had read about diatom algae, and I was expecting some to appear.
Nothing had prepared me for this. Some quick reading indicated that it
was normal and should clear up in time. No change to water chemistry.
Tomorrow is time for the first water change. As the tank is now cycled,
I don’t want to add any more ammonia; neither do I want to add any more
silicates. I filter the tap water through zeolite to remove the ammonia
and through Phos-Ban to remove the silicates. After the water is free of
contaminates, I dechlorinate, using Prime, and circulate the water.
Day Twelve: Brown Scum conquers the glass
My nice clear glass is now brown. Spend the morning cleaning the sides
of the tank, and my first 20% water change. To my pleasant surprise, the
diatoms do get sucked right up. I have a few older powerheads lying
about; I cut some foam rubber tubes and mount them to the intakes as
filters to start straining the diatoms out of the water. This actually
worked better than expected; I rinse out the filters about once an hour.
For convenience, I am wringing out the diatom-loaded filters in my now
empty salt mix bucket. Not really thinking about it at the time, I cap
up the bucket without emptying it.
Water testing eight hours later shows no change in water chemistry
except for silicates, which are now down to about 0.3 ppm, and the
nitrates are down to 15 ppm.
Day Thirteen: The Cleanup Crew Arrives
The Brown Scum has once again advanced under the cover of darkness. As
the water has remained stable for the last three days, and if the
diatoms are any indication, the tank is more than capable of supporting
life at this point; the kids and I head to the LFS to purchase some
“real” life.
Browsing through the LFS, my daughter declares blue-legged hermit crabs
“cute” and proclaims that we need some in our tank. My research
indicated that they stay small, and do eat algae and other undesirable
stuff in the tank. Daughter picks out six hermit crabs of various sizes
and promptly names them. I pick out six turbo snails, a magnetic glass
cleaner, and some nice red
Halymenia algae. I purchased the red algae for two reasons.
One, to compete with the diatoms for nutrients, and two, if it gets
covered in diatoms, wife will not notice.
Arrive back home and release our cleanup crew against the Brown Scum.
Within fifteen minutes, the crabs and snails are busy wandering about
the tank.
Wife declares the crabs cute as well, and then makes the observation
that to date, we have spent over $1000.00 on equipment, chemicals, salt,
and formerly purple rocks, to house $18.00 worth of crabs, snails, and
plant matter that we diligently try to kill in our swimming pool on a
weekly basis.
After reassuring wife that the tank will be beautiful, and that patience
is required, I resume my new routine of stirring up the diatoms and
wringing and rinsing out my home made filters. The salt mix bucket now
has about half an inch of reddish-brown water in it. Again, not thinking
I cap up the bucket, intending on emptying it tomorrow when I do another
water change.
I mix up some more saltwater for tomorrow. Fill up another jug full of
freshwater for top offs. The evaporation in the tank has picked up a bit
with the more intense lighting.
The amount of bubbles produced by the skimmer has finally subsided. I
remove the air stone from the air inlet. Skimmer is now working
normally, producing about half a cup of dark liquid per day. I rigged up
a drain line from the collection cup and run the hose into an empty milk
jug.
Days Fourteen-Eighteen: Hermit crab genocide!
Other activities prevented me from doing a water change as planned. The
diatoms do appear to be receding. Learned three valuable lessons over
the past five days:
- Snails and hermit crabs apparently love diatoms.
- Larger hermit crabs perceive smaller hermit crabs as a threat, which
must be eradicated immediately.
- Never allow daughter to name small aquarium critters, particularly
ones she deems “cute.”
The largest crab killed off the two smallest crabs, but doesn’t seem to
bother with the other three. I personally caught him riding the back of
a snail as it climbed up the side of the tank. Suspecting that this crab
doesn’t like his shell, I run to the LFS and pick up some empty shells
and drop them in the tank.
The daily stir and rinse on the powerhead filters continues. Wife is now
grudgingly allowing me use of the sink to do the rinsing and wringing.
Water testing remains stable. Nitrates are down to 10 ppm, silicates down
to 0.25ppm. By day eighteen, the diatoms are almost gone. At this point,
I start adding the calcium supplement Purple-Up to the tank on a daily
basis.
Purple-Up is used to boost the calcium and iodine levels to
accelerate coralline algae growth, In the long term, this is an
expensive method of dosing calcium, but I don’t feel comfortable with
kalkwasser yet. Should Purple-Up not be available in your area,
Tropic Marin Bio-Calcium is essentially the same thing.
Day Nineteen: Discovery of “that fish smell” and a leaking
canister filter
Today is water change and clean the canister filter day. I ready the
gravel vacuum and open up that salt mix bucket that I haven’t touched in
five days, the one filled with diatom water. I now firmly believe that
the source of the strong “fish” smell that we associate with fish is in
fact, the smell of a lot of dead diatoms in water. I would not have been
the least bit surprised if the stench had not bubbled the paint off of
the walls. Run outside with the bucket, open the windows of the house,
and an hour later, the rotten fish smell has finally dissipated.
I do the water change, and clean the filter. I didn’t seat the hose
assembly back into the canister filter quite far enough. An hour later,
I hear water splashing under the tank stand. Approximately a gallon of
water had collected in the stand. After shutting everything down I used
the “free beach towel” that Instant Ocean thoughtfully provides in every
bucket to mop up the water. As I had sealed everything before setup, the
water was contained inside the stand rather than running all over the
floor or soaking into my drywall.
Day Twenty-five: Finally add some fish
After twenty days, the water is stable enough to finally add some fish.
As I’ve mentioned previously, there are seven local fish stores.
However, there are only two that I would consider buying “real’
livestock from. The best store in the area routinely quarantines their
incoming livestock for fourteen days before bringing them “out front”,
and is a believer in prophylactic use of copper for most species.
Clownfish and other sensitive species are given freshwater and formalin
dips and then quarantined.
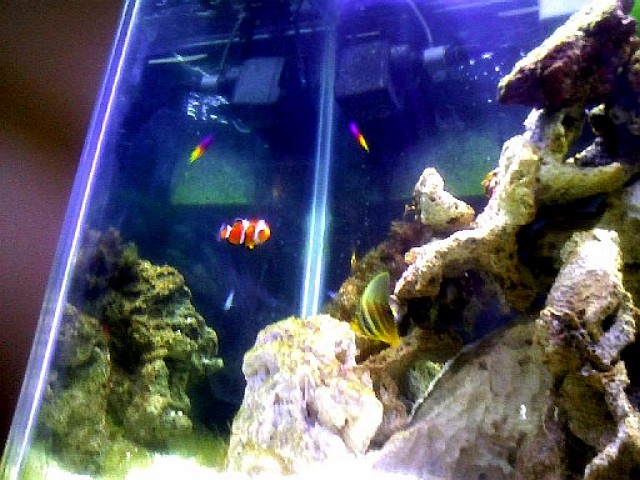
I picked up two Blue-Green Chromis. I brought them home, and after
giving them a
freshwater dip using formalin and methylene blue, I added them to
the tank. In the future, I will purchase a quarantine tank, but for now,
the mention of getting another tank causes my wife to twitch and
threaten various kinds of bodily injury. On day twenty-five, I wasn’t
really paying attention while cleaning the powerhead filters. In the 30
seconds it took me to rinse out the filter, the smaller of the two
Chromis had gotten sucked into the intake, killing it instantly.
To my surprise, my wife suggested we go get another fish. We went back
to the store and purchased two more Chromis. While we were there, my
wife fell in love with an Ocellaris clownfish (Amphiprion ocellaris).
Seeing a chink in her armor, we bought that fish as well.
We brought the fish home, dipped the fish and got them into the tank.
The Chromis started schooling almost immediately. The Clownfish spent
the next day scouting out the tank before settling down in the front
corner of the tank.
We feed the fish twice a day; using
New Life Spectrum, and offering Mysis shrimp and algae
flakes three times per week.
Day Twenty-six and beyond
By day twenty-six the tank started looking like the tanks you see in
books. The diatoms had receded to a manageable level, the coralline
algae has come back in abundance, and I’ve even noticed some starting to
grow on the “dead” rock.
I added a peppermint shrimp to the tank on or about day thirty. In the
two weeks that we have had him, he has already molted and can usually be
found in one of the little caves, picking algae off of the rocks.
I’m getting small clumps of hair algae on one of the rocks. So far the
patch has remained small. The crabs and snails seem to enjoy it. As I
plan on adding a Tang in a few months, I would expect it to take care of
whatever the crabs and snails leave behind; so unless it grows
uncontrollably, I’m just going to leave it alone. I’ve added a few more
pieces of live rock, and some Grape Caulerpa algae to one of the dead
rocks.
The tank is on a weekly 10% water change. The canister filter is cleaned
at that time as well. My tank parameters are as follows: Lighting: 300
Watts, Circulation: 500 GPH through canister filter, 450 GPH through
protein skimmer, and 295 GPH through a Maxi-jet 1200 powerhead for an
approximate rating of 1245 GPH. Live and dead rock 160 lb, 240 lb of
substrate.
Water chemistry on day twenty-six: ammonia 0 ppm, nitrite 0 ppm, nitrate
< 5 ppm, calcium 400 ppm, magnesium 1400 ppm, phosphate 0 ppm, silicate
0 ppm, dKH 12, pH 8.3, SG 1.024, copper - 0 ppm. This skimmer is working
well; I’m collecting about four ounces of dark brown skimmate per day.
On or about day 45, as the hair algae was starting to grow out of
control, I added a juvenile
Sailfin Tang (Zebrasoma veliferum) to the system. The Tang
was dipped using FW with Methylene Blue and Formalin for approximately
15 minutes, then added to the tank. As this fish will be rather large in
time, I decided that this fish will be the “centerpiece” of the tank.
On day 55, I discovered that the LFS had just put a shipment of
Caribbean fish released from quarantine and out for sale. I picked up a
Royal Gramma (Gramma loreto), a
Blackcap Gramma (Gramma melacara), and a
Cherub Angelfish (Centropyge argi). After a welcoming
freshwater dip, all were added to the tank.
On Day 60, I picked up another 260-watt power compact fixture. As I have
enough actinic light, 130 watts, I am running 2 x 10K and 2 x 12K bulbs
in this fixture. I still need to add a sump, but for now, I’m going to
let the tank run “as is”.
Conclusions
If I had to do it over again, and I’m sure I will in the future, here is
what I would do differently:
- More patience at the beginning. I should have made
up more saltwater in advance, rather than mixing it up on the spot.
- Been much more careful when adding live sand.
Everything turned out better than I had expected, but I scooped about a
gallon (by volume) of foul smelling gelatinous scum out of the tank.
- Keep the powerhead and filter intakes screened!
- Only use dechlorinator that specifically says “Safe for
protein skimmers.”
- Check and double-check the hose connections.
Setting up a saltwater tank is definitely a rewarding experience, but
as I discovered, it is not a process that can be rushed. To anyone that
is starting out, I cannot stress the importance of planning. Your plan
may have to change once you put it into practice, but as long as you
know where you are and where you are going, it is much easier to adapt.
|
Marine Set Ups on WWM:
Marine Aquarium Set-up in General by Bob Fenner,
Marine Aquarium Set-Up 2
by Bob Fenner,
Cookbook Approach to
Marine System Set-Up
by Bob Fenner,
A Brief Outline on Saltwater Set-Up by Bob
Fenner,
Marine
Planning, Getting Started with a Marine Tank By
Adam Blundell,
Technology, Putting on the Brakes: How much is too much? by
Tommy Dornhoffer
& Related FAQs on:
Best of Marine Set-Up 1,
Best of Marine Set-Up 2,
Marine Set-Up 1,
Marine Set-Up 2,
Marine Set-Up 3,
Marine Set-Up 4, Marine
Set-Up 5, Marine
Set-Up 6,
Marine Set-Up 7, Marine
Set-Up 8,
Marine Set-Up 9,
Marine Set-Up 10, Marine
Set-Up 11, Marine
Set-Up 12,
Marine Set-Up 13, Marine
Set-Up 14, Marine
Set-Up 15, Marine
Set-Up 16,
Marine Set-Up 17, Marine
Set-Up 18, Marine
Set-Up 19, Marine
Set-Up 20, Marine
Set-Up 21, Marine
Set-Up 22, Marine
Set-Up 23, Marine
Set-Up 24,
Marine
Set-Up 25,
Marine Set-Up 26, |
|
|